Lessons from Korchnoi

There are many candidates for the title of ‘the best chessplayer never to win the world championship’. I think I first heard Keres given that title, and he was the second-highest-rated player at some point (according to Jeff Sonas’ ChessMetrics website http://www.chessmetrics.com ). Other second-highest-rated players include Chigorin, Zukertort, Blackburne, Nimzowitsch, Tarrasch, Schlechter, Najdorf and Ivanchuk. In fact, there are a number of players who were the highest-rated in Jeff’s lists at some point but who never became World Champion: Pillsbury, Maroczy, Kolisch, Gunsberg, Janowsky, Rubinstein, Reshevsky, Bogoljubow… and Viktor Korchnoi. Korchnoi was primus inter pares for the last quarter of 1965, following a dominating tournament win
http://chessmetrics.com/cm/CM2/PlayerProfile.asp?Params=199510SSSSSWS067916000000111000000000016610100

He competed strongly in Candidates’ Matches in the 1967 cycle, but didn’t qualify for a Championship match until 1978, when his actual rating was rather higher.

“I have heard so many times that Korchnoi had the great misfortune of meeting me when his best playing was already behind him. Nothing of the sort! Korchnoi’s best years arrived exactly at the time he battled me”
— Anatoly Karpov

In the end, Korchnoi was a Candidate in 10 of the 11 cycles held between 1962 and 1991, and a Challenger in 1978 and 1981. His Candidates’ Final match with Karpov in 1974 turned out to be a Championship match in effect, when Fischer could not agree terms to defend his title, and forfeited it.

Korchnoi’s style is … complex! He seems to make life as difficult for himself as his opponent, relishing the role of defender — or rather, counter-attacker.

“I like to coax my opponents into attacking, to let them taste the joy of the initiative, so that they may get carried away, become careless, and sacrifice material”

For this reason, Korchnoi’s style is also exciting, not to say nerve-wracking, to watch… Perhaps for these or other reasons, he was often in time trouble.

“It is a gross overstatement, but in chess, it can be said I play against my opponent over the board and against myself on the clock”

The drama and political intrigue of his life are every bit as rich and compelling as his chess, but here I will take a few moments from his battles over the board.

Opening

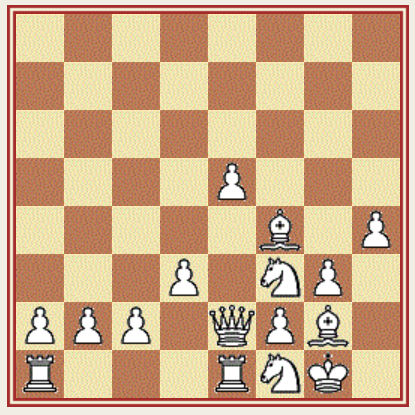
I’ve always liked this example of Korchnoi’s play. His counter-attacking style seems ready-made for the Grunfeld, where White is invited to set up an ‘ideal’ centre, while Black has fluent development without weaknesses, and can strive to undermine it.

Here’s a quote about Korchnoi, rather than from him directly:

“Viktor Korchnoi was always saying: if you want to make progress, you have to learn new openings all the time. If such a person gives you such an advice, you should listen to it” Boris Gelfand

Korchnoi’s annotations to this game made a strong impression on me: surely Grandmasters know everything, or at least, know everything that they play? The unknowable nature of chess that was revealed was somehow more alluring than the prospect of a knowable nature.

Middlegame

Korchnoi is the great sceptic of chess. He is never overly impressed with an opponent’s attacking ideas, not even when they are conjured up by the magician from Riga. Korchnoi had a large plus score against Tal; here he wins as Black when Tal was at the height of his powers.

Korchnoi also has an awesome record with White against the King’s Indian. Here is one example from hundreds: in his seventh decade, he plays blindfold in the very double-edged Mar del Plata variation. Black cannot do much about White’s Queen’s-side  attack, but can instead start a dangerous attack against the white King.

And a fine example of Korchnoi’s brave counter-attacking style, the first game in Simon Webb’s [em]Chess for Tigers[/em]

“A good illustration of how to play on your opponent’s weaknesses is provided by the way Korchnoi tackled Geller in their semi-final match in the 1971 World Championship Candidates’ series. He knew that he couldn’t outplay Geller positionally (as he frankly admitted after the
match); so he deliberately aimed for complicated and unclear positions, in which he believed Geller would be uncomfortable. This approach paid off handsomely. Geller continually became short of time trying to fathom
the complications which Korchnoi produced, failed to find the right answers, and lost 5.5-2.5. Indeed he lost 3 of the 8 games on time. ” — Webb

Endgame

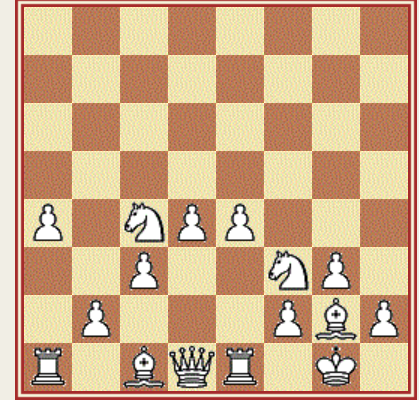
Nunn’s awesome attacking talent and theoretical knowledge are tamed by accepting a small disadvantage in what looks like a technical endgame. Korchnoi does not intend to swap everything and draw, however, but increases the tension over the whole board, and White can’t quite hold it together. A game quite in the style of Lasker — whom both players admire.

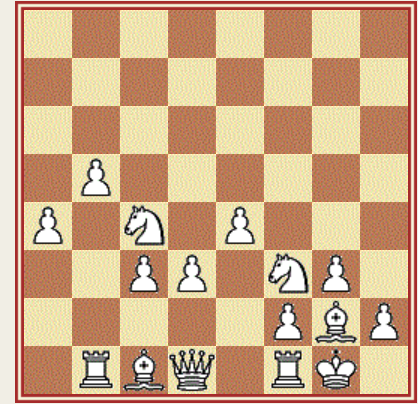
Lastly, a terrific win against Karpov. Neil McDonald has written about how he was perplexed by Korchnoi’s choice of plan — surely you are supposed to play the minority attack in such positions? But Korchnoi has other ideas.

Lessons from Judit Polgar

I don’t entirely like the parade of endless men in the ‘Lessons from…’ series, so here’s one from the other half of humanity, and a fine Appendix to the list of guys that ever joined the ‘Vera Menchik Club’.

Judit Polgar was strongest woman chess player ever.  She never became World Champion, and was never interested in becoming Women’s World Chess Champion ( a title held by her two sisters, Susan and Sofia).  She was in the world top ten and improving when she retired.

Opening


In 2003, Polgár scored one of her best results: an undefeated clear second place in the Category 19 Corus chess tournament in Wijk aan Zee, Netherlands, just a half-point behind future World Champion Viswanathan Anand, and a full point ahead of then-world champion Vladimir Kramnik. She devised this TN over the board.


Middlegame

For Polgar, chess is the attack, so I’ve shown some of her best and best-known, but her imposition of a classic good-N-bad-B on Anand is very classy, with a glorious finish.


The trapper trapped! <p> Someone commented on this next one, it’s like exchange chess: no time to count the pieces, the initiative is everything!


Endgame

Like all top GMs, the endgame is a strength of Polgar, but may not be noticed among the maulings… <p>This is just about space, but in a position with just one pair of pieces, and you could argue that White has the worse Bishop!

PS “She has fantastic chess talent, but she is, after all, a woman. It all comes down to the imperfections of the feminine psyche. No woman can sustain a prolonged battle.” Garry KASPAROV <p> PPS https://en.wikipedia.org/wiki/Judit_Polg%C3%A1r#Kasparov_touch-move_controversy <p>PPPS

That was the first time a woman had beaten the best player in the world, although in 2006 she took Topalov outside  a couple of times and filled him in, when he was the top-rated player and FIDE champion.

Bishop Endgames

Bishop endings are generally easier to win than rook endings
because there is no way for the defending side to exclude the
attacking King, and neither is there a perpetual check. But perhaps
because they are less common, they may be neglected in a player’s
study.

General Advice for bishop
endings

(1) The easiest endings to draw are those with opposite coloured
bishops.

  (2) Do not place pawns on the colour of your bishop.

  (3) BB vs. BN or NN are usually a real advantage.
In open positions the two bishops are murder: in most other
positions they are a real advantage.

  [See Double Bishop Endings.]
(4) In open or semi-open positions a lone bishop is usually
superior to a lone knight.
The knight is superior to the bishop in blocked positions or when
the bishop is hemmed in by pawns on the same colour squares as the
bishop.

K+B vs. K+P

Normally the bishop can keep an eye on the P from far enough away
to keep the draw in hand, even two Ps if the opposing K is not
close

K+B+P vs. K

A simple win unless it’s an a-/h-P when the lone K can blockade on
the colour square opposite to the B. Similarly, K+B vs. K+B+gP+hP
may be drawn for this reason if BxgP is allowed.

K+B vs. K+B+P

Often a draw unless the P is far advanced. The side with the P must
try to drive the B from covering the path of the P. This can
usually be done only if the Bs travel on the same colour squares –
bishops of opposite colours usually can set up immovable blockades
or threats of sacrifice – and even then, only if the Pawn is not a
central one and the defending K is not close.

K+N vs. K+B+P

The bishop can try to create zugzwang positions when the N must
move away, and although blockades are possible the ending is
promising. K+N vs. K+B+gP+hP may be drawn for the reason noted
above if NxgP is allowed.

K+B vs. K+N+P

The N+P have far more difficulty winning against the B, but again
on the wing the B may run out of squares and the K may be distant.


Key ideas in bishop
endings:

sacrifice to draw, running out of space at the edge, draw with
a-/h-pawns, draw with opposite coloured bishops, controlling the
diagonals leading to the queening square


space to dodge

-+-+k+-+
+-+p+-+-
-+-+j+-+
B-+-+-L-
-+-+-+-+
+-+-+-+-
-+-+-+-+
+-+-+-+-

The White King cannot control the bishop from here. 1 Bd8 Bf4, 2
Be7 Bc7, 3 Bd6! Ba4 holds.

  With both Kings distant it’s the same; with wKe8, Bke1
1.Bb4! wins (threat Be7) [thanks to Bart Robeyns for rescuing this
example].


no space at the edge

-+k+-+-+
Bp+-+-+-
-+-+-+-+
+-+-L-+-
-+-+-+-+
+-+-+-+-
-+-+-+-+
+-+-+j+-

1 Bb8 Bd4, 2 Bc7 Ba7, 3 Bb6! 1-0


draw with bishops of opposite colour

-+-+-+-+
+-+-+-+-
-+-+l+-+
+-K-B-+-
-+-PjP-+
+-+-+-+-
-+-+-+-+
+-+-+-+-

White cannot control the squares d5 or f5 and chase away the bishop
at the same time:

  1 Kd6 Bg8, 2 Ke7 and if later Kf6, …Bh7! when d5 is no
threat.


controlling diagonals

-+-+-+-+
+-+-+k+-
-+-+p+-+
+-L-+-+-
-+-+-+-+
+-B-+-+-
-+-+-+-+
+j+-+-+-

The short diagonal can be dominated by the White King.

1 Bf6 Kc2, 2 Be7 Be3 3 Bd6 Bg5, 4 Be5! and 5 Bf6


Studies

These comprise the selection given by John Littlewood in
Chess Coaching. Littlewood also gives an ABC for
Pawn, Knight, Rook and Queen endings.


-+-+-+-+
+-+-+-L-
-+-+-+-+
+pP-+-+-
-+-+-+-+
+-+-J-+-
-+-+-+k+
+-+-+-+-

128 BP
W to play wins

  The bishop is poorly placed. 1 c6! Be5; 2 b6
winning


-+-+-+-+
+-+-+-+-
-+-+-L-+
+pP-+-+-
-+-+-+-+
+-+-J-+-
-+-+-+K+
+-+-+-+-

129 BP
W to play draws against best defence

  Better bB position: 1 c6 Bd8! or 1 b6 Bd4! 2 b7
Be5


-+-+-+-+
+-+-+-+-
-+-+-+-+
+-+-Bx+-
-+-+-+x+
+k+-J-+-
-+-+-+-+
+-+-+-+-

130 BP
W to play draws

  The wK is just close enough to hold. 1 Kc2! f4; 2 Kd1
f3; 3 Ke1, f2+; 4 Kf1, Kf3; 5 Bd4, g3; 6 Bxf2,
gxf2 stalemate or 2…g3; 3 Ke1, g2; 4 Bxf4+! draws


-+-J-+-+
+-+-+k+-
-+-+p+-+
+-L-+-+-
-+-+-+-+
+-B-+-+-
-+-+-+-+
+-+-+-+-

131 B
W to play wins

  If Black can control e7 with the B, the pawn can never
advance without …Bxe7 drawing. White must drive off the B:
1 Bf6+ Kc8; 2 Be7, Bf2; 3 Bd6, Bh4; 4 Be5 (1…Kc7; 2 Be7, Bf2; 3
Bd6+!)


-+-+-+-+
+-+-+k+-
-+j+p+-+
+-L-+-+-
-+-+-+-+
+-B-+-+-
-+-+-+-+
+-+-+-+-

132 B
B to play draws
The bK is closer to the pawn, and can nip round to prevent 6
Bf6:
1…Kd5! 2 Bf6, Ke4! 3 Be7, Bf2; 4 Ba3, Bh4; 5 Bb2, Kf5!


-+-+-K-+
+-+-+p+-
-+-+j+-B
+-L-+-+-
-+-+-+-+
+-+-+-+-
-+-+-+-+
+-+-+-+-

133 B
W to play wins

  (check)

  1 Kg8! controlling the ‘short side’ and threatening 2
Bf8, Be3; 3 Ba3, Bh6; 4 Bb2 and 5 Bg7,
so 1…Kf5, but 2 Bf8, Be3; 3 Ba3, Bh6; 4 Bc1!


-+kB-+-+
+p+-+-+-
-+j+-+-+
+-+-+-+-
-+-+-+-+
+-+-+-+-
-+-+-+-L
+-+-+-+-

134 B
W to play wins

  (Centurini)

  Take a deep breath…

  If White’s bishop were on a7, 1 Bb8, Bg1; 2 Bg3, Ba7; 3
Bf2! wins
But 1 Bh4, Kb6! 2 Bf2+ Ka6 and wB can’t get to a7.
If the bB was on g3, 1 Bh4! Bh2; 2 Bf2 and 3 Ba7, 4 Bb8 wins.
It’s not quite zugzwang, since with Black to move 1…Bd6!
2 Be7, Bh2 holds (3 Bc5 isn’t possible here)
So, zugzwang would be on if one of the squares h2 or d6
were taken away from the bB.
1 Bh4, Kb5; 2 Bf2, Ka6; 3 Bf5! Bg3; 4 Be7, Kb5; 5 Bd8, Kc6; and now
6 Bh4! Bh2 when 7 Bf2, Bf4; 8 Ba7, Bh2; 9 Bb8, Ba7; 10 Bg3, Ba7; 11
Bf2! bingo!


-+-+k+-+
+-Jp+s+-
-+-+-+-+
+-+-+-+-
-+-+-+-+
+-+b+-+-
-+-+-+-+
+-+-+-+-

135 NB
W to play wins, B to play draws

  1 Ke7, Nd8; 2 Be4, Nf7; 3 Bf3, Nd8; 4 Bd5!
zugzwang
1… Nd6+; 2 Ke7, Nc8+! 3 Ke6, Nb6 draws
[This is a common drawing resource in Knight endings]


-+k+-+-+
+-+p+-+-
-+sJ-+-+
+-+-+-+-
-+-+-+-+
+-B-+-+-
-+-+-+-+
+-+-+-+-

136 NB
W to play wins, B to play draws

  1 Bb4+ Ke6; 2 Kc7, Kd5; 3 Ba3! zugzwang

  1…Ne7+ 2 Kd8 Nc6+ 3 Ke8, Ke6 draws


-+-+s+-B
+-+k+-+-
-+p+-+-+
+-J-+-+-
-+-+-+-+
+-+-+-+-
-+-+-+-+
+-+-+-+-

137 NB
W to play wins

  If the bK were on b5, 1 Bd4 would be an immediate
zugzwang, so

  1 Bc3! Kb6! 2 Ba5+! Kb5! 3 Bd8! (guarding f6) 3…Kc5; 4
Bg5, Kb5! (4…Kd5; 5 Be7 or 4…Kb6; 5 Be3+ Kb5; 6 Bd4!) 5 Bh4!
Kc5; 6 Bg3+ Kd5; 7 Bd4! Nd6; 8 c7 wins


-+-+-+-+
+-Kp+-+-
-+-+-+-+
+-+-+-+-
-+-N-+-L
+-+-+-+-
-+-+-+-+
+-+-+j+-

138 NB
W to play wins

  1 Nc6! Kf2; 2 Kd6 ( threat 3 Ne7, Bg3+; 4 Kc6)

  2…Bg3+! 3 Kc5! and now
3…Bc7? 4 Kb5! heading for b7
or 3…Bh4; 4 Kd5! with 5 Ke6 and 6 Ne7 winning


-+-+-+-+
+-+-K-+-
-+-+-P-+
+-+-+-+-
-+-+n+-+
+l+-+-+-
-+-+-+-+
+-J-+-+-

139 NB
W to play wins (Kosek)

1 Ng5! Bg8; 2 Nf7!! Kd2; 3 Kf8, Kh7; 4
Ng5
and now
4…Bg6; 5 Kg7, Be8; 6 Ne4+ Ke3; 7 Nd6, Kh5; 8 Kh6!
4…Bd3; 5 Ne6! Bg6 (5…Bf5 loses as above); 6 Nf4! Bb1; 7 Ke7,
Ba2; 8 Ne6 winning


l+-+-+-+
P-+-+-+-
nK-+-+-+
+-+-+-+-
-+-+-+-+
+-+-J-+-
-+-+-+-+
+-+-+-+-

140 NB
W to play wins (Horwitz)

1 Nc7, Bh1; 2 Ne6+ Ke5; 3 Nd8, Ba8! 4 Kc7,
Kd5!
(idea 5 Kb8? Kd6! 6 Kxa8, Kc7! drawing)

5 Nb7! Ke6! (idea 6 Kb8, Kd7; 7 Kxa8,
Kc8! drawing)

6 Na5! Ke7; 7 Kc8! Ke8; 8 Nc4! Ke7; 9 Kb8, Kd8;
10 Nd6, Kd7; 11 Nb7! Kc6; 12 Kxa8, Kc7; 13 Nd6!

zugzwang


Example Bishop
Endings


Fischer – Taimanov #4 [B47]
Bishop Ending: B/N, 1971

1. e4 c5 2. Nf3 Nc6 3. d4 cxd4 4. Nxd4 Qc7 5. Nc3 e6 6. g3 a6 7.
Bg2 Nf6 8. O-O Nxd4 9. Qxd4 Bc5 10. Bf4 d6 11. Qd2 h6 12. Rad1 e5
13. Be3 Bg4 14. Bxc5 dxc5 15. f3 Be6 16. f4 Rd8 17. Nd5 Bxd5 18.
exd5 e4 19. Rfe1 Rxd5 20. Rxe4+ Kd8 21. Qe2 Rxd1+ 22. Qxd1+ Qd7 23.
Qxd7+ Kxd7 24. Re5 b6 25. Bf1 a5 26. Bc4 Rf8 27. Kg2 Kd6 28. Kf3
Nd7 29. Re3 Nb8 30. Rd3+ Kc7 31. c3 Nc6 32. Re3 Kd6 33. a4 Ne7 34.
h3 Nc6 35. h4 h5 36. Rd3+ Kc7 37. Rd5 f5 38. Rd2 Rf6 39. Re2 Kd7
40. Re3 g6 41. Bb5 Rd6 42. Ke2 Kd8 43. Rd3 Kc7 44. Rxd6 Kxd6


-+-+-+-+
+-+-+-+-
-XsJ-+x+
XbX-+x+x
p+-+-P-P
+-P-+-P-
-P-+k+-+
+-+-+-+-

White has the classic advantage of Bishop against Knight with pawns
on both sides of the board. Black also has the disadvantage of
having his pawns advanced and fixed, with an entry point on the
Queen’s-side.

  45. Kd3 Ne7 46. Be8 Kd5 47. Bf7+ Kd6 48. Kc4 Kc6 49. Be8+
Kb7 50. Kb5 Nc8


-+s+b+-+
+j+-+-+-
-X-+-+x+
XkX-+x+x
p+-+-P-P
+-P-+-P-
-P-+-+-+
+-+-+-+-

Black is being stretched.

  51. Bc6+ Kc7 52. Bd5 Ne7 53. Bf7 Kb7 54. Bb3 Ka7 55. Bd1
Kb7 56. Bf3+ Kc7 57. Ka6 Nc8 58. Bd5 Ne7 59. Bc4 Nc6 60. Bf7 Ne7
61. Be8


-+-+b+-+
+-J-S-+-
kX-+-+x+
X-X-+x+x
p+-+-P-P
+-P-+-P-
-P-+-+-+
+-+-+-+-

zugzwang

  61… Kd8 62. Bxg6 Nxg6 63. Kxb6 Kd7 64. Kxc5 Ne7 65. b4
axb4 66. cxb4 Nc8 67. a5 Nd6 68. b5 Ne4+ 69. Kb6 Kc8 70. Kc6 Kb8
71. b6 1-0


-J-+-+-+
+-+-+-+-
-Pk+-+-+
P-+-+x+x
-+-+sP-P
+-+-+-P-
-+-+-+-+
+-+-+-+-


Walther – Fischer [B99] Bishop
Ending: OCB As Draw, 1960

1. e4 c5 2. Nf3 d6 3. d4 cxd4 4. Nxd4 Nf6 5. Nc3 a6 6. Bg5 e6 7. f4
Be7 8. Qf3 Nbd7 9. O-O-O Qc7 10. Bd3 b5 11. Bxf6 Nxf6 12. Rhe1 Bb7
13. Kb1 Rc8 [13…b4] 14. g4 Nd7 15. g5 Nb6 16. f5 e5 17.
f6 gxf6 18. gxf6 Bf8 19. Nd5 Nxd5 20. exd5 Kd8 21. Nc6+ Bxc6 22.
dxc6 Qxc6 23. Be4 Qb6 24. Qh5 Kc7 25. Bf5 Rd8 26. Qxf7+ Kb8 27. Qe6
Qc7 28. Re3 Bh6 29. Rc3 Qb7 30. f7 Bg7 31. Rcd3 Bf8 32. Qxe5 dxe5
33. Rxd8+ Ka7 34. R1d7 h5 35. Rxb7+ Kxb7 36. c3 Kc7 37. Ra8
[37. Re8!] 37…Kd6 38. Rxa6+ Ke7 39. Re6+ Kxf7 40. Rxe5
b4 41. cxb4 Bxb4 42. h3 Kf6 43. Rb5 Bd6 44. Be4 Re8 45. Rf5+ Kg7
46. Bf3 Re1+ 47. Kc2 Rf1 48. Rd5 Rf2+ 49. Rd2 Rxd2+ 50. Kxd2


-+-+-+-+
+-+-+-J-
-+-L-+-+
+-+-+-+x
-+-+-+-+
+-+-+b+p
pP-K-+-+
+-+-+-+-

50… h4 51. Kd3 Kf6 52. Kc4 Ke7 53. Kb5 Kd7 54. a4 [54.
b4
] 54… Kc7 55. b4 Kb8 56. a5 Ka7 57. Kc4 Bg3 58. b5 Bf2 59.
Be2 Be3 60. Kb3 Bd2 61. b6+ Kb7 62. Ka4 Kc6 63. Bb5+ Kc5 1/2-1/2


-+-+-+-+
+-+-+-+-
-P-+-+-+
PbJ-+-+-
k+-+-+-X
+-+-+-+p
-+-L-+-+
+-+-+-+-


Capablanca,Jose –
Janowsky,Dawid (NY 03) [D15] B ending: same colour, 1916

1. d4 Nf6 2. Nf3 d5 3. c4 c6 4. Nc3 dxc4 5. e3 Bg4 6. Bxc4 e6 7. h3
Bh5 8. O-O Be7 9. Qb3 Qb6 10. Ne5 Nbd7 11. Qxb6 axb6 12. Nxd7 Kxd7
13. Bd2 b5 14. Bd3 Bg6 15. Bxg6 hxg6 16. Rfc1 Ra6 17. a3 Rha8 18.
Na2 Nd5 19. Rab1 f5 20. Kf1 Ra4 21. Nc3 Rc4


t+-+-+-+
+x+jL-X-
-+x+x+x+
+x+s+x+-
-+tP-+-+
P-N-P-+p
-P-B-Pp+
+rR-+k+-

Concedes the exchange for some attack

  22. b3 Rxc3 23. Bxc3 Rxa3 24. Be1 Bf6 25. Ke2 e5 NEXT
DIAGRAM


-+-+-+-+
+x+j+-X-
-+x+-Lx+
+x+sXx+-
-+-P-+-+
Tp+-P-+p
-+-+kPp+
+rR-B-+-

Black’s pieces are placed as well as they can be, so now we see the
break. However, this may only serve in the long run to open lines
for the Rook.

  26. dxe5 Bxe5 27. f4 Bd6 28. Bc3 Ra2+ 29. Kf3 Bc5 30. Rd1
Ke6 31. Rd3 Bf8 32. Be5 b4 33. Rc1 g5 34. g4 g6 35. e4 fxe4+ 36.
Kxe4 Re2+ 37. Kf3 Rh2 38. Kg3 Re2 39. h4 gxh4+ 40. Kxh4 Be7+ 41.
Kg3 g5 42. Kf3 Rh2 43. Re1 Rh3+ 44. Ke4 Rh4 45. fxg5 Bxg5 46. Kf3
Rh3+ 47. Bg3+ Kd7 48. Kg2 Rh7


-+-+-+-+
+x+j+-+t
-+x+-+-+
+-+s+-L-
-X-+-+p+
+p+r+-B-
-+-+-+k+
+-+-R-+-

White decides to give back the exchange to get chances to advance
the g-pawn. 49. Re5 Bf6 50. Rexd5+ cxd5 51. Rxd5+ Ke8 52. Rb5 Rd7
53. Rxb4 Kf7 54. Rb6 Bd4 55. Rd6 NEXT DIAGRAM


-+-+-+-+
+x+t+j+-
-+-R-+-+
+-+-+-+-
-+-L-+p+
+p+-+-B-
-+-+-+k+
+-+-+-+-

-+-+-+-+
Forcing the exchange of Rooks, which are often a strong drawing
factor, giving a pure Bishop ending.

  55… Rxd6 56. Bxd6

+x+-+j+-

-+-B-+-+
+-+-+-+-
-+-L-+p+
+p+-+-+-
-+-+-+k+
+-+-+-+-
56… Kg6 57. Kf3 Bf6 58. Bf4 Kf7 59. Ke4 Ke6 60. Be3 Be7 61. g5
Bd8 62. Kf4

Bc7+ 63. Kg4 Be5 64. Kh5 Kf7 65. Kh6 Kg8 66. Bb6 Bc3 67. Kg6 Bd2
68. Kf6 Bc3+ 69. Ke6 Bd2 70. g6 Bc3 71. Kd5 Bd2 72. Bd4 b5 73. Ke4
b4 74. Be3 Bc3 75. Kd3 Be1 76. Bd2 Bf2 77. Ke4 Bc5 78. Kd5 Be7 79.
Kc4 Kg7 giving up the g-pawn for the b-pawn 80. Bxb4 Bd8 81. Bc3+
Kxg6 82. b4 Kf5 83. Kd5


-+-L-+-+
+-+-+-+-
-+-+-+-+
+-+k+j+-
-P-+-+-+
+-B-+-+-
-+-+-+-+
+-+-+-+-

The change of front has left White with a pawn which can Queen on a
dark square, and the Black King with difficulties in approaching.
Black resigned, but Averbach later showed an amazing save (used by
Fischer vs. Taimanov) which was known to Centurini in the last
century!

[83. Kd5 Kf4 ! and Black rushes around the
back.]


Menchik,V – Capablanca,JR
(Hastings 1930/31) [A47] bishop ending: same colour, 1996

1. d4 Nf6 2. Nf3 b6 3. e3 Bb7 4. Bd3 c5 5. O-O Nc6 6. c3 e6 7. Ne5
d6 8. Nxc6 Bxc6 9. Qe2 Be7 10. Bb5 Qd7 11. Bxc6 Qxc6 White is
slipping behind in development and activity. 12. Nd2 O-O 13. dxc5
dxc5 14. e4 Rad8


-+-T-Tj+
X-+-LxXx
-Xd+xS-+
+-X-+-+-
-+-+p+-+
+-P-+-+-
pP-NqPpP
R-B-+rK-

White would of course like to move her Knight, but the next puts a
pawnon a dark square.

  15. e5 Nd5 16. Nf3 Rd7 17. Rd1 Rfd8 18. Bd2 b5 19. Kf1
Nb6 20. Bf4 h6 21. Rxd7 Rxd7 22. Rd1 Rxd1+ 23. Qxd1


-+-+-+j+
X-+-LxX-
-Sd+x+-X
+xX-P-+-
-+-+-B-+
+-P-+n+-
pP-+-PpP
+-+q+k+-

Black’s next pushes the Bishop out of action on g3, then Black
makes a raid on the Queen’s-side.

  23… Qe4 24. Bg3 Qc4+ 25. Qe2 Qxe2+ 26. Kxe2 Na4 27. Kd2
Nxb2 28. Kc2 Nc4 29. Nd2 Nxd2 30. Kxd2


-+-+-+j+
X-+-LxX-
-+-+x+-X
+xX-P-+-
-+-+-+-+
+-P-+-B-
p+-K-PpP
+-+-+-+-

The Bishop ending that follows is very difficult for White: a pawn
down with a duff Bishop.

  30… c4 31. Bf4 a6 32. Be3 Kf8 33. Bb6 Ke8 34. Ke3 Kd7
35. Kd4 Kc6 36. Ba7


-+-+-+-+
B-+-LxX-
x+j+x+-X
+x+-P-+-
-+xK-+-+
+-P-+-+-
p+-+-PpP
+-+-+-+-

White is running out of squares for the Bishop.

  36… f5 37. a4

  Doing Black’s work for him.

  37… g6 38. f4 h5 39. axb5+ Kxb5 40. g3 a5 41. Ke3 Bc5+
42. Bxc5 Kxc5 1-0

A disaster in the Stonewall

Alsop,A – Blundell,J [D00] East Devon Minor (Exeter) (4), 05.03.2000

What went wrong here? Play over this game twice, once fairly quickly to see how it went, and then again slowly to see what went on in more detail, and think of other ideas.


Lessons from this game:

  1. Play with a plan . If you understand the ideas behind your chosen openings you have a big advantage over your opponent and can often win games very quickly. In this game White played with one idea – to lock up the centre then attack the King’s-side – and carried it out. Black went from move to move without making any huge mistakes, but this is not enough.
  2. If you think your opponent will stop your plan, play it straight away! Black did have one chance to play …c5, but in trying to make it better, lost the chance.
  3. Open a file for your Rooks . Rooks are worth half a Queen each, and if you don’t get them working, it’s like being a Queen behind! When you plan where to put your pieces in the opening, you must also think about your Rooks. In this game Black suffered from not getting the c-file open for his Rooks. This started to go wrong at move 3!
  4. Don’t castle into an attack . In this game White was ‘pointing’ towards the King’s-side. If Black had blocked this attack – or not castled King’s-side – White’s pieces might have been on silly squares.
  5. Swap off your opponent’s good pieces, keep your own . Black swapped his good Ne4 for a duff White piece on d2, but he did have the good idea of exchanging the Nc6 for the Bd3. Without the Bd3 White would be pretty planless.

None of these criticisms are made because Black is a poor player, it’s just very hard to play positions where you don’t know what to do. It takes a lot of experience before you can plan what to do in positions you haven’t seen before, but it is possible to pinch ideas from other people. So, try to play positions you understand, try to understand the positions you play.

With light notes:


Erro ergo sum: analysis and error


A tactic appears for you: you get it right.

Here’s a simple one to get us started:


Regis,D – Jones,R (1995)

1. c4 Nf6 2. Nc3 e6 3. e4 Nc6 4. Nf3 b6 5. e5 Ng4 6. d4 g6 7. h3 Nh6 8. Bg5 Ne7 9. Qd2 Nhf5 10. g4 Ng7 11. Ne4 f5 12. exf6 Bb7


t+-DjL-T
XlXxS-Sx
-X-+xPx+
+-+-+-B-
-+pPn+p+
+-+-+n+p
pP-Q-P-+
R-+-Kb+r

13. f7+ Kxf7 14. Ne5+ 1-0


  And a more complicated one: the idea is easy, but can you analyse it to a finish?


Regis,D – Lane,P (1994)

t+-Dj+t+
XxXlSx+q
-+-+x+-+
S-+-P-B-
-+b+-+-+
+-P-+n+-
pP-+-PpP
+-Kr+-+r

13. Bxe6 fxe6 14. Qh5+ Kf8 15. Bh6+ Rg7 16. Ng5 Qe8 17. Nh7+ 1-0


  Ah, if only it was all like that…


A tactic appears for you: you miss it.


Regis,D. – Aston,P (1994)

-+j+-L-T
X-+t+rXx
-+-+-+-+
+-PxQ-+-
-+-+-+-D
+n+-P-+-
pPp+-+pP
R-+-+-K-

21. Qe8+??

[21. Qe6 Qd8 22. c6 or even 21. Rxd7 Kxd7 22.Rd1]

  …1-0

  Patzer sees a check… It didn’t affect the outcome in the end but White had to start all over again to build up another combination.


Jackson,Dave – Regis, D (1993)

-+-+j+-T
X-+-SxLx
-T-Xl+x+
DxX-+-+-
-+-+pP-+
+p+p+n+-
p+pBq+bP
+k+r+r+-

17… b4 ??

[17… Qxa2+ 18. Kxa2 Ra6+ 19. Ba5 Rxa5+ 20. Kb1 Ra1#]

18. a4 Bd7 19. e5 Bxa4 20. Bc1 O-O 21. Nd2 Bb5 22. Bb2 Nf5 23. Nc4 Bxc4 24. dxc4 ( Draw agreed)

  I suppose I wasn’t looking for a win just then!


A tactic appears for your opponent: you miss it.

Oh, how many times… asleep, overconfident or confused, we ignore our opponent’s best reply.


Regis,D. – Beake,B. (1994)

t+-+dTj+
+xX-+lXx
-+s+-X-+
X-L-+n+-
p+n+pX-+
+-P-+-+-
-Pq+bPpP
+-+r+rK-

18. g3? f3 19. Bd3 Ne5 20. Nxe5 fxe5 …0-1

  You don’t get away with that sort of thing against 200-grade players.


Regis,D – Stirling,A (1984)

1. e4 Nf6 2. e5 Nd5 3. c4 Nb6 4. c5 Nd5 5. Bc4 e6 6. Nc3 Nf4


tSlDjL-T
XxXx+xXx
-+-+x+-+
+-P-P-+-
-+b+-S-+
+-N-+-+-
pP-P-PpP
R-BqK-Nr

7. Qg4 Qh4 …0-1

  There are lots of opening traps like that: White bites off more than he can chew.


Fayle,A – Regis,D (1984)

-+-+-T-J
+-+-+-X-
-S-+-+-X
X-T-+x+-
pX-Rx+-+
+b+-+-P-
-Pp+k+-P
+-+r+-+-

29… Rfc8?? 30. Rd8+ Rxd8 31. Rxd8+ Kh7 32. Bg8+ Kg6 33. Rd6+ winning a piece (but …0-1!)

  It was almost the only thing Black had to analyse, and I didn’t!


A tactic appears for you: you see it but analyse it wrongly.


Regis,D. -Stooks, Charles (1993)

-TlL-+tJ
S-+d+x+x
-+-X-PxQ
+xXnX-+-
-+p+p+-+
+-+p+-P-
-P-+n+bP
R-+-+rK-

19. Nef4? ( yes, very good but unfortunately 19…exf4; 20 Rxf4, g5! gets at least a draw! 20 Nxf4 also fails to 20…g5 )

19… Nc6??

[19… Qb7]

20. Nh3 Qg4 21. Ng5 1-0

  Simple over-optimism: I didn’t consider 20…g5.


Regis,D – Prideaux,E (1994)

t+l+j+-+
+x+-LxX-
-B-+-+-+
+p+-Xd+-
-+n+-X-T
+-+-+-+p
-+p+q+b+
+-+r+-K-

White lashes out without much justification:

  30. Rd8+ Bxd8 31. Nd6+ Kf8 32. Nxf5 Bxb6+ 33. Kh2 Bxf5 winning…

  (but here and black’s flag fell… 1-0 There ain’t no justice…)

  Not hard to analyse, just I felt I had to do something and couldn’t see anything else!


A tactic appears for you: you see it and analyse it correctly, but wrongly assess the outcome.


Ward,D – Regis,D (1994)

-+-+tTj+
+xX-+-+-
x+-X-+-X
+-+pLsXd
p+p+nX-+
+-+-+p+p
-P-+qBp+
+r+-R-+k

26… Bd4 27. Bxd4 Rxe4 28. Qxe4 Ng3+ 29. Kg1 Nxe4 30. Rxe4 Re8 31. Rbe1 Rxe4 32. Rxe4 Qf7 33. Re6 Kh7 34. Rf6

[34. Kh2! …when it’s all a bit tricky!]

34… Qe8 35. Re6 Qxa4 36. Re7+ Kg6 37. Rxc7 Qd1+ 0-1

  The tactic was obvious enough, what I failed to assess was how good White’s pieces would be in the ending.


Webb,S – Regis,D (1994)

17…a5


t+-Dt+j+
+-+s+xLx
-+x+l+x+
Xx+x+s+-
-+-P-B-+
+bN-+n+-
pPpQrPpP
+-+-R-K-

18. Bxd5 cxd5 19. Nxd5 Bxd5 20. Rxe8+ Qxe8 21. Rxe8+ Rxe8

  As last time, Black has secured (or provoked White into giving up) a material advantage that is difficult to make use of, this time with the opponent having the Queen.

22. Ne5 Nxe5 23. dxe5 Bc6 24. Qc3 Re6 25. f3 a4 26. a3 g5 27. Bxg5 Bxe5 28. Qd3 Bd4+ 29. Kf1 Ne3+ 30. Bxe3 Bxe3 31. b3 Bf4 32. c4! Bxh2 33. bxa4 bxc4 34. Qxc4 Bg3 35. Qg4+ Rg6 36. Qc8+ Kg7 draw agreed .

  As we start to comment more deeply on these examples, we see two sources of error: mistakes in analysis, surely, but also misjudgements – errors in the general assessment of the board or the opponent.

  Let’s clarify this with an example:


Kasparov – Karpov, Linares, 1994

t+l+jL-T
+xD-+xX-
-S-+xS-X
X-+-N-+-
-+-P-+-+
Pb+-+-+-
-P-+qPpP
R-B-K-Nr

1. e4 c6 2. d4 d5 3. Nd2 dxe4 4. Nxe4 Nd7 5. Bc4 Ngf6 6. Ng5 e6 7. Qe2 Nb6 8. Bb3 h6 9. N5f3 a5 10. c3 c5 11. a3 Qc7 12. Ne5 cxd4 13. cxd4 DIAGRAM

13… a4

[13… Bxa3]

14. Bc2 Bd7 15. Nxd7 Nbxd7 16. Qd1 Bd6 17. Ne2 Nd5 …drawn

  I wouldn’t like to say there’s anything wrong with the analytical abilities of either player – what we have here is and error of judgement. My guess is, it’s a quiet position in a solid opening, and neither player bothered to look.

  Chess is a tense game. This tension may make you want to believe things that aren’t really true, and comfort yourself with things that mean you don’t have to think too hard any more. Not a bit of it….


Petrosian-Korchnoi 1963

-+-+-T-+
X-+-+j+-
-X-P-+rX
+-X-X-+p
-+p+pXk+
+p+-+-+-
p+-+-+-+
+-+-+-+-

Black has a hopeless, passive position, just as he has had for the last umpteen moves. Petrosian just went

1. Rxh6

  which was met by

1…f3!

  Hoping for 2. Kxf3 Kg7 discovered check, winning the rook.

2. Kg5 Ke8 White resigns, unable to catch the f-pawn.

  Afterwards, Petrosian explained that a move like …f3 just didn’t fit with “Black’s hopeless position“. But where there’s life, there’s hope!

“For a long time I had regarded my position as a winning one. Thus the whole opening phase of the struggle, when Korchnoi was unable to get out of trouble, had psychologically attuned me to the idea that the ending would be favourable to me … and here comes the oversight 35 Rxh6?? I did not even see the threat …f4-f3, possibly because it was in contrast to Black’s hopeless position. Personally, I am of the view that if a strong master does not see such a threat at once he will not notice it, even if he analyses the position for twenty or thirty minutes.” – PETROSIAN.

  I have a whole book full of these types of disaster, when one player just turned the alarm off. You should be on guard all the time, with the alarm dial turned up to 11!

  Please note that Petrosian was also thinking less than objectively about the game, and thinking only about his plans. Your opponent also has a right to exist…

B. Analysis

It used to be thought that there wasn’t much difference in the abilities of strong and weak players at analysis – rather, it was all about judgement and experience. There might not be a lot of difference between GMs and IMs, but there is increasing evidence that among we club players, there are large and important differences.

  Here White gets carried away with his attacking possibilities, when unflappable Exeter player Brian Hewson calmly sidesteps the main line of a sacrifice (11…fxe6) threatening a pin on the e-file.

  and won. It is often the case that players will analyse one line very deeply but fail to spot an early alternative – as mentioned above, Grandmaster Kotov advised many years ago to identify each candidate move at the outset before analysing any one move deeply. Had White done this he could not fail to notice the possibility of Black castling, and should then spot the classic pattern of Q and K lined up on the e-file which suggests a pin from a Black R on e8.


surprising/paradoxical moves


Retreats


Christiansen – Karpov (1993)

1.d4 Nf6 2.c4 e6 3.Nf3 b6 4.a3 Ba6 5.Qc2 Bb7 6.Nc3 c5 7.e4 cxd4 8.Nxd4 Nc6 9.Nxc6 Bxc6 10.Bf4 Nh5 11.Be3 Bd6 (wait for it…)


t+-Dj+-T
X-+x+xXx
-XlLx+-+
+-+-+-+s
-+p+p+-+
P-N-B-+-
-Pq+-PpP
R-+-Kb+r

12.Qd1 1-0

  The error made by Karpov above is actually a common one – missing an undeveloping retreat.

  Other errors of this sort – hard types of move to spot – include long moves, sideways moves by Queens, captures by Pawns away from the centre, and so on. Another example:


Putting pieces en prise


Fischer – Sherwin, USA Ch’p , 1957

-+-+-Tj+
+-+-+xXx
-+-X-+-+
+-+b+-D-
r+-+p+s+
+-T-+-+-
p+-+q+pP
+-+-+r+k

30. Rxf7 Rc1+ 31. Qf1!! h5 32. Qxc1 Qh4 33. Rxf8+ Kh7 34. h3 Qg3 35. hxg4 h4 36. Be6 1-0

  How about that one: a Queen moving backwards into a position where it can be captured!


‘Creeping moves’

Purdy advises:

“examine moves that smite!”

  …which is clearly good advice. But have a look at this:


Spassky – Korchnoi, Kiev, 1968

1. d4 Nf6 2. c4 g6 3. Nc3 Bg7 4. e4 d6 5. f3 O-O 6. Be3 Nc6 7. Nge2 a6 8. Nc1 e5 9. d5 Nd4 10. Nb3 Nxb3 11. Qxb3 c5 12. dxc6 bxc6 13. O-O-O Be6 14. Qa3 Ne8 15. h4 f6 16. c5 Rf7 17. Qa4 Qc7 18. Bc4 Bxc4 19. Qxc4 Bf8 20. h5 dxc5 21. hxg6 hxg6 22. Qe6 Rd8 23. Rxd8 Qxd8 24. Rd1 Qe7 25. Qxc6 Nc7 DIAGRAM


-+-+-Lj+
+-S-Dt+-
x+q+-Xx+
+-X-X-+-
-+-+p+-+
+-N-Bp+-
pP-+-+p+
+-Kr+-+-

The situation in this Candidates’ Match game is tense Although White undoubtedly holds the advantage, Moscow players analysing while the game was going on could find no clear continuation, e.g. 26. Nd5 Qe6! and Black holds.

26. Qb6

  Surprising and elegant, this ‘creeping move’ impressed many, including Kotov who has cited it more than once. The move prepares to answer …Qe6 with Bxc5 and leads to a swift win. To Kotov, this was a far more brilliant move than the Queen sacrifice that ended the game.

26… Kg7 27. Nd5 Qe6 28. Bxc5 Bxc5 29. Qxc5 Nb5 30. Qe3 Qc6+ 31. Kb1 Nd4 32. Rc1 Qb5 33. Nc7 Qe2 34. Ne6+ Kh7 35. Qh6+ 1-0

  It’s hardest of all to spot a ‘creeping’ move in the middle of a combinational exchange.


Wahltuch – Palmer, Manchester, 1912

1. e4 e5 2. Nf3 Nc6 3. Bb5 Nf6 4. O-O Nxe4 5. d4 Nd6 (Berlin Defence, Rio De Janiero Variation) 6. dxe5 [6. Bxc6] 6… Nxb5 7. a4


t+lDjL-T
XxXx+xXx
-+s+-+-+
+s+-P-+-
p+-+-+-+
+-+-+n+-
-Pp+-PpP
RnBq+rK-

This is a gorgeously messy line

7… Nd6 [better 7… d6]

8. Bg5 f6 9. Re1 fxg5 10. exd6+ Ne7 11. Ne5 cxd6 12. Qh5+ g6 13. Nxg6 Qa5 14. Nxh8+ Kd8

  Have a look at the next diagram and see what you think.

t+lJ-L-N
Xx+xS-+x
-+-X-+-+
D-+-+-Xq
p+-+-+-+
+-+-+-+-
-Pp+-PpP
Rn+-R-K-

15. Nc3

  [Obviously not 15. Qf7 Qxe1#]

  It is tempting to try a forcing move, but none work.

“A quiet move in the midst of an attack is the sign of the master” – Du Mont

15… Qf5 (else Qf7) 16. Nb5 Ng6 17. Qxg5+ 1-0


The ‘tree of analysis’

The starting point for any consideration of analysis must be Kotov, again.

Candidate moves must be established straight away and they must be clearly enumerated.


Once we have established all the candidate moves, we then proceed to work out the variations arising from them one by one.


In analysing complicated variations, one must examine each branch of the tree once and once only.


This task cannot be split into parts, by examining one move fully and then looking for the next one.

  Kotov gives some example of positions where the analysis get progressively more detailed.

[trees]

      bare trunk          bare trunk  with     coppice                bush                                                side-branch                                                     

‘Just plunge in’:


Corden – Nunn, Birmingham 1975

Nunn and Griffiths advise: “Just plunge in”

  The first move to look at must be 15. Ba4 Nd2+ 16. Kc3 Qe3+ 17. Kb4 a5#

…”and straightaway you have learned a lot about the position”.

  That is, you can regain at least one piece whenever you wish, still keeping the K exposed. Other lines include:


‘Play a good positional move’

Nimzovitch


How to improve your analytical skills

So much for theory. How do you put this into practice? Well, you practice!


Solving problems in books and magazines

You have probably seen either the British Chess Magazine column Find the Winning Continuation, or the same idea in Chess magazine, called there Winning Combinative Play. There are also books of tactical positions for solving, one I quite liked for the basics was Chernev and Reinfeld, Winning Chess.

  After that, you get serious. More testing (literally) is the Chess magazine feature, How Good is your Chess? which takes you through a real game and gives you points (There is a book of these under the same name by Danny King; BCM have a similar feature called Test Your Chess.) Here’s an easy example of such a test:


How good is your chess?

If you are determined to get better, try the Russian chess training programme contained in three books by Livshits: Test your chess IQ, Vol.1 (for players up to 160), Test your chess IQ, Vol.2 (for 160-200) and Test your chess IQ, Vol.3 – Grandmaster Challenge (for 200+ grades).

  This is all ‘practice makes perfect’ style with little explanation. The theory of candidate moves and trees of analysis I found in Kotov, Think like a Grandmaster (a summary is also to be found in Kotov, Plan like a Grandmaster). This book also describes how Kotov used to analyse complicated master games, writing down his conclusions for comparison. Both books give test positions with a full tree of analysis.

  Another important book for theory is Nunn and Griffiths, Secrets of Grandmaster Play. It is a deliberately educative book, showing, firstly, what a complete analysis of a game looks like, but also giving lots of practical tips and observations, and trying to show how much players really see at the board.

  And lastly, there are some good ideas in Dvoretsky, Secrets of chess tactics. In particular, he describes the technique of playing-out of positions for which an analysis has been published. For example, he played on from the following positions from the Nunn/Griffiths book with his pupils (Yusupov and Dolmatov) as if the position had arisen in a game against the clock. This is a realistic test and you can check your conclusions against what Nunn has analysed.


“I can see the combinations as well as Alekhin, I just cannot get into the same positions” — SPIELMANN


E. Bibliography

Alexander, The Penguin Book of Chess Positions

  Avni, Danger in Chess

British Chess Magazine, Find the Winning Continuation

  Chernev and Reinfeld, Winning Chess

Chess magazine, Winning Combinative Play

Chess magazine, How Good is your Chess? (Book of same name by Danny King)

  Dvoretsky, Secrets of chess tactics

  Kotov, Think like a Grandmaster )_candidate moves, tree of analysis, analysis of master games

  Kotov, Plan like a Grandmaster )

  Livshits, Test your chess IQ, Vol.1

  Livshits, Test your chess IQ, Vol.2

  Livshits, Test your chess IQ, Vol.3 – Grandmaster Challenge

  Nunn and Griffiths, Secrets of Grandmaster Play

My best(?) games

These would be my Best Games if they didn’t have dirty great holes in them!

The best holes


regis,d (1960) – richmond,rh (2150) [A21]

 BEST?: cambridge city vs. NCI, 1986

 1. c4 e5 2. Nc3 d6 3. g3 f5 4. d4 e4 5. Nh3 Nf6 6. Bg2 Be7 7. O-O O-O 8. Bg5 c6 9. f3 exf3 10. exf3 h6 11. Be3 Be6 12. Qd3 d5 13. c5 Qd7 14. Nf4 Bf7 15. b4 g5 16. Nfe2 Kg7 17. Rab1 Bg6 18. f4 Ne4 19. b5 Qc7 20. fxg5 hxg5 21. Nxe4 fxe4 22. Qd2

tS-+-T-+
XxD-L-J-
-+x+-+l+
+pPx+-X-
-+-Px+-+
+-+-B-P-
p+-Qn+bP
+r+-+rK-

 22… Qd8 Bob thought exchanging rooks was better … 23. Rxf8 Kxf8 24. bxc6 bxc6 25. Bh3 Na6 26. Bg4 Nc7 27. Rb7 Bf7 28. Qc1 Kg8 29. Qf1 Nb5 30. Qh3 [30. Bxg5 – lay unnoticed until 1992!] 30… Na3 31. Bf5 Qa5 32. Qh7+ Kf8 33. Qh8+ Bg8 34. Qh6+ Ke8 35. Qxc6+ Kf8 36. Qh6+ Ke8 37. Rxe7+ Kxe7 38. Bxg5+ Ke8 39. Qc6+ 1-0


regis,d (1935) – aston,pa (2000) [B23]

 BEST?: east devon 2, 1994

 1. e4 c5 2. Nc3 e6 3. Nge2 d5 4. exd5 exd5 5. d4 Nc6 6. Be3 Nf6 7. dxc5 Qa5 8. Nd4 Ng4 9. Bb5 Nxe3 10. fxe3 [10. Nxc6] 10… Bd7 11. Nb3 Qb4 12. O-O Qh4 [12… O-O-O 13. Rf4] 13. Nxd5 O-O-O 14. Qf3 Be6 15. Bxc6 bxc6 16. Nf4 Bd5 17. Nxd5 cxd5 18. Qf5+ Kc7 19. Qe5+ Kc8 20. Rxf7 Rd7

-+j+-L-T
X-+t+rXx
-+-+-+-+
+-PxQ-+-
-+-+-+-D
+n+-P-+-
pPp+-+pP
R-+-+-K-

 21. Qe8+ Yes, very good, but [21. Qe6 Qd8 22. c6] 21… Qd8 22. Qxd8+ Kxd8 23. Rxd7+ [23. Raf1] 23… Kxd7 24. Rd1 Kc6 25. Nd4+ Kxc5 26. Ne6+ Kc6 27. Nf4 Bc5 28. Nxd5 Rf8 29. c4 a5 30. Rf1 Re8 31. Rf3 Re4 32. b3 Kd6 33. Kf2 g6 34. Rf6+ Ke5 35. g3 Bxe3+ oops 36. Kf3 Bc5 37. Ra6 [37. Re6+ Kxe6 38. Kxe4 g5 39. Ne3 Bf8 40. h3 Bc5 41. Nc2 h5 42. g4 hxg4 43. hxg4 Bf2 44. a3 Bc5 45. b4 Be7 46. c5] 37… Bb4 [37… g5 38. h3 h5 39. Rg6] 38. Nxb4 Re1 1-0


osland,bs (1800) – regis,d [A00]

 BEST?: thetford major r4, 1979

 1. b4 c6 2. e3 e5 3. Bb2 f6 4. a3 a5 5. b5 Ne7 6. c4 cxb5 7. cxb5 d5 8. d4 e4 9. a4 Ng6 10. Nd2 Be6 11. Qb3 Nd7 12. Rc1 [12. Nxe4 bleah …] 12… Bd6 13. Ne2 Kf7 ! 14. g3 Nb6 15. Nf4 Nxf4 16. exf4 Qe7 17. Be2 Bb4 !?

t+-+-+-T
+x+-DjXx
-S-+lX-+
Xp+x+-+-
pL-PxP-+
+q+-+-P-
-B-NbP-P
+-R-K-+r

 I was very proud of this at the time: I intended to swap off all White’s good pieces and win the a-pawn. That’s actually what happended! 18. Bc3 Rhc8 19. Nb1 Bxc3+ 20. Rxc3 Rxc3 21. Nxc3 Qb4 22. Qxb4 axb4 23. Nb1 Rxa4 24. O-O Ra2 25. Re1 Nc4 26. Bxc4 dxc4 27. Rxe4 Ra1 28. Re1 Bf5 29. Kg2 Rxb1 30. Re2 b3 31. d5 c3 32. d6 c2 33. Re7+ Kg6 34. d7 c1=Q ! 35. g4 Qg1+ 36. Kf3 Qxg4+ 37. Ke3 Re1+ 38. Kd2 Qd1+ 39. Kc3 Rxe7 0-1


escott,k. – regis,d. [B06]

 BEST?: warcs. vs devon (county 1/4 final), 1995

 1. e4 g6 2. d4 d6 This move order is designed to stop White playing his next move! 3. c4 e5 4. d5 Bh6 ? Strategically brilliant but tactically a joke. 5. Nd2 [5. Bxh6 Nxh6 6. Qd2 Qh4 7. Nc3 f5 8. g3 Qh5 9. Be2] 5… Nf6 6. Bd3 Na6 7. Ngf3 Nc5 8. Bc2 a5 9. b3 Nh5 10. g3 O-O 11. Bb2 Qe8 12. a3 f5

t+l+dTj+
+xX-+-+x
-+-X-+xL
X-SpXx+s
-+p+p+-+
Pp+-+nP-
-BbN-P-P
R-+qK-+r

 I could see the combination coming… 13. b4 [13. exf5 gxf5 14. b4 e4 15. bxc5 exf3+ 16. Kf1 f4] 13… axb4 14. axb4 Rxa1 15. Bxa1

-+-+-Tj+
+xX-+d+x
-+-X-SxL
+-+pX-+-
-Pp+b+l+
+-+q+nP-
-+-+kP-P
B-+-+-+r

 15…Nxe4 16. Nxe4 fxe4 17. Bxe4 Bg4 18. Qd3 Qf7 19. Ke2 Nf6 20. h3 Bxf3+ 21. Bxf3 e4 22. Bxe4 Nxe4 23. f4 Bg7 24. Bxg7 Kxg7 25. Ra1 Re8 26. Kf3 Qf5 27. Qd4+ Qf6 28. Qxf6+ Kxf6 29. Ra2 Nc3 30. Ra7 Re4 31. Rxb7 Rxc4 32. Ke3 Nxd5+ 33. Kd3 Rxb4 0-1

My best cheapos… I blush with shame, but I’d do it all over again.

Magnificent cheapos…


regis,d – lane,pc [A18]

 CHEAPO: exchange vs. exeter,newman speed league, 1994

 1. c4 e6 2. Nc3 Nf6 3. e4 Bb4 sucker 4. e5 Bxc3 5. dxc3 Ng8 6. Qg4 Ne7 7. Qxg7 Rg8 8. Qxh7 Nbc6 9. Nf3 d5 10. Bg5 Bd7 11. O-O-O dxc4 12. Bxc4 Na5

t+-Dj+t+
XxXlSx+q
-+-+x+-+
S-+-P-B-
-+b+-+-+
+-P-+n+-
pP-+-PpP
+-Kr+-+r

 13. Bxe6 fxe6 14. Qh5+ Kf8 15. Bh6+ Rg7 16. Ng5 Qe8 17. Nh7+ My neatest combination, I think 1-0


regis,d. (1855) – jones,rh (1800) [A18]

 CHEAPO: exchange vs. exmouth, 1995

 1. c4 Nf6 2. Nc3 e6 3. e4 Nc6 4. Nf3 b6 5. e5 Ng4 6. d4 g6 7. h3 Nh6 8. Bg5 Ne7 9. Qd2 Nhf5 10. g4 Ng7 11. Ne4

t+lDjL-T
X-XxSxSx
-X-+x+x+
+-+-P-B-
-+pPn+p+
+-+-+n+p
pP-Q-P-+
R-+-Kb+r

 11… f5 12. exf6 Bb7 13. f7+ Kxf7 14. Ne5+ [14. Ne5+ Kg8 15. Nf6#] 1-0


ryba,a (2015) – regis,d [B22]

 CHEAPO: downing vs. trinity, 1979

 1. e4 c5 2. c3 Nf6 3. e5 Nd5 4. d4 cxd4 5. cxd4 b6 6. Nf3 e6 7. Nc3 Bb4 8. Bd2 Bb7 9. Nb5 Be7 10. Rc1 a6 11. Nc3 O-O 12. Bc4 Nxc3 13. Rxc3

tS-D-Tj+
+l+xLxXx
xX-+x+-+
+-+-P-+-
-+bP-+-+
+-R-+n+-
pP-B-PpP
+-+qK-+r

 White’s chances for an attack must be excellent. 13… f6 14. a3 fxe5 15. dxe5 Nc6 16. O-O Qe8 17. Qc2

t+-+dTj+
+l+xL-Xx
xXs+x+-+
+-+-P-+-
-+b+-+-+
P-R-+n+-
-PqB-PpP
+-+-+rK-

 Casual 17… Rxf3 18. gxf3 Nd4 19. Qd1 Qg6+ 20. Kh1 Rf8 21. Be2 Nxe2 22. Qxe2 Qh5 23. Kg1 [23. Rg1 Bxf3+ 24. Rxf3 Qxf3+ 25. Qxf3 Rxf3 26. Be3] 23… Rxf3 24. Re1 Qg4+ 0-1

Playing White against odd Black defences after 1.e4 (part 1)

Black avoids 2…Nc6 or plays one of the semi-open defences

rnbqkbnr
pppppppp
-+-+-+-+
+-+-+-+-
-+-+P+-+
+-+-+-+-
PPPP-PPP
RNBQKBNR

An Exeter Junior Chess Club booklet Edition 1., December, 99


Bibliography:

Dunnington, How to play the King’s Indian Attack

Evans, The Chess Opening for You

Hodgson/Day, The Grand Prix Attack

Hort, Alekhin’s Defence (inc. Nimzovitch Defence)

Karpov, The Semi-Open Game in Action

Kasparov/Keene, Batsford Chess Openings 2

Keene et al. Understanding the Caro-Kann Defence

Levy/Keene, An Opening Repertoire for the Attacking Club
Player

Nunn, The Complete Pirc

Pachman, Semi-Open Chess

Schiller, How to play the King’s Indian Attack

Solitis/Hall, The King’s Indian Attack

Walker, Chess Openings for Juniors


Various magazines and other books


Introduction

The repertoires below offer you three ways of playing against
most of the semi-open defences, and also tell you what to do
against some of the less common lines after 1. e4 e5 2. Nf3.

The three approaches are:

­ Fast attacking game with pieces

­ Slower attacking game with f4

­ King’s Indian Attack with g3

Which you choose will depend on what sort of player you are. It
may also depend on what you hope to play after 1. e4 e5.

Fast attacking game with pieces

­ Giuoco Piano (my main recomendation for junior players)
or

­ Scotch Game

Slower attacking game with f4

­ Vienna Gambit or

­ King’s Gambit)

King’s Indian Attack with g3

­ KIA with 1. e4 e5 2. Nf3 Nc6 3. g3 or

­ in the Vienna 1. e4 e5 2. Nc3 Nc6 3. g3

Sadly, the KIA lines have no real force and are not good lines
to adopt against 1…e5. But the point is, how well does your
chosen repertoire fit together? Once I used to play the following
lines, together with the King’s Gambit:

Alekhin

1. e4 Nf6

Chase variation

1. e4 Nf6 2. e5 Nd5 3. c4 Nb6 4. c5 Nd5 5. Bc4 e6 6. Nc3

Caro-Kann

1. e4 c6

Panov-Botvinnik Attack

1. e4 c6 2. d4 d5 3. exd5 cxd5 4. c4

French

1. e4 e6

Advance Variation

1. e4 e6 2. d4 d5 3. e5

Pirc/Modern

1. e4 …d6/…g6

King’s Indian Attack

1. e4 d6 2. d4 Nf6 3. Nc3 g6 4. Nge2 and 5. g3, 6. Bg2

Sicilian

1. e4 c5

Chamaeleon Variation

1. e4 c5 2. Nc3 … 3. Nge2

This was an awful lot to keep track of, but more importantly, it
didn’t really combine well. Against the Alekhin I played fast,
against the Caro I played medium, against the French and Pirc I
played slow; the Panov line is main-line established theory with
lots to learn and keep track of, the Chamaeleon is a new and
obscure line where you have to think at the board.

Now, I’m sure a better idea, and the right idea, is to play
similarly against each opening. For example, if you like gambits
and play the Danish Gambit against 1…e5, try and find a gambit
against the lot….

Alekhin 1. e4 Nf6

1. e4 Nf6 2. Bc4 Nxe4 3. Bxf7+ Kxf7 4. Qh5+ g6 5. Qd5+

Caro-Kann 1. e4 c6

Fantasie Variation

1. e4 c6 2. d4 d5 3. f3 e5 4. Nf3 exd4 5. Bc4

French 1. e4 e6

Advance Variation, Milner Barry Gambit

1. e4 e6 2. d4 d5 3. e5 c5 4. c3 Nc6 5. Nf3 Qb6 6. Bd3

Pirc/Modern

1. e4 …d6/…g6

I don’t know any gambits for White in the Pirc but against the
Modern you can try… the Monkey’s Bum!

1. e4 g6 2. Bc4 d6 3. Qf3 Nf6 4. d4 e5 5. Nh3

Sicilian 1. e4 c5

Morra Gambit: 1. e4 c5 2. d4 cxd4 3. c3 dxc3 4. Nxc3 or 3. …
Nf6 4. e5 Nd5 5. Bc4 Qc7 6. Qe2

I think neither the Alekhin line nor the Monkey’s Bum are
really any good, but at least we’re thinking along the right lines,
even if this isn’t the repertoire we settle on.

Here’s a repertoire based on pawn advances and space
advantages:

Alekhin 1. e4 Nf6

Four pawns variation 1. e4 Nf6 2. e5 Nd5 3. c4 Nb6 4. d4 d6 5.
f4

Caro-Kann 1. e4 c6

Advance Variation 1. e4 c6 2. d4 d5 3. e5

French 1. e4 e6

Advance Variation 1. e4 e6 2. d4 d5 3. e5

Pirc/Modern

1. e4 …d6/…g6

Three Pawns Attack 1. e4 d6 2. d4 Nf6 3. c3 g6 4. f4

Sicilian 1. e4 c5

Big Clamp Variation 1. e4 c5 2. d3 (…) 3. f4


Now, what sort of player are you? Whether you like lively piece
attacks, slow pawn advances that you can use to force open lines or
more flexible systems, there is a repertoire here for you.

Let’s have a look at some variations that fit together.

Defence

Piece attack

rnbqkbnr
pppppppp
-+-+-+-+
+-+-+-+-
-+B+P+-+
+-+-+N+-
PPPP-PPP
RNBQK-+R

Slow attack with f4

rnbqkbnr
pppppppp
-+-+-+-+
+-+-+-+-
-+-+PP-+
+-+-+-+-
PPPP-+PP
RNBQKBNR

King’s Indian Attack


rnbqkbnr
pppppppp
-+-+-+-+
+-+-+-+-
-+-+P+-+
+-+P+NP-
PPPN-PBP
R-BQK-+R

Alekhin

1. e4 Nf6

1. e4 Nf6 2. Nc3 d5 3.exd5 Nxd5 4. Bc4

1. e4 Nf6 2. d3 and 3.f4 (sadly, this line has no real force
and
is not a very good line to adopt)

1. e4 Nf6 2. d3 and 3.g3/Bg2 (sadly, this line has no real
force
and is not a very good line to adopt)

Caro-Kann

1. e4 c6

1. e4 c6 2. d4 d5 3.Nc3 dxe4 4. Nxe4 Bf5 5. Ng3 Bg6 6. h4 h6
7.
Nh3 (Main line with 7.Nh3)

1. e4 c6 2. Nc3 d5 3.f4 (a line of the Dunst opening, 1.Nc3)

1. e4 c6 2. d3 d5 3.Nd2 (KIA vs. Alekhin)

French

1. e4 e6

1. e4 e6 2. d4 d5 3.Nc3 Nf6 4. Bg5 Be7 5. e5 Nfd7 6. h4
(Alekhin-Chatard Attack)

1. e4 e6 2. Nc3 d5 3.f4 (a line of the Dunst opening, 1.Nc3)

1. e4 e6 2. d3 d5 3.Nd2 (KIA vs. French)

Pirc/Modern

1. e4 …d6/…g6

1. e4 d6 2. d4 Nf6 3.Nc3 g6 4. f4 (Austrian Attack)

1. e4 d6 2. d4 Nf6 3.Nc3 g6 4. f4 (Austrian Attack)

1. e4 d6 2. d4 Nf6 3.Nc3 g6 4. Nge2 and 5. g3, 6. Bg2 (King
Fianchetto Variation)

Sicilian

1. e4 c5

Closed: without d4

1. e4 c5 2. Nf3 and 3.Be2 (idea 4. c3) or 3. Bb5(+) (Rossolimo
Variation)

1. e4 c5 2. f4 (Grand Prix Attack) or

1. e4 c5 2. Nc3 Nc6 3. g3 with 4. Bg2, 5. d3, 6. f4 (Closed
Variation)

1. e4 c5 2. Nf3 and 3.g3 (KIA vs. Sicilian)

I simply haven’t the courage to take on a repertoire which
includes the Open Sicilian, and my experience of playing the Black
side of the Sicilian is that not many White club players have
either! So I’ll leave those lines to you and any time you have to
do your own research. I have a feeling it’s something you come to
study as your chess improves. Analysis and Games


I’ll go through each approach in turn, looking at a system to
play against each defence.

I’ll concentrate more on the example games than the theory, and
more on the ‘piece attack’ lines than the others, because I think
that’s what you should be playing.


A. Piece attacks against the
common half-open defences

In each of these lines White has a straightforward plan of
campaign:

­ rapid development

­ keep Black passive

­ keep lines open if you can

­ keep an eye out for lightning raids


A1. Piece attacks vs.
Alekhin 1. e4 Nf6: 1. e4 Nf6 2. Nc3 d5 3. exd5 Nxd5 4.
Bc4

This is not a particularly well-regarded line for White – that
is, it is not considered to be a good way to try for advantage at
GM level. But it gives you game where you don’t have to learn much
sharp theory and you are playing the sort of game you like. It has
also been responsible for some amusing miniatures:

Ourmet,J – Cierniak,P (1) Paris,
1989

1. e4 d5 2. exd5 Nf6 3. Nc3 Nxd5 4. Bc4 Nxc3 5. Qf3 e6
6. Qxc3 Nc6 7. Nf3 b6

r+bqkb-r
p-p-+ppp
-pn+p+-+
+-+-+-+-
-+B+-+-+
+-Q-+N+-
PPPP-PPP
R-B-K-+R

8. Bb5 1-0

and

Iskov,G – Woge Nielsen,J, it,
Kobenhavn, 1989

1. e4 Nf6 2. Nc3 d5 3. e5 d4 4. Nce2 Ne4 5. c3 c5 6. d3
1-0


You must be prepared, after 1. e4 Nf6 2. Nc3, to play the Vienna
or other opening after 2…e5.

After 2…d5 3. exd5 Nxd5 4. Bc4 Black has a choice of moving
the knight (4…Nb6, 4…Nxc3) or finding some way to defend it
(4…c6, 4…e6):


|
Avoiding with 4…Nb6

White’s next is easy to find.

5. Bb3 c5

[5… Nc6 6. Qf3 e6 7. Nge2 Be7 8. d3 O-O 9. Bf4 Na5 10. Qg3
Bd6 11. Ne4 Nxb3 12. axb3 Bxf4 13. Nxf4

r+bq-rk+
ppp-+ppp
-n-+p+-+
+-+-+-+-
-+-+NN-+
+P+P+-Q-
-PP+-PPP
R-+-K-+R

+= Tietze-Neumann, corr; the Knights are nicely
placed]

6. Qh5 e6 7. d3 Nc6 8. Bg5 +=

[This is the best move, but an example with 8. Nf3 went
8…Be7 9. Ng5 g6 10. Qh6 Bf8 11. Qh3 Bg7 12. Nge4 Nd5 13. Bh6
e5

r+bqk+-r
pp+-+pbp
-+n+-+pB
+-pnp-+-
-+-+N+-+
+BNP+-+Q
PPP+-PPP
R-+-K-+R

White plays a likely-looking Queen sacrifice.

14. Bxg7 Bxh3 15. Nxd5 Qa5+ 16. Kf1 O-O-O 17. Bxh8 Rxh8 18.
gxh3

-+k+-+-r
pp+-+p+p
-+n+-+p+
q-pNp-+-
-+-+N+-+
+B+P+-+P
PPP+-P-P
R-+-+K+R

Visser-Spanjaard 1948; White is better, as the Black pieces
can’t get going]

]

Avoiding with 4… Nxc3

White has a cunning reply to this move.

5. Qf3 e6 6. Qxc3

rnbqkb-r
ppp-+ppp
-+-+p+-+
+-+-+-+-
-+B+-+-+
+-Q-+-+-
PPPP-PPP
R-B-K-NR

6… Qg5 7. Nf3

[7. Kf1 +=]

7… Qxg2 8. Rg1 Qh3

rnb+kb-r
ppp-+ppp
-+-+p+-+
+-+-+-+-
-+B+-+-+
+-Q-+N+q
PPPP-P-P
R-B-K-R-

]

White has compensation for the sacrificed pawn.


Defending with 4… c6

Again, the Qf3 move is strong; Black is obliged to lock in the
Bc8.

5. Qf3 Be6 6. Nge2 Nc7 7. Bxe6 Nxe6 8. d4

[8. d3 += is good enough]

8… Nxd4 9. Nxd4 Qxd4 10. Be3 Qb4 11. O-O-O e5
?

[11… e6]

12. Qf5 f6 13. Ne4 Be7 14. Qe6

rn-+k+-r
pp+-b-pp
-+p+Qp-+
+-+-p-+-
-q-+N+-+
+-+-B-+-
PPP+-PPP
+-KR+-+R

+- Potengowski-Kerckhoff, 1930; White has a clear
advantage]

Defending with 4… e6

White places his pieces as actively as possible.

5. Qf3 Nb4 ?! 6. Bb3 N8c6 7. Nge2 Be7 8. a3 Ne5 9. Qg3
Nbc6 10. d4

r+bqk+-r
ppp-bppp
-+n+p+-+
+-+-n-+-
-+-P-+-+
PBN-+-Q-
-PP+NPPP
R-B-K-+R

+/- Bellon-Alburt 1978]

White is better placed.


Example games
A1

|


Karaklajic,N – Marjanovic,Z (3) Pula, 1990 [B02]

1. e4 Nf6 2. Nc3 d5 3. exd5 Nxd5 4. Bc4 Nb6 5. Bb3 c5 6.
Qh5

rnbqkb-r
pp+-pppp
-n-+-+-+
+-p-+-+Q
-+-+-+-+
+BN-+-+-
PPPP-PPP
R-B-K-NR

Again, White tries to get Black to play …e6; Black
resists.

6… c4 7. Bxc4 Nxc4 8. Qb5+ Nc6 9. Qxc4 Qd4 10. Qxd4
Nxd4 11. Kd1

r+b+kb-r
pp+-pppp
-+-+-+-+
+-+-+-+-
-+-n-+-+
+-N-+-+-
PPPP-PPP
R-BK+-NR

White is a pawn up and just needs to survive the next few moves
to reach a winning endgame.

11… Bf5 12. d3 O-O-O 13. Be3 e5 14. Nge2 Bc5 15. Re1
Nxe2 16. Kxe2 Bxe3 17. Kxe3 Rhe8 18. f3 h5 19. a4 g5 20. h3 g4 21.
hxg4 hxg4 22. f4 Rd4 23. fxe5 Rxe5+ 24. Kd2 1-0


Lendwai – Neckar,L, Nova-Park/SW,2,21, 1989 [B02]

1. e4 Nf6 2. Nc3 d5 3. exd5 Nxd5 4. Bc4 e6 5. Nf3 Be7 6.
O-O O-O 7. Re1 Nb6 8. Bb3 c5 9. d3 Nc6 10. a3 Nd5 11. Ne4 b6 12.
Qe2 Qc7

r+b+-rk+
p-q-bppp
-pn+p+-+
+-pn+-+-
-+-+N+-+
PB+P+N+-
-PP+QPPP
R-B-R-K-

Neat Knights!

13. Bd2 Nf4 14. Qe3 Nd5 15. Qe2 h6 16. Ng3 Nf6 17. Bc3
Bb7 18. h4

An adventurous pawn

18…Rad8 19. Ng5 hxg5 20. hxg5 Nd5 21. g6 Nf4 22. gxf7+
Rxf7 23. Qg4 Nd4 24. Bxd4 Rxd4

-+-+-+k+
pbq-brp-
-p-+p+-+
+-p-+-+-
-+-r-nQ+
PB+P+-N-
-PP+-PP+
R-+-R-K-

Now an enterprising sacrifice to expose the Black King. White
can regain the exchange with Bb3xe6 xf7 but hopes for more.

25. Rxe6 Nxe6 26. Qxe6 Qf4 27. Nf5 c4 28. Nxe7+ Kh7 29.
Qg6+ Kh8 30. Qh5+ Qh6 31. Qxf7 Rd8 32. Bxc4 1-0


Madl,I – Guadalpi,D (1) Val-Thorens, 1989 [B02]

1. e4 d5 2. exd5 Nf6 3. Nc3 Nxd5 4. Bc4 Nxc3 5. bxc3 g6
6. Qf3 e6 7. Ne2 Bg7 8. Ba3 Nc6 9. d4 Ne7 10. O-O O-O 11. Ng3 Re8
12. Rfe1 Rb8

-rbqr+k+
ppp-npbp
-+-+p+p+
+-+-+-+-
-+BP-+-+
B-P-+QN-
P+P+-PPP
R-+-R-K-

White has good chances for an attack.

13. Ne4 Nf5 14. Rad1 b5 15. Bd3 a5 16. Bc1 Bb7 17. Qe2
Bxe4 18. Bxe4 Qe7 19. Bxf5 gxf5 20. Rd3 b4 21. Rg3 Kh8 22. Qh5 Qf8
23. Bf4 Rb7

-+-+rq-k
+rp-+pbp
-+-+p+-+
p-+-+p+Q
-p-P-B-+
+-P-+-R-
P+P+-PPP
+-+-R-K-

Black undoubtedly missed White’s idea when considering his last
few moves.

24. Rxg7 1-0


Weiss,M – Shields,P (5), Chicago, 1989 [B02]

1. e4 Nf6 2. Nc3 d5 3. exd5 Nxd5 4. Bc4 e6 5. Qf3 Nxc3
6. Qxc3 Nc6 7. Nf3 Qd6 8. a3 Bd7 9. O-O O-O-O

-+kr-b-r
pppb+ppp
-+nqp+-+
+-+-+-+-
-+B+-+-+
P-Q-+N+-
-PPP-PPP
R-B-+RK-

Black skips to the Queen’s-side

10. d4 Be7 11. Be3 Bf6 12. Rad1 Ne7 13. Ne5 Be8 14. Bf4
Nf5 15. Ng6 e5

-+krb+-r
ppp-+ppp
-+-q-bN+
+-+-pn+-
-+BP-B-+
P-Q-+-+-
-PP+-PPP
+-+R+RK-

This central break is the right sort of idea for Black, but goes
very wrong here.

16. dxe5 Qxd1 17. exf6 Bc6 18. Qe5 Rd7 19. Rxd1 Rxd1+
20. Bf1 Nd6 21. Nxh8 Bb5 22. Qxb5 Nxb5 23. fxg7 1-0


I have spent quite a while on the Alekhin’s, not
because it’s a very common line but

­ you won’t find much on the Bc4 plan in the
books

­ the White plan is exactly what you should be
doing in all the recommended lines below.


A2. Piece attacks vs.
Caro-Kann Defence

All the main lines in the books continue:

1. e4 c6 2. d4 d5

and now

3. Nc3 dxe4 4. Nxe4

You may find players who will try and gum the whole position up
with 3…g6. tempting 4. e5. You can play 4. h3 but the resulting
positions are rather dull If you don’t like that idea, try
instead

3. Nd2

when 3…g6 can be met by 4. c3, keeping the tension in the
centre, and

3…dxe4 4. Nxe4

gives us the starting position from the books.

Black has tried 3…Nf6 e.g.


Tal-Campomanes, Leipzig Olympiad 1960 [B15]

1. e4 c6 2. d4 d5 3. Nc3 Nf6 4. e5 Nfd7 5. e6 fxe6 6. Bd3 Nf6 7.
Nf3 g6 8. h4 c5 9. dxc5 Nc6 10. Qe2 Bg7 11. Bd2 Qc7 12. O-O-O e5
13. Bg5 Be6 14. Nb5 Qb8 15. h5 gxh5 16. Nfd4 Bg4 17. f3 e4 18. fxg4
Nxd4 19. Nxd4 exd3 20. Rxd3 Ne4 21. Nf5 Qe5 22. Nxg7+ Qxg7 23. Rxd5
Nxg5 24. Qb5+ Kf7 25. Rf1+ Kg6 26. Qd3+ Kh6 27. Rh1 1-0


A2.1 Solid line with 4…
Nd7

White places his pieces actively in the hope of forcing …e6
before the Bc8 escapes.

5. Bc4 Ngf6 6. Ng5 e6 7. Qe2 Nb6

[7… h6 8. Nxf7 Kxf7 9. Qxe6+ Kg6 10. Bd3+ Kh5 11.
Qh3#]

8. Bd3 h6

[8… Qxd4 is too dangerous:

9. N1f3

idea Ne5,Ng5xf7

9… Bb4+ 10. c3 Bxc3+ 11. Kf1 Qc5 12. bxc3 Qxc3 13. Bb2
Qa5

r+b+k+-r
pp+-+ppp
-np+pn-+
q-+-+-N-
-+-+-+-+
+-+B+N+-
PB-+QPPP
R-+-+K+R

White has great play for the pawn]

9. N5f3 c5 10. dxc5 Bxc5 11. Ne5 Nbd7 12. Ngf3 O-O 13.
Bd2 Nxe5 14. Nxe5 Bd4

[14… Qd5 15. O-O-O Qxa2 16. c3]

15. O-O-O Qd5 16. f4 Qxa2 17. c3 Bc5 18. g4 Nd5 19. g5
Qa1+ 20. Bb1 g6 21. gxh6 b5 22. Qd3 Ba3 23. Qc2 Bb7 24. Rhg1
Rfc8

r+r+-+k+
pb+-+p+-
-+-+p+pP
+p+nN-+-
-+-+-P-+
b-P-+-+-
-PQB-+-P
qBKR+-R-

Ripe for picking, I’d say.

25. Rxg6+ Kf8 26. h7 Ke7 27. Rg7 b4

[27… Rf8 28. Ng6+ Kf6 29. Nxf8 Kxg7 30. h8=Q+ Kxh8 31.
Qh7#]

28. Rxf7+ Kd6 29. Rd7+ Kc5 30. Rxb7 1-0

Kirpichnikov-Lein, 1974]


A2.2. Lines with 4… Nf6

5. Nxf6+

…and Black has a choice of captures.


A2.2.1 Tartakower Variation, 5…
exf6

This is a dull line for Black. The most straightforward
attacking line against it is

6. c3 Bd6 7. Bd3 O-O 8. Ne2 Re8 9. Qc2 g6 10.
h4

See example games.


A2.2.2 Bronstein-Larsen line,
5…gxf6

This is the more dynamic line; Black hopes to make good use of
the half-open files.

6. Nf3 Bg4

[6… Bf5

is the normal-looking move, but it isn’t very good here
e.g.

7. Bd3 Bg6 8. O-O Qc7 9. c4 Nd7 10. d5 O-O-O 11. Be3 e5 12.
Be2 Kb8

[12… c5 13. Nh4]

13. Rc1 f5 14. c5

-k-r-b-r
ppqn+p+p
-+p+-+b+
+-PPpp+-
-+-+-+-+
+-+-BN+-
PP-+BPPP
+-RQ+RK-

14… cxd5 15. c6 bxc6 16. Bb5]

7. Be2 Qc7 8. h3 Bh5 9. O-O Nd7

[9… e6 is better, but White should still get a good
attacking game after 10. c4 Nd7 11. d5 O-O-O]

10. d5 Rd8 11. c4 Nb6 12. Be3 Bxf3

[12… cxd5 13. cxd5 Nxd5

[13… Rxd5 14. Bxb6 Rxd1 15. Bxc7]

14. Bb5+]

13. Bxb6 axb6 14. Bxf3 cxd5 15. cxd5 Bh6 16. Qa4+ Kf8
+/- Smyslov-Pachman 1964]


|
A2.3 Classical Variation with 4…Bf5

Now play:

5. Ng3 Bg6 6. h4 h6 7. Nh3

This is the most exciting line. The main line goes something
like:

7. Nf3 Nd7 8. h5 Bh7 9. Bd3 Bxd3 10. Qxd3 Qc7 11. Bd2 e6 12.
O-O-O Ngf6 13. Qe2 O-O-O 14. Ne5

-+kr-b-r
ppqn+pp-
-+p+pn-p
+-+-N-+P
-+-P-+-+
+-+-+-N-
PPPBQPP+
+-KR+-+R

…when White has a small advantage which is difficult to make
any use of.

7… Nf6 8. Nf4 Bh7 9. Bc4 e6 10. O-O Bd6

Now we see the point of the Nf4 move:

11. Nxe6 fxe6 12. Bxe6

rn-qk+-r
pp+-+-pb
-+pbBn-p
+-+-+-+-
-+-P-+-P
+-+-+-N-
PPP+-PP+
R-BQ+RK-

White has good chances for attack, although if the attack fails,
the missing piece will lose the game.

12… Qc7 13. Re1

[13. Nh5 may be better]

13… Nbd7 14. Bg8+ Kf8 15. Bxh7 Rxh7

and Black is holding on.


Example games
A2

Kavalek-Andersson 1978

1. e4 c6 2. d4 d5 3. Nd2

Kavalek actually played 3. Nc3

3…dxe4 4. Nxe4 Nf6 5. Nxf6+ exf6 6.c3 Bd6 7. Bd3 O-O
8. Ne2 Re8 9. Qc2 g6 10. h4 Nd7 11. h5 Nf8 12. Bh6 Qc7 13. O-O-O
Be6

[13… b5 14. Rh4]

14. c4 Rad8 15. hxg6 fxg6 16. c5 Be7 17. Nf4 Bf7 18.
Bc4

-+-rrnk+
ppq-bb+p
-+p+-ppB
+-P-+-+-
-+BP-N-+
+-+-+-+-
PPQ+-PP+
+-KR+-+R

The Bf7 must be exchanged.

18… Rd5

[18… Bxc4 19. Qxc4+ Kh8 20. Qf7 Bd6 21. Bg7#]

19. Rde1 Red8 20. Bxd5 cxd5 21. Re3 Rd7 22. Rhe1
g5

else Qe2 and Re8+

23. Bxf8 Bxf8 24. Rh1 h6 25. Ng6 Bxc5 26. Rc3 Bd6 27.
Rxh6 Kg7 28. Nf8 Kxf8

[28… Bg8 29. Nxd7]

29. Rh8+ Ke7 30. Qe2+ Be6 31. Rh7+

-+-+-+-+
ppqrk-+R
-+-bbp-+
+-+p+-p-
-+-P-+-+
+-R-+-+-
PP-+QPP+
+-K-+-+-

White, who has conducted the attack with great accuracy, finds
an equally crisp finish.

1-0

[31… Kf8 32. Rxc7 Bxc7 33. Qxe6 Rxh7 34. Qc8+]

[31… Kd8 32. Qxe6 Rxh7 33. Qg8+]


De Armas,A – Jensen,C (7) Novi, 1990 [B18]

1. e4 c6 2. d4 d5 3. Nd2 dxe4 4. Nxe4 Bf5 5. Ng3 Bg6 6.
h4 h5 7. N1e2 e6 8. Nf4 Ne7 9. c3 Nd7 10. Nxg6 Nxg6 11. Nxh5 Nxh4
12. g3

r+-qkb-r
pp+n+pp-
-+p+p+-+
+-+-+-+N
-+-P-+-n
+-P-+-P-
PP-+-P-+
R-BQKB+R

The open h-file looks dangerous for both sides, but Black must
retreat.

12… Ng6 13. Bd3 Rh7 14. Qc2

r+-qkb-+
pp+n+ppr
-+p+p+n+
+-+-+-+N
-+-P-+-+
+-PB+-P-
PPQ+-P-+
R-B-K-+R

Suddenly, White looks much the better.

14… f5 15. Qb3 Ne7 16. Qxe6 g6 17. Bg5 Qa5 18.
O-O-O

r+-+kb-+
pp+nn-+r
-+p+Q+p+
q-+-+pBN
-+-P-+-+
+-PB+-P-
PP-+-P-+
+-KR+-+R

White is looking very good!

18… Rxh5

[18… gxh5 19. Rde1 O-O-O 20. Re5 Qa4 21. Bxf5 Rg7

-+kr-b-+
pp+nn-r-
-+p+Q+-+
+-+-RBBp
q+-P-+-+
+-P-+-P-
PP-+-P-+
+-K-+-+R

19. Bxe7 Qd5 20. Qxg6+ Kxe7 21. Rxh5

r+-+-b-+
pp+nk-+-
-+p+-+Q+
+-+q+p+R
-+-P-+-+
+-PB+-P-
PP-+-P-+
+-KR+-+-

Enough! 1-0


Haas,C – Trachsel, Arosa, 1990 [B18]

1. e4 c6 2. d4 d5 3. Nc3 dxe4 4. Nxe4 Bf5 5. Ng3 Bg6 6.
h4 h6 7. Nh3 Nf6 8. Nf4 Bh7 9. c3 e6 10. Bc4 Nd5 11.
Qg4

rn-qkb-r
pp+-+ppb
-+p+p+-p
+-+n+-+-
-+BP-NQP
+-P-+-N-
PP-+-PP+
R-B-K-+R

Black now exchanges one his two developed pieces, bringing
another White piece into play.

11… Nxf4 12. Bxf4 Qf6 13. Kf1 Nd7 14. Re1 O-O-O 15.
Rh3 Bf5

-+kr-b-r
pp+n+pp-
-+p+pq-p
+-+-+b+-
-+BP-BQP
+-P-+-NR
PP-+-PP+
+-+-RK+-

Winning the exchange? This was actually a cunning trap for Black
to fall into.

16. Qf3 Bxh3 17. Qxc6+ 1-0


Rodriguez,Danie – Ruxton,K (6) WchJ, 1989 [B18]

1. e4 c6 2. d4 d5 3. Nc3 dxe4 4. Nxe4 Bf5 5. Ng3
Bg6

Here White adopts a slightly different move order to the
recommended line above.

6. N1e2 e6 7. Nf4 Bd6 8. h4

rn-qk+nr
pp+-+ppp
-+pbp+b+
+-+-+-+-
-+-P-N-P
+-+-+-N-
PPP+-PP+
R-BQKB+R

Again, Black is prompted to exchange on f4.

8… Bxf4 9. Bxf4 h6 10. h5 Bh7 11. c3 Nf6 12. Qb3 Qe7
13. Be5 b6 14. O-O-O O-O 15. Bd3 Bxd3 16. Rxd3 Nbd7 17. Kb1 Ng4 18.
Re1

r+-+-rk+
p-+nqpp-
-pp+p+-p
+-+-B-+P
-+-P-+n+
+QPR+-N-
PP-+-PP+
+K+-R-+-

White simply plays to dominate the d-file after the exchange on
e5.

18… Ngxe5 19. dxe5 Nc5 20. Qa3 Qg5 21. Rd4 Rfd8 22.
Red1 Rd5 23. b4 Nd7 24. c4 Rxd4 25. Rxd4 Qe7 26. f4 c5 27. b5 f6
28. exf6 Nxf6 29. Rd2 e5 30. fxe5 Qxe5 31. Qd3

r+-+-+k+
p-+-+-p-
-p-+-n-p
+Pp-q-+P
-+P+-+-+
+-+Q+-N-
P+-R-+P+
+K+-+-+-

Black’s position is loose and he must be very careful…

31… Rf8 32. Re2 Qf4 33. Nf5 Re8

-+-+r+k+
p-+-+-p-
-p-+-n-p
+Pp-+N+P
-+P+-q-+
+-+Q+-+-
P+-+R+P+
+K+-+-+-

34. Ne7+ Kf7 35. Qg6+ Kf8

-+-+rk-+
p-+-N-p-
-p-+-nQp
+Pp-+-+P
-+P+-q-+
+-+-+-+-
P+-+R+P+
+K+-+-+-

36. Qxe8+ Kxe8 37. Nd5+ 1-0

…More careful than that, anyway


Schlindwein,R – Hugger,M (1) Badenweiler, 1990
[B18]

1. e4 c6 2. d4 d5 3. Nc3 dxe4 4. Nxe4 Bf5 5. Ng3 Bg6 6.
N1e2 h6 7. Nf4 Bh7 8. Bc4 e6 9. O-O Nf6 10. Re1 Nd5

rn-qkb-r
pp+-+ppb
-+p+p+-p
+-+n+-+-
-+BP-N-+
+-+-+-N-
PPP+-PPP
R-BQR-K-

The pin on the e-file can be exploited.

11. Bxd5 cxd5 12. Qh5 Qg5

[12… g6 13. Qxd5 Nc6]

13. Rxe6+ Kd8 14. Qxf7 Nc6 15. Re8# 1-0

A3. Piece attacks vs. French
1. e4 e6: 1. e4 e6 2. d4 d5 3. Nc3 Nf6 4. Bg5 Be7 5. e5 Nfd7 6. h4
(Albin-Alekhin-Chatard Attack)

Well, you won’t get the Alekhin line in every game. The French
starts:

1. e4 e6

Now play the natural sequence

2. d4 d5 3. Nc3

Black now has an important choice: safe or brave?


A3.1. Rubinstein Variation
3…dxe4 4. Nxe4

rnbqkbnr
ppp-+ppp
-+-+p+-+
+-+-+-+-
-+-PN+-+
+-+-+-+-
PPP+-PPP
R-BQKBNR

This is a solid line but Black lacks counterplay.


A3.1.1 Rubinstein Variation with
4…Nf6

1. e4 e6 2. d4 d5 3. Nc3 dxe4 4. Nxe4 Nf6

White can get an advantage through straightforward moves:

5. Nxf6+ gxf6

(5…Qxf6 6. Nf3 h6 7. Bd3

rnb+kb-r
ppp-+pp-
-+-+pq-p
+-+-+-+-
-+-P-+-+
+-+B+N+-
PPP+-PPP
R-BQK-+R

6. Nf3 b6 7. Bb5+ c6 8. Bc4 Bb7 9. Bf4 Bd6 10. Bg3 Qc7
11. Qe2 Nd7 12. O-O O-O-O 13. Ba6

-+kr-+-r
pbqn+p+p
Bppbpp-+
+-+-+-+-
-+-P-+-+
+-+-+NB-
PPP+QPPP
R-+-+RK-

Liublinsky-Ufimsev 1945.


A3.1.2 Rubinstein Variation with
4…Bd7

1. e4 e6 2. d4 d5 3. Nc3 dxe4 4. Nxe4 Bd7

This

Stonewall

variation recently had some recommendations with the idea of
getting a line for the Bishop with Bc6, but White shouldn’t be
short of play:

5. Nf3 Bc6 6. Bd3

rn-qkbnr
ppp-+ppp
-+b+p+-+
+-+-+-+-
-+-PN+-+
+-+B+N+-
PPP+-PPP
R-BQK-+R

6…Nf6

(6…Nd7 may be better)

7. Nxf6+ gxf6 8. Qe2

rn-qkb-r
ppp-+p+p
-+b+pp-+
+-+-+-+-
-+-P-+-+
+-+B+N+-
PPP+QPPP
R-B-K-+R

+/- Levy.


A3.1.3 Rubinstein Variation with
4…Nd7

1. e4 e6 2. d4 d5 3. Nc3 dxe4 4. Nxe4 Nd7

The main line, which, however, promises Black little. There have
been many lines explored here but as an example you could play
over:

5. Nf3 Nf6 6. Nxf6+ Nxf6 7. Ne5

r+bqkb-r
ppp-+ppp
-+-+pn-+
+-+-N-+-
-+-P-+-+
+-+-+-+-
PPP+-PPP
R-BQKB+R

White has a small advantage with easy development. Tarrasch
showed us several times how to play these positions: see EG.


A3.2. Guimard Variation 3.
… Nc6

r+bqkbnr
ppp-+ppp
-+n+p+-+
+-+p+-+-
-+-PP+-+
+-N-+-+-
PPP+-PPP
R-BQKBNR

In this line, Black cannot play the natural counterattck …c5,
and the other break with …f6 is riskier. Now

4. e5

r+bqkbnr
ppp-+ppp
-+n+p+-+
+-+pP-+-
-+-P-+-+
+-N-+-+-
PPP+-PPP
R-BQKBNR

4…Nge7 5. Nce2 Nf5 6. Nf3 b6 7. Nf4+/-

r+bqkb-r
p-p-+ppp
-pn+p+-+
+-+pPn+-
-+-P-N-+
+-+-+N+-
PPP+-PPP
R-BQKB+R

leaves Black without scope, so Black should prefer

4…f6

when, after

5. exf6 Nxf6 6. Nf6 Bd6 7. Bg5 O-O 8. Bd3 Bd7 9. Qd2 Qe8
10. O-O-O Qh5 11.Rde1

r+-+-rk+
pppb+-pp
-+nbpn-+
+-+p+-Bq
-+-P-+-+
+-NB+N+-
PPPQ-PPP
+-K-R-+R

White has pressure along the e-file and is in any event more
actively placed.


A3. 3. Classical Variation,
3…Nf6

This is met by:

4. Bg5

rnbqkb-r
ppp-+ppp
-+-+pn-+
+-+p+-B-
-+-PP+-+
+-N-+-+-
PPP+-PPP
R-+QKBNR


The natural reply here is the balancing …Be7 but Black has two
alternatives: …Bb4 and …dxe4.


A3.3.1. The Burn Variation, 4…
dxe4

rnbqkb-r
ppp-+ppp
-+-+pn-+
+-+-+-B-
-+-Pp+-+
+-N-+-+-
PPP+-PPP
R-+QKBNR

This has obvious links with the Rubinstein line.

5. Nxe4 Be7 6. Bxf6

And Black has tried both recaptures:


6…Bxf6 (Variation 1)

rnbqk+-r
ppp-+ppp
-+-+pb-+
+-+-+-+-
-+-PN+-+
+-+-+-+-
PPP+-PPP
R-+QKBNR

Black has the two bishops and is solid; White can claim only a
small advantage.

7. Nf3 Nd7 8. Qd2 O-O 9.O-O-O b6 10. d5 Ne5 11. Qf4 Ng6
12. Nxf6+ Qxf6 13. Qxf6 gxf6

r+b+-rk+
p-p-+p+p
-p-+ppn+
+-+P+-+-
-+-+-+-+
+-+-+N+-
PPP+-PPP
+-KR+B+R

…when White hopes that the greater harmony of the pawns will
give the advantage.


6… gxf6 (Variation 2)

rnbqk+-r
ppp-bp+p
-+-+pp-+
+-+-+-+-
-+-PN+-+
+-+-+-+-
PPP+-PPP
R-+QKBNR

A more risky and more dynamic try.

After 7. Nf3 Black hopes the two bishops and open d- and g-files
will give active play. White should develop properly and aim for
d5, breaking open the position.


|
A3.3.2. The MacCutcheon Variation, 4… Bb4

rnbqk+-r
ppp-+ppp
-+-+pn-+
+-+p+-B-
-b-PP+-+
+-N-+-+-
PPP+-PPP
R-+QKBNR

This line still offers Black some prospects of a
counterattacking game, but is not as good as the Winawer.

5. e5 h6 6. Bd2 Bxc3 7. bxc3 Ne4 8. Qg4 g6 9. Bd3 Nxd2
10. Kxd2 c5 11. Qf4 Nc6 12. Nf3

r+bqk+-r
pp+-+p+-
-+n+p+pp
+-ppP-+-
-+-P-Q-+
+-PB+N+-
P+PK-PPP
R-+-+-+R

White has the idea of dxc5 and Nd4, with advantage.

A3.3.3. The Classical Variation 4… Be7
(and Alekhin Chatard attack with 6. h4)

rnbqk+-r
ppp-bppp
-+-+pn-+
+-+p+-B-
-+-PP+-+
+-N-+-+-
PPP+-PPP
R-+QKBNR

Again White’s move is easy to remember:

5. e5 Nfd7

rnbqk+-r
pppnbppp
-+-+p+-+
+-+pP-B-
-+-P-+-+
+-N-+-+-
PPP+-PPP
R-+QKBNR

6. h4

This is, at last, the Alekhin-Chatard Attack. White offers a
pawn for chances of attack. Just how good this line can be is shown
by the following miniature:

Zuber,M – Halmkin,P (Exeter Vs
Teignmouth, 1995)

1. e4 e6 2. d4 d5 3. Nc3 Nf6 4. Bg5 Be7 5. e5 Nfd7 6. h4
Bxg5 7. hxg5 Qxg5 8. Nh3 Qe7 9. Qg4 g6 10. Bd3 b6 11. Nf4 Ba6 12.
Bxg6 fxg6 13. Nxe6 Nf8 14. Nxd5 Nxe6 15. Nxe7 1-0

Good, isn’t it?

Black has various ways of declining the gambit, but none are
very promising (analysis from BCO2 and elsewhere):


Declining with 6… f6

7. Qh5+ Kf8

[or 7… g6 8. exf6 gxh5 9. fxe7 Qxe7 10. Bxe7 Kxe7

rnb+-+-r
pppnk-+p
-+-+p+-+
+-+p+-+p
-+-P-+-P
+-N-+-+-
PPP+-PP+
R-+-KBNR


Declining with 6… c5

7. Bxe7 Qxe7 8. Nb5 +=


Declining with 6… h6

7. Be3 c5 8. Qg4 g6 9. Nf3 +=

Hellers-Barayev 1986


Declining with 6… a6

7. Qg4 Bxg5 8. hxg5 c5 9. g6 f5 10. Qg3 h6 11. Nf3 O-O
12. O-O-O Nc6 13. Ne2

r+bq-rk+
+p+n+-p-
p+n+p+Pp
+-ppPp+-
-+-P-+-+
+-+-+NQ-
PPP+NPP+
+-KR+B+R

+=/unclear BCO2


Declining with 6… O-O

7. Qg4 f5 8. exf6 Nxf6 9. Qg3 c5 10. dxc5 Nbd7 11. O-O-O
Nxc5 12. Bd3 b5

r+bq-rk+
p-+-b-pp
-+-+pn-+
+pnp+-B-
-+-+-+-P
+-NB+-Q-
PPP+-PP+
+-KR+-NR

unclear: Kupreichik-Moskalenko 1986


The Gambit accepted: 6…Bxg5

7. hxg5 Qxg5 8. Nh3 Qe7 9. Nf4 Nc6

rnb+k+-r
pppnqppp
-+-+p+-+
+-+pP-+-
-+-P-N-+
+-N-+-+-
PPP+-PP+
R-+QKB+R

The N goes to h3 instead of f3 to allow Q to move to g4 when
White has good prospects of attack.

Black has a couple of alternatives to 9…Nc6:

[9… f5 10. Qh5+ Qf7 11. Nxe6 g6 12. Nxc7+ Kd8 13.
Qf3

rnbk-+-r
ppNn+q+p
-+-+-+p+
+-+pPp+-
-+-P-+-+
+-N-+Q+-
PPP+-PP+
R-+-KB+R

+- BCO2

13… Kxc7 14. Nxd5+ Kd8 15. Bc4]

[9… Nf8 10. Qg4 f5 11. exf6 gxf6 12. O-O-O: see example
games]

[9… a6 10. Qg4 Kf8 11. Qf3 Kg8 12. Bd3 c5

[12… h6]

13. Bxh7+

rnb+-+kr
+p+nqppB
p+-+p+-+
+-ppP-+-
-+-P-N-+
+-N-+Q+-
PPP+-PP+
R-+-K-+R

Keres-Wade 1954]

10. Qg4 Nxd4 11. O-O-O Nf5 12. Nfxd5

r+b+k+-r
pppnqppp
-+-+p+-+
+-+NPn+-
-+-+-+Q+
+-N-+-+-
PPP+-PP+
+-KR+B+R

With compensation, according to BCO2


A3.4. The Winawer variation,
3… Bb4 and Alekhin Gambit 4. Nge2

rnbqk+nr
ppp-+ppp
-+-+p+-+
+-+p+-+-
-b-PP+-+
+-N-+-+-
PPP+-PPP
R-BQKBNR

Black takes a risky decision – to attack White’s Knight but with
the important dark-squared bishop. White has the main try 4. e5 but
also some ways of avoiding these critical lines, including the
gambit lines 4. Nge2 and 4. a3, and the Winawer Exchange 4.
exd5.

4. Nge2

Another Alekhin Gambit

rnbqk+nr
ppp-+ppp
-+-+p+-+
+-+p+-+-
-b-PP+-+
+-N-+-+-
PPP+NPPP
R-BQKB+R

Black is advised not to hang on to the pawn, but to concentrate
on good development instead.

4… dxe4 5. a3 Be7 6. Nxe4 Nf6

rnbqk+-r
ppp-bppp
-+-+pn-+
+-+-+-+-
-+-PN+-+
P-+-+-+-
-PP+NPPP
R-BQKB+R

An open game with about equal chances has resulted.


Example games
A3

A3.3.3 Examples of the Alekhin-Chatard
Attack

|
Alekhin – Fahrni, Mannheim, 1914

This is an early game that showed us all the way.

1. e4 e6 2. d4 d5 3. Nc3 Nf6 4. Bg5 Be7 5. e5 Nfd7 6. h4
Bxg5 7. hxg5 Qxg5 8. Nh3

rnb+k+-r
pppn+ppp
-+-+p+-+
+-+pP-q-
-+-P-+-+
+-N-+-+N
PPP+-PP+
R-+QKB+R

The key move in the Gambit Accepted.

8… Qe7 9. Nf4 Nf8 10. Qg4 f5 11. exf6 gxf6 12. O-O-O
c6 13. Re1 Kd8

[13… Na6 14. Bxa6 bxa6 15. Nfxd5 cxd5 16. Nxd5 Qf7 17.
Qf4]

14. Rh6 e5 15. Qh4 Nbd7 16. Bd3 e4 17. Qg3
Qf7

r+bk-n-r
pp+n+q+p
-+p+-p-R
+-+p+-+-
-+-PpN-+
+-NB+-Q-
PPP+-PP+
+-K-R-+-

18. Bxe4 dxe4 19. Nxe4 Rg8 20. Qa3!

Great idea.

20… Qg7 21. Nd6 Nb6 22. Ne8 Qf7 23. Qd6+ Qd7 24.
Qxf6+

r+bkNnr+
pp+q+-+p
-np+-Q-R
+-+-+-+-
-+-P-N-+
+-+-+-+-
PPP+-PP+
+-K-R-+-

1-0


Cid,M – Araya,R (4) Copa, 1989[C13]

1. e4 e6 2. d4 d5 3. Nc3 Nf6 4. Bg5 Be7 5. e5 Nfd7 6. h4
a6

Declined

7. Qg4 Bxg5 8. hxg5 c5 9. g6 f5 10. Qf4 h6 11. Nf3 O-O
12. dxc5 Qe8 13. O-O-O

rnb+qrk+
+p+n+-p-
p+-+p+Pp
+-PpPp+-
-+-+-Q-+
+-N-+N+-
PPP+-PP+
+-KR+B+R

The g-pawn is tempting…

13… Qxg6 14. Nxd5

A characteristic sac.

14…exd5 15. Rxd5 Qg4 16. Qd2 f4 17. Rh4 Qe6 18. Bc4
Kh8 19. Rxf4 Rxf4 20. Qxf4 Qe7 21. Nh4 Qe8 22. Rd6

rnb+q+-k
+p+n+-p-
p+-R-+-p
+-P-P-+-
-+B+-Q-N
+-+-+-+-
PPP+-PP+
+-K-+-+-

Black’s useless Q-side pieces are all still in bed.

1-0


Djurhuus,R – Minero,S (7) Santiago, 1990[C13]

1. Nc3 d5 2. e4 e6 3. d4 Nf6 4. Bg5 Be7 5. e5 Nfd7 6. h4
a6

Declined

7. Qg4 Kf8 8. Qf4 c5 9. dxc5 Nc6 10. Nf3 Nxc5 11. O-O-O
b5 12. Rh3

r+bq-k-r
+-+-bppp
p+n+p+-+
+pnpP-B-
-+-+-Q-P
+-N-+N+R
PPP+-PP+
+-KR+B+-

The position is still not easy for Black

12… Bd7 13. Kb1 b4 14. Ne2 Ne4 15. Bxe7+ Qxe7 16. Ng5
Nc5 17. h5 h6 18. Nf3 Ne4 19. Qe3 a5 20. Ng3 Nc5 21. Nd4 a4 22. f4
b3 23. cxb3 Nxd4 24. Rxd4 axb3 25. a3 Rb8 26. Rb4 Rc8 27. Ne2 Ba4
28. Qd4 Bd7 29. Nc1 g6 30. hxg6 fxg6 31. Nxb3 Kg7 32. Nxc5 Rxc5 33.
Rg3 Rhc8

-+r+-+-+
+-+bq-k-
-+-+p+pp
+-rpP-+-
-R-Q-P-+
P-+-+-R-
-P-+-+P+
+K+-+B+-

At last the K-side attack comes!

34. f5 Rc1+ 35. Ka2 Rxf1 36. f6+ Rxf6 37. exf6+
Qxf6

And White won with the exhange and extra pawns.

38. Qa7 Rd8 39. Rb7 Qe7 40. Rc3 Kf8 41. Qb6 Kf7 42. Qe3
Qg5 43. Qd4 h5 44. Rf3+ Kg8 45. a4 Qe7 46. Qe5 Qg7 47. Rf6 Ra8 48.
b3 Re8 49. Qg5 Kh7

-+-+r+-+
+R+b+-qk
-+-+pRp+
+-+p+-Qp
P+-+-+-+
+P+-+-+-
K+-+-+P+
+-+-+-+-

50. Rxd7 1-0


Sokolov – Shemiakin, T, Simferopol, 1989[C13]

1. e4 e6 2. d4 d5 3. Nc3 Nf6 4. Bg5 Be7 5. e5 Nfd7 6. h4
O-O

Declined

7. Bd3 f5 8. exf6 Nxf6 9. Nf3 c5 10. dxc5 Nc6 11. Qe2
Qa5 12. O-O-O

r+b+-rk+
pp+-b-pp
-+n+pn-+
q-Pp+-B-
-+-+-+-P
+-NB+N+-
PPP+QPP+
+-KR+-+R

Black now becomes provocative

12… d4 13. Bxf6 gxf6 14. Nxd4 Nxd4

r+b+-rk+
pp+-b-+p
-+-+pp-+
q-P-+-+-
-+-n-+-P
+-NB+-+-
PPP+QPP+
+-KR+-+R

The crowd were baying for…

15. Bxh7+ Kxh7 16. Qh5+ Kg7 17. Rxd4 f5 18. Rh3 Bxc5 19.
Rg3+ Kf6 20. Ne4+

r+b+-r-+
pp+-+-+-
-+-+pk-+
q-b-+p+Q
-+-RN+-P
+-+-+-R-
PPP+-PP+
+-K-+-+-

The lonely King wanders to his grave

20… Ke5

[20… fxe4 21. Rg6+ Kf7 22. Rh6+ Ke7 23. Rh7+ Rf7 24.
Qxf7#]

21. f4+ Kxd4 22. Qd1+ Qd2+ 23. Nxd2 Kd5 24. Nb3+ Kc6 25.
Nxc5 Kxc5 1-0


Zeh,H – Bahry,J, Baden-Baden, 1989[C13]

1. d4 Nf6 2. Nc3 e6 3. e4 d5 4. Bg5 Be7 5. e5 Nfd7 6. h4
a6 7. Qg4 h5

Declined again

8. Qg3 g6 9. Nf3 c5 10. dxc5 Nc6 11. O-O-O

r+bqk+-r
+p+nbp+-
p+n+p+p+
+-PpP-Bp
-+-+-+-P
+-N-+NQ-
PPP+-PP+
+-KR+B+R

11… Bxg5+ 12. Nxg5 Qe7 13. f4 Nxc5 14. Be2 Bd7 15. Qf2
O-O-O

Black escapes to the Q-side

16. g3 Rdf8

-+k+-r-r
+p+bqp+-
p+n+p+p+
+-npP-Np
-+-+-P-P
+-N-+-P-
PPP+BQ-+
+-KR+-+R

17. Rxd5 exd5 18. Nxd5

the sacrifice is not so great, after all!

18… Nd3+ 19. Bxd3 Qd8 20. Ne4 Kb8 21. Nd6 Qa5 22. Nc3
Be6 23. a3

-k-+-r-r
+p+-+p+-
p+nNb+p+
q-+-P-+p
-+-+-P-P
P-NB+-P-
-PP+-Q-+
+-K-+-+R

23… Nxe5

[I think this is unnecessary, but it’s hard to give Black
good advice e.g. 23… Rd8 24. Rd1 f6 25. Nce4 fxe5 26. Nxb7!? Kxb7
27. Nc5+ Kb8 28. Nxe6 Rd6 29. Bc4]

24. fxe5 Qxe5 25. Qb6 Bc8 26. Bxa6 1-0


Now, a few games in the other Alekhin gambit.

A3.4 Examples of the Alekhin Gambit in
the Winawer Variation

Miles – Reefschlager, Porz,
1982

1. e4 e6 2. d4 d5 3. Nc3 Bb4 4. Nge2 dxe4 5. a3 Bxc3+ 6.
Nxc3 Nc6 7.

Bb5 Nge7 8. Be3 O-O 9. Qd2 a6 10. Bxc6 Nxc6 11. O-O-O f5
12. Bg5 Qe8

13. f3 exf3 14. gxf3

r+b+qrk+
+pp-+-pp
p+n+p+-+
+-+-+pB-
-+-P-+-+
P-N-+P+-
-PPQ-+-P
+-KR+-+R

14… Nd8

[14… e5 return the pawn to activate the Bc8]

15. Rhg1 c6 16. Rg3 Rf7 17. Rdg1 b5

to allow …Ra7, but a move too late

18. Bf6

r+bnq+k+
+-+-+rpp
p+p+pB-+
+p+-+p+-
-+-P-+-+
P-N-+PR-
-PPQ-+-P
+-K-+-R-

1-0 18… Rxf6

[18… Raa7 19. Qh6 Qf8 20. Be5 Kh8 21. Rh3 Qg8 22. Ne2 f4 23.
Rxg7 Rxg7 24. Nxf4 -+bn-+qk
r-+-+-rp
p+p+p+-Q
+p+-B-+-
-+-P-N-+
P-+-+P+R
-PP+-+-P
+-K-+-+-

]

19. Rxg7+ Kh8 20. Qg5 Rg6

[20… Rf8 21. Rxh7+]

21. Rxg6 hxg6 22. Qh6+

1-0


Conejero,J. M – Perez Torres,J [C15], Valencia

1. e4 e6 2. d4 d5 3. Nc3 Bb4 4. Nge2 dxe4 5. a3 Bxc3+ 6.
Nxc3 f5

Yeuch.

7. Bf4 Nf6 8. f3

The best approach.

8…exf3 9. Qxf3 O-O 10. O-O-O Nd5 11. Be5 Rf7 12.
Bc4

rnbq-+k+
ppp-+rpp
-+-+p+-+
+-+nBp+-
-+BP-+-+
P-N-+Q+-
-PP+-+PP
+-KR+-+R

12… Qg5+ 13. Kb1 Ne3 14. Bf4

1-0


Ristic,Nen – Sanchis, A [C15], Chartres

1. e4 e6 2. d4 d5 3. Nc3 Bb4 4. Nge2 dxe4 5. a3 Be7 6.
Nxe4 Nc6 7. Bf4 Nf6 8. Qd3 b6 9. O-O-O Bb7 10. N2c3 O-O 11. Kb1 Qd7
12. Nxf6+ Bxf6

r+-+-rk+
pbpq+ppp
-pn+pb-+
+-+-+-+-
-+-P-B-+
P-NQ+-+-
-PP+-PPP
+K+R+B+R

13. d5

Always, this is the key break.

13…Ne5 14. Qg3 Ng6 15. Bb5 Qc8 16. Bxc7 Bxc3 17. dxe6
Bxg2

The position is opened up nicely.

18. Rhg1 Bf6 19. exf7+ Rxf7 20. Bc4 Bb7 21. Rge1 Qf5 22.
Qb3 Bg5 23. Be6 Qf3 24. Rd3 Qf6 25. Rd7 Ne7 26. Be5 Qxf2 27. Bg3
Qf3 28. Bxf7+

r+-+-+k+
pb+RnBpp
-p-+-+-+
+-+-+-b-
-+-+-+-+
PQ+-+qB-
-PP+-+-P
+K+-R-+-

1-0


Westerinen,H – Bergsson,S [C15], Gausdal

1. e4 e6 2. d4 d5 3. Nc3 Bb4 4. Nge2 dxe4 5. a3 Bxc3+ 6.
Nxc3 Nc6 7. Bf4 Nf6 8. Bb5

r+bqk+-r
ppp-+ppp
-+n+pn-+
+B+-+-+-
-+-PpB-+
P-N-+-+-
-PP+-PPP
R-+QK-+R

Black now prompts a move White might make voluntarily.

8… a6 9. Bxc6+ bxc6 10. Bg5 h6 11. Bxf6 Qxf6 12.
Nxe4

r+b+k+-r
+-p-+pp-
p+p+pq-p
+-+-+-+-
-+-PN+-+
P-+-+-+-
-PP+-PPP
R-+QK-+R

Black’s pawns look awful.

12… Qh4 13. Qd3 e5 14. dxe5 Qf4 15. O-O Qxe5 16. f4
Qxb2

Careless.

17. Rfb1

r+b+k+-r
+-p-+pp-
p+p+-+-p
+-+-+-+-
-+-+NP-+
P-+Q+-+-
-qP+-+PP
RR+-+-K-

1-0


Abdulla,M – Khechen,N [C15], Novi

1. e4 e6 2. d4 d5 3. Nc3 Bb4 4. Nge2 dxe4 5. a3 Bxc3+ 6.
Nxc3 Nc6 7. Bb5 Nge7 8. Bg5 f6

Ill-advised.

9. Be3 a6 10. Bxc6+ Nxc6

r+bqk+-r
+pp-+-pp
p+n+pp-+
+-+-+-+-
-+-Pp+-+
P-N-B-+-
-PP+-PPP
R-+QK-+R

11. Qh5+ g6 12. Qh6 Qe7 13. Nxe4 Bd7 14. Qh4 Rf8 15.
O-O-O O-O-O 16. Rhe1 Be8

-+krbr-+
+pp-q-+p
p+n+ppp+
+-+-+-+-
-+-PN+-Q
P-+-B-+-
-PP+-PPP
+-KRR-+-

Again, the position needs opening up with d5.

17. d5 Rxd5 18. Rxd5 exd5 19. Bc5

winning the exchange

19… Qf7 20. Bxf8 dxe4 21. Qxe4 Bd7 22. Bc5
Qa2

-+k+-+-+
+ppb+-+p
p+n+-pp+
+-B-+-+-
-+-+Q+-+
P-+-+-+-
qPP+-PPP
+-K-R-+-

a hopeful lunge

23. Bd4 Nxd4 24. Qxd4 Qa1+ 25. Kd2 Qa2 26. Re7 Bc6 27.
c4 b6 28. Rxh7 Bxg2

-+k+-+-+
+-p-+-+R
pp-+-pp+
+-+-+-+-
-+PQ-+-+
P-+-+-+-
qP-K-PbP
+-+-+-+-

1-0


|


Castillo,O – Segovia,J [C15], WchJ

1. e4 e6 2. d4 d5 3. Nc3 Bb4 4. Nge2 dxe4 5. a3 Be7 6.
Nxe4 Nc6 7. Qd3 Nf6 8. Nxf6+ Bxf6 9. Be3 O-O 10. O-O-O

r+bq-rk+
ppp-+ppp
-+n+pb-+
+-+-+-+-
-+-P-+-+
P-+QB-+-
-PP+NPPP
+-KR+B+R

Black now tries a break. Because White is not much better
developed, he keeps it closed. We than have an opposite-side
castling situation, where both sides must attack quickly.

10… e5 11. d5 Ne7 12. Ng3 Ng6 13. Qe4 Bg5 14. Nf5
Bxe3+ 15. fxe3 Ne7 16. g4

r+bq-rk+
ppp-nppp
-+-+-+-+
+-+PpN+-
-+-+Q+P+
P-+-P-+-
-PP+-+-P
+-KR+B+R

You can make this sort of move if your king is on the other
side.

16… Bxf5 17. gxf5 f6 18. Rg1 Kh8 19. Rg3 Qd7 20. Bd3
Rad8 21. Rdg1 Rg8 22. Qh4 h6

-+-r-+rk
pppqn-p-
-+-+-p-p
+-+PpP+-
-+-+-+-Q
P-+BP-R-
-PP+-+-P
+-K-+-R-

Black’s attack hasn’t even started.

23. Rxg7 Nxf5 24. Rxg8+ Rxg8 25. Qxf6+ 1-0


De Eccher,S – Schneiders,A [C15], Lugano

1. e4 e6 2. d4 d5 3. Nc3 Bb4 4. Nge2 dxe4 5. a3 Be7 6.
Nxe4 Nf6 7. Qd3 b6 8. Bf4 Bb7 9. Nxf6+ Bxf6 10. O-O-O

rn-qk+-r
pbp-+ppp
-p-+pb-+
+-+-+-+-
-+-P-B-+
P-+Q+-+-
-PP+NPPP
+-KR+B+R

Black is fairly well placed, though behind in development, but
now blunders.

10… Bg5 11. Qb5+ 1-0


A3. Example of other French
variations


Tarrasch – Mieses[C30], Berlin Match (3) , 1916

1. e4 e6 2. d4 d5 3. Nc3 dxe4 4. Nxe4 Nd7 5. Nf3 Ngf6 6.
Bd3 Be7 7. O-O Nxe4 8. Bxe4 Nf6 9. Bd3 b6

r+bqk+-r
p-p-bppp
-p-+pn-+
+-+-+-+-
-+-P-+-+
+-+B+N+-
PPP+-PPP
R-BQ+RK-

Black has conceded a small space advantage and plays his last
move to get the blocked Bc8 out. Tarrasch prevents even that.

10. Ne5 O-O

Else Bb5+

11. Nc6 Qd6 12. Qf3 Bd7 13. Nxe7+ Qxe7 14. Bg5 Rac8 15.
Rfe1 Rfe8

Black knows enough not to move his King’s-side pawn unless he is
forced to. So Tarrasch forces him to!

16. Qh3

-+r+r+k+
p-pbqppp
-p-+pn-+
+-+-+-B-
-+-P-+-+
+-+B+-+Q
PPP+-PPP
R-+-R-K-

Threatening 17. Bxf6 and 18. Qxh7

16… Qd6 17. Bxf6 gxf6 18. Qh6 f5

In just a few moves, Tarrasch has got into the heart of the
King’s defences.

19. Re3 Qxd4 20. c3!

A pretty final move: Black resigns, unable to stop Rg3.
-+r+r+k+
p-pb+p+p
-p-+p+-Q
+-+-+p+-
-+-q-+-+
+-PBR-+-
PP-+-PPP
R-+-+-K-


The fianchetto: a user’s guide

Fianchetto basics

A Bishop developed in fianchetto reaches deep into the opponent’s position and influences two important central squares.
We can see this effect in IQP positions.

Commonly in isolated Queen-Pawn positions Black has a cramped position and White has chances for attacking the King.

When an IQP faces a fianchetto, Black has two advantages over the standard formation: extra pressure on the isolated Pawn, and an extra-strong defensive phalanx on the light squares.
We can see this in Rubinstein’s line in the Tarrasch Defence. 1. d4 d5 2. c4 e6 3. Nc3 c5 4. cxd5 exd5 5. Nf3 Nc6 6. g3

If the opponent tries to block the long diagonal with Pawns, you can lever open the line again with your own Pawns.


This is a simple plan which can be played by either side. I have played dozens of games like this.

A castled fianchetto position can be a very hard nut to crack – for example, h7 is difficult to get to. The Pawns cover the dark squares and the Bishop covers the light squares.


However, there is a recipe for attacking the castled King’s fianchetto position.
The weaknesses created by the g2-g3 move can be used by the opponent to get at the King: either by getting pieces into the holes (f3 and h3), or by using the h-Pawn to lever open the h-file, or some combination of these ideas. If the Bishop is removed, all that will be left is a network of holes.

Black has correctly tried to get at the King through the h-file, particularly h3. If White plays Bxh3, the Black Queen will leap onto the doorstep of the White King. Another clever point is: Black has held the Bishop on h3 while advancing the h-Pawn, so White cannot meet …h7-h5 with h2-h4, blockading the h-file.
Here Black should play 1…hxg3 with the idea of 2. hxg3 Bxg2 3. Kxg2 Qh3+ mating.
This attacking scheme is not very quick to set up, but works like clockwork.
“I had won hundreds of five-minute games in similar positions and had it down to a science: lever open the h-file… sac, sac … and mate!” – Bobby Fischer

Lee,R – Holmes,D [E82] BCCC 1969-70

1.d4 Nf6 2.c4 g6 3.Nc3 Bg7 4.e4 d6 5.f3 0-0 6.Be3 b6 7.Qd2 c5 8.d5 Na6 9.0-0-0 Nc7 10.Bh6 a6 11.g4 b5 12.h4 bxc4 13.Bxc4 Nb5 14.Nge2 Nxc3 15.Nxc3 Bd7 16.h5 Qe8 17.hxg6 fxg6 18.Bxg7 Kxg7 19.Qh6+ Kh8 20.e5 dxe5 21.d6 exd6 22.Rxd6 Qe7 23.Rxf6 Rxf6 24.Nd5 Qg7 25.Nxf6 1-0

Homer,S – Wilde,T [B07] Devon vs. Cornwall, 06.02.1999

1.e4 d6 2.d4 Nf6 3.Nc3 g6 4.Be2 Bg7 5.h4 h6 6.Be3 0-0 7.h5 Kh7 8.hxg6+ fxg6 9.Qd2 Ng8 10.0-0-0 Nc6 11.Nf3 Qe8 12.Rh4 h5 13.g4 Nf6 14.gxh5 gxh5 15.Rdh1 Rh8 16.Nd5 Nxd5 17.Rxh5+ Kg8 18.Rxh8+ Bxh8 19.Rg1+ Bg7 20.exd5 Nd8 21.Bh6 1-0

[Cool Blue Cat says:]
I must emphasise the importance of this plan. There are several standard attacks which you must be able to play – this is one of them – and where it often seems the attack is easier to play than the defence. If you ever intend to play a fianchetto system, your opponents can trot out this plan almost without thinking, and if you get your counterattack wrong you will almost certainly be checkmated. In every opening where there is a King’s-side fianchetto you can expect to find a critical line where the opponent tried to checkmate down the h-file.

Having placed your Bishop on the long diagonal you need to be careful how you place your central Pawns. If they sit about in front of the Bishop they limit its reach until they move; if they become blocked they can choke it for a long while.

On the other hand, leaving your central Pawns unmoved leaves the centre free for your opponent! So fianchetto openings are difficult to handle, particularly in how you play in the centre. This is part of the attraction of fianchetto systems: they are difficult and so grandmasters can hope for their GM opponents to go astray at some point.

Fianchetto Openings

Fianchettoes turn up frequently in closed Queen’s-Pawn openings, and there is a Fianchetto Variation for White in each of the Indian Defences (semi-closed openings).

  • King’s Indian: 1. d4 Nf6 2. c4 g6 3. Nc3 Bg7 4. Nf3 O-O 5. g3
  • Grunfeld: 1. d4 Nf6 2. c4 g6 3. g3 d5
  • Queen’s Indian: 1. d4 Nf6 2. c4 e6 3. Nf3 b6 4. g3
  • And most recently, Kasparov has experimented with:

    Nimzo Indian: 1. d4 Nf6 2. c4 e6 3. Nc3 Bb4 4. g3

But the history of the fianchetto is particularly bound up with the history of the flank (hypermodern) openings.
Reti and his contemporaries rejoiced in the fianchetto, arguing that you did not need to occupy the centre as White as long as you controlled it.
The diagram is from Reti-Lasker, New York 1924. We can see that Reti has allowed Lasker to occupy the centre but Rtei has fianchettoed both Bishops to hit back at this, and has even backed up his Bb2 with a Queen on a1!

1.Nf3 d5 2.c4 c6 3.b3 Bf5 4.g3 Nf6 5.Bg2 Nbd7 6.Bb2 e6 7.O-O Bd6 8.d3 O-O 9.Nbd2 e5 10.cxd5 cxd5 11.Rc1 Qe7 12.Rc2 a5 13.a4 h6 14.Qa1 Rfe8 15.Rfc1

This is the outline of the Catalan Opening (1. d4, 2. c4, & g3). White combines a fianchetto with both a central stake on d4 and pressure on Black’s centre with c2-c4. Black can try to reinforce d5 with moves like …e6 and …c6, but this is rather passive.
Black can stop the fight for the d5 point by …d5xc4, but this gives White a central majority and opens up the long light diagonal.

This is a development we often see in the English Opening (1.c4). White uses the pressure of the fianchettoed Bishop to strike at the Black Queen’s-side.

Having plonked a Pawn on c4, it makes sense to let the light-squared Bishop peer around the side of it; we see the same development by Black in many closed Sicilian systems and in the Benoni and Dutch Defences, where Black fianchettoes to avoid the Bishop’s Pawn. In each case the fianchettoed Bishop can used to support a Pawn advance.

The Reti-Barcza system beginning with 1. Nf3 reserves all White’s options.


This is a rather slow, subtle opening system which is difficult for all players to handle.
White can expand on the King’s-side, centre or Queen’s-side (west, south-west, south).
The King’s-side expansion is known as the King’s Indian Attack, and is often played by players of 1.e4 against half-open defences like the French. It’s another clockwork attack.

Expansion on the King’s-side

Expansion in the centre

Expansion on the Queen’s-side

The fianchetto can also be tried in e-Pawn games, particularly the half-open defences – we have mentioned the King’s Indian Attack against the French, and the Pirc and Modern Defences are based upon a Black King’s-side fianchetto. White has also tried a fianchetto of the King’s Bishop in many lines of the Sicilian, Open and Closed.

  • Closed Sicilian: 1. e4 c5 2. Nc3 Nc6 3. g3 g6
  • Open Sicilian: 1. e4 c5 2. Nf3 e6 3. d4 cxd4 4. Nxd4 Nf6 5. Nc3 d6 (Scheveningen Variation) 6. g3
  • Sicilian: 1. e4 c5 2. Nf3 e6 3. b3

1.e4 c5 2.Nf3 d6 3.d4 cxd4 4.Nxd4 Nf6 5.Nc3 g6
In the open Sicilian, Black may post the dark-squared Bishop on the long diagonal without fear that it may be stifled by Pawns. The Dragon Bishop is a fearsome creature, particularly if White castles Queen’s-side hoping to carry out the clockwork attack against Black’s King’s-side. Black already has a half-open c-file against White’s own King!

Conclusion

The fianchetto is one of the basic building-blocks of chess thinking. Although it is associated with some of the most complex opening systems that are played by GMs, you are bound to come across it, and should at least know how to attack a castled King which is also hiding behind a fianchetto.

Beating the Anti-Indians

Playing Black in Indian systems without c2-c4: a repertoire for
the …g6 and the …e6 player

Daniel Hill, Dave Regis and Steve Webb (Credits)

A. Colle System

1. d4 Nf6 2. Nf3 and 3. e3


tSlDjL-T
XxXxXxXx
-+-+-S-+
+-+-+-+-
-+-P-+-+
+-+-Pn+-
pPp+-PpP
RnBqKb+r

White will play slowly for the e2-e4 break, opening up the game.

  There is a club booklet on the Colle.


Black plays …g6 against the
Colle

This is well-known as a good system: the Bd3 bites on granite and
e3-e4 results in a Pirc-style game satisfactory for Black.

  The Colle proper is a system which follows 1. d4 d5,
which is not the Indian move-order, but you may end up in the line
below:

4. c3


tSlDjL-T
Xx+-XxXx
-+-+-S-+
+-Xx+-+-
-+-P-+-+
+-P-Pn+-
pP-+-PpP
RnBqKb+r

4… g6 5. Nbd2 Nbd7 6. Bd3 Bg7 7. O-O O-O


t+lD-Tj+
Xx+sXxLx
-+-+-Sx+
+-Xx+-+-
-+-P-+-+
+-PbPn+-
pP-N-PpP
R-Bq+rK-

Now Fine says White is best advised to play

8. b4=

Since

[8. e4 dxe4 9. Nxe4 cxd4 10. Nxd4 Ne5 11. Nxf6+ Bxf6
12. Be2 Bd7 is =+]


Colle system vs. King’s
Indian

1. d4 Nf6 2. Nf3 g6 3. e3


tSlDjL-T
XxXxXx+x
-+-+-Sx+
+-+-+-+-
-+-P-+-+
+-+-Pn+-
pPp+-PpP
RnBqKb+r

Now e2-e4 just loses a tempo on the Pirc, if that’s in your
repertoire (which it should be! White has more than one way to try
and transpose…). Otherwise White can try to get into a main line
as below:


Belavanets – Bronstein 13th USSR
semi-final, 1941

1. d4 Nf6 2. c4 d6 3. Nc3 e5 4. Nf3 Nbd7 5. g3 g6 6. Bg2
Bg7 7. O-O O-O 8. b3 Re8 9. e3 c6 10. Qc2 Qa5 11. a4 Nf8 12. Ba3
Bf5 13. Qb2 Rad8 14. Rfd1 e4 15. Nd2 Ne6


-+-Tt+j+
Xx+-+xLx
-+xXsSx+
D-+-+l+-
p+pPx+-+
BpN-P-P-
-Q-N-PbP
R-+r+-K-

The Qa5 is not typical, but we can see several themes here:

fianchetto of the King’s bishop

use of the e-pawn to gain an initiative on the
K-side

over-protection of the advanced
e4-pawn

move all the pieces to the K-side in a committal
attack

16. b4 Qc7 17. Rdb1 Qd7 18. c5 Ng5

  More over-protection

19. cxd6 Bh3 20. Bh1 Qf5 21. Ne2 Nd5 22. b5
Bg4


-+-Tt+j+
Xx+-+xLx
-+xP-+x+
+p+s+dS-
p+-Px+l+
B-+-P-P-
-Q-NnP-P
Rr+-+-Kb

23. Kf1

  Two sword-swipes with the Knights decide the game.

23…Nxe3+ 24. Ke1 Nf3+ 0-1


Black plays …e6 against the
Colle

3. e3


tSlDjL-T
XxXx+xXx
-+-+xS-+
+-+-+-+-
-+-P-+-+
+-+-Pn+-
pPp+-PpP
RnBqKb+r

Of course 3…e6 gives Black a problem developing the Bc8. It can
hold back and wait for …e6-e5, but it is more natural to develop
it either on the long diagonal or immediately (after …d5 and
before …e6).

3… Bg4 4. Nbd2 Nbd7 5. h3 Bh5 6. c4 e6 7. Qb3
Rb8


-T-DjL-T
XxXs+xXx
-+-+xS-+
+-+x+-+l
-+pP-+-+
+q+-Pn+p
pP-N-Pp+
R-B-Kb+r

about equal: Kovacevic-Timman 1984]


Colle with …b6

2… b6 3. e3 Bb7

“The Queen’s Indian formation against the
Colle-Zukertort has a reputation for reliability; Black indeed had
a good plus score in the games examined.” TRENDS

4. Bd3 e6 5. O-O c5


tS-DjL-T
Xl+x+xXx
-X-+xS-+
+-X-+-+-
-+-P-+-+
+-+bPn+-
pPp+-PpP
RnBq+rK-

6. Nbd2

[6. c3 is the traditional recipe]

6… Be7

  is the main line but others are known:

[6… cxd4 7. exd4 Be7 8. Re1 O-O 9. a4 a6 10. Nf1
d6= Kovacevic-Hulak, 1985 (BCO)]

[6… d6 is known to theory]

[6… Nc6!? 7. b3

[7. a3 Be7 8. Re1 O-O 9. b3 d6 10. Bb2 Re8 11. c4 Nb8
Yusupov-Sax, 1988 (1/2-1/2, 63)]

7… cxd4 8. exd4 Nb4 9. Be2 Rc8 10. c4 d5
Yusupov-Chernin, 1987 (1/2-1/2, 18)]

  Example Game:


Colle,Edgar – Capablanca,Jose
(18) [A47] *Karlsbad, 1929

1. d4 Nf6 2. Nf3 b6 3. e3


tSlDjL-T
X-XxXxXx
-X-+-S-+
+-+-+-+-
-+-P-+-+
+-+-Pn+-
pPp+-PpP
RnBqKb+r

3… Bb7 4. Nbd2 e6 5. Bd3 c5 6. O-O Nc6 7. c3 Be7 8. e4
cxd4 9. Nxd4 O-O 10. Qe2


t+-D-Tj+
Xl+xLxXx
-Xs+xS-+
+-+-+-+-
-+-Np+-+
+-Pb+-+-
pP-NqPpP
R-B-+rK-

10… Ne5 11. Bc2 Qc8 12. f4 Ba6 13. Qd1 Nc6 14.
Rf3


t+d+-Tj+
X-+xLxXx
lXs+xS-+
+-+-+-+-
-+-NpP-+
+-P-+r+-
pPbN-+pP
R-Bq+-K-

14… g6 15. N2b3 Nxd4 16. Nxd4 Bb7 17. Qe2 Bc5 18. Rh3 Qc6
19. e5 Nd5 20. Qf2


t+-+-Tj+
Xl+x+x+x
-Xd+x+x+
+-LsP-+-
-+-N-P-+
+-P-+-+r
pPb+-QpP
R-B-+-K-

20… Bxd4 21. cxd4 Rac8 22. Bd1 f6 23. Qh4 Rf7


-+t+-+j+
Xl+x+t+x
-Xd+xXx+
+-+sP-+-
-+-P-P-Q
+-+-+-+r
pP-+-+pP
R-Bb+-K-

24. Bf3 Qc4 25. Be3 Nxe3 26. Bxb7 Nf5 27. Qe1 Rc7 28. Be4
Qxd4+ 29. Kh1 fxe5 30. Bxf5 exf5 31. fxe5 Re7 32. Re3 Qxb2 33. e6
dxe6 34. Rxe6 Kf7


-+-+-+-+
X-T-Tj+x
-X-+r+x+
+-+-+x+-
-+-+-+-+
+-+-+-+-
pD-+-+pP
R-+-Q-+k

White is two pawns down with still the worse position, so:

0-1


B. London System

1. d4 Nf6 2. Nf3 and 3. Bf4


tSlDjL-T
XxXxXxXx
-+-+-S-+
+-+-+-+-
-+-P-B-+
+-+-+n+-
pPp+pPpP
Rn+qKb+r

White holds the centre and develops quickly, attacking on either
side as the opportunity arises.


Black plays …g6 against the
London System

tSlDjL-T
XxXxXx+x
-+-+-Sx+
+-+-+-+-
-+-P-B-+
+-+-+n+-
pPp+pPpP
Rn+qKb+r

The Bishop rather invites …d6 and …e5.

3… Bg7 4. e3 d6

[4… d5 is recommended by Varnusz, but may not sit
easily in the repertoire of a KID player. Also anecdotal evidence
suggests that …d5 may suit a London player’s style]

5. h3

  To preserve the Bf4, but it has at the moment little
scope and its position even invites …e5. We will look at an
example game:


Polugaevsky-Gufeld,
1979

5… O-O 6. Be2 c5 7. Nbd2 cxd4 8. exd4 Nc6 9. O-O Bf5 10.
c3 Rc8=


-+tD-Tj+
Xx+-XxLx
-+sX-Sx+
+-+-+l+-
-+-P-B-+
+-P-+n+p
pP-NbPp+
R-+q+rK-

The Bf5 is awkward while it stays and awkward to remove.

11. Bh2 a6 12. a4 Re8 13. Nc4 d5 14. Nce5 Qb6 15.
Ra2 Ne4 16. Nxc6?!

[16. g4!?]

16… bxc6 17. a5 Qb7 18. g4 Bd7 19.
Ne5


-+t+t+j+
+d+lXxLx
x+x+-+x+
P-+xN-+-
-+-Ps+p+
+-P-+-+p
rP-+bP-B
+-+q+rK-

19… Bxe5

  An unusual exchange!

20. Bxe5

[20. dxe5 e6 /\ …c5]

20… f6 21. Bh2 c5 22. f3 Ng5 23. h4 Nf7 24. Re1
Bb5 25. b3 cxd4 26. cxd4 Rc3 27. Kg2 e5 28. Bxb5 Qxb5 29. Rae2
Rd3


-+-+t+j+
+-+-+s+x
x+-+-Xx+
Pd+xX-+-
-+-P-+pP
+p+t+p+-
-+-+r+kB
+-+qR-+-

30. Rd2 Rxd2+ 31. Qxd2 Qxb3 32. Re3 Qb5 33. g5 Nd6 34. Re1
Nc4 35. Qf2 exd4 36. Rxe8+ Qxe8 37. gxf6 Ne3+ 38. Kg1 Qb5 39. Be5
Qb1+ 40. Kh2 Qf5 41. Bg3 Qc2 42. Qxc2 Nxc2 43. Be5 Kf7 44. Kg2 d3
45. Kf2 d2 46. Ke2 Ne3


-+-+-+-+
+-+-+j+x
x+-+-Px+
P-+xB-+-
-+-+-+-P
+-+-Sp+-
-+-Xk+-+
+-+-+-+-

0-1

  White’s poor Bishop could do nothing about the Black
attack, and finally dies on what should be its best square!


Hills-Webb 1995

5… Nbd7

  for 5…O-O see below

6. Be2

[6. Bd3 is deterred by the Pawn on g6]

6… O-O 7. c4

[7. c3 and Nbd2 is a slower way to play the system;
Black can play the Bc8 to b7 as in the game.]

[7. O-O Qe8 is recommended in the book (Varnusz),
planning …e5]

or

[7… c5 8. c3 b6 9. a4 Bb7 10. Bh2 a6!
Varnusz]

7… c5

  Thematic, playing to pressurise the long diagonal.

8. Nc3 cxd4 9. exd4 b6 10. O-O Bb7 11. Qc2 Rc8
12. b3

  Defends the c4 Pawn but weakens the dark squares.

12… a6

  /\ …b5

13. a4 Re8 14. Rfd1 Nb8


-StDt+j+
+l+-XxLx
xX-X-Sx+
+-+-+-+-
p+pP-B-+
+pN-+n+p
-+q+bPp+
R-+r+-K-

/\ …Nb8-c6-b4

15. d5 Nxd5

  draw agreed (!)

[15… Nxd5 16. Bd2 Nb4-+ ]

  One last one with a slightly different move order.

Short,N-Kasparov,Gary/Skelleftea (4) 1989

2… c6 3. Bf4 d6 4. h3 Qb6 5. b3 c5 6. dxc5 Qxc5
7. c4 g6 8. Nc3 Bg7 9. Rc1 Bf5


tS-+j+-T
Xx+-XxLx
-+-X-Sx+
+-D-+l+-
-+p+-B-+
+pN-+n+p
p+-+pPp+
+-RqKb+r

Black is fine here: both Bishops are better than White’s, Black has
control of e4 and can enjoy the discomfort of White’s King, which
is at least three moves from castling.

10. Be3 Qa5 11. Bd2 Qd8 12. Nd4 Be4 13. e3 Nc6
14. Nde2 Bd3 15. Nf4 Bxf1 16. Kxf1 O-O 17. g3 e6 18. Kg2 d5 19.
cxd5 exd5 20. Qf3 d4 21. Ncd5 Nxd5 22. Qxd5 Qe7 23. Rhe1 Rad8 24.
Qc5 Qd7 25. e4 Ne5 26. Red1 b6 27. Qc7


-+-T-Tj+
X-Qd+xLx
-X-+-+x+
+-+-S-+-
-+-XpN-+
+p+-+-Pp
p+-B-Pk+
+-Rr+-+-

27. Qc7 Qb5 28. Qxa7 g5 29. Qa4

  Sacrificing the Knight for some play

29… Qxa4 30. bxa4 gxf4 31. gxf4 Nd3 32. Rc6 Nb2
33. Rdc1 Nxa4 34. f5 Rfe8 35. f3 Ra8 36. Kh1 Nc5 37. Rg1 Kh8 38.
Rc7 Rf8 39. Bf4 Rac8 40. Re7 Rce8 41. Rc7 Nd3 42. Bd6 Rg8 43. Rxf7
Be5 44. Rxg8+ Rxg8 45. Rd7 Nf2# 0-1


Black plays …e6 against the
London System

3. Bf4


tSlDjL-T
XxXx+xXx
-+-+xS-+
+-+-+-+-
-+-P-B-+
+-+-+n+-
pPp+pPpP
Rn+qKb+r

3…b6

[3… d5 4. e3 Bd6 5. Bg3 c5 6. c3 Ne4 7. Bxd6 Qxd6
8. Nbd2 Nxd2 9. Qxd2 Nc6 = Osmanovitch-Lputian, 1983]

4. e3 Bb7 5. Bd3

[5. c4 is Miles’ variation in the Queen’s Indian 5…
Ne4]

5… Be7 6. h3 O-O 7. Nbd2 c5 8. c3 d5 9. O-O Qc8
10. Re1 Ba6 11. Bc2 Rd8 12. Ne5 Nc6 13. Bg5 h6 14. Bh4 Qc7 15. f4
Rac8 16. Qf3 Ne4

  1/2-1/2 Gulko-Browne, 1988 (Given in The London
System
by Soltis)


C. Torre Attack/Torre System
vs. King Fianchetto

1. d4 Nf6 2. Nf3 and 3. Bg5


tSlDjL-T
XxXxXxXx
-+-+-S-+
+-+-+-B-
-+-P-+-+
+-+-+n+-
pPp+pPpP
Rn+qKb+r

The founder of this system scored a famous victory over Lasker with
a ‘windmill’ combination. It has similar ideas to the London
System, and chooses perhaps a better square for the Bishop. It also
tempts Black to chase the bishop.


Black plays …g6 against the
Bg5 system

3. Bg5


tSlDjL-T
XxXxXx+x
-+-+-Sx+
+-+-+-B-
-+-P-+-+
+-+-+n+-
pPp+pPpP
Rn+qKb+r

3… Bg7

  White can try and fiddle c2-c4 or Nb1-c3 with 4. e3, but
this forgoes e2-e4.

4. Nbd2 c5

  White can now try

5. Bxf6 or

5. c3:

  we’ll look at a game with each.


5. Bxf6 e.g.
Spiridonov,N-Kasparov,Gary/Skara (4) 1980

5. Bxf6 Bxf6 6. Ne4 Bxd4! 7. Nxd4 cxd4 8. Qxd4 O-O 9.
c4


tSlD-Tj+
Xx+xXx+x
-+-+-+x+
+-+-+-+-
-+pQn+-+
+-+-+-+-
pP-+pPpP
R-+-Kb+r

Although Black lacks the dark-squared Bishop, his position is fine.

9… Nc6 10. Qd2 d6 11. Nc3 Be6 12. e4 Qb6 13.
Rd1?!


t+-+-Tj+
Xx+-Xx+x
-DsXl+x+
+-+-+-+-
-+p+p+-+
+-N-+-+-
pP-Q-PpP
+-+rKb+r

Over-ambitious: Black spies the traditional weakness on f2

13… Ne5 14. b3 f5! 15. Be2 f4!-+


t+-+-Tj+
Xx+-X-+x
-D-Xl+x+
+-+-S-+-
-+p+pX-+
+pN-+-+-
p+-QbPpP
+-+rK-+r

Cementing the post on e5.

16. Nd5 Bxd5 17. Qxd5+ Kg7 18. O-O Rac8 19. b4
Qxb4 20. Rb1 Qa3 21. Rxb7


-+t+-T-+
Xr+-X-Jx
-+-X-+x+
+-+qS-+-
-+p+pX-+
D-+-+-+-
p+-+bPpP
+-+-+rK-

White seems to have developed some uncomfortable threats…

21… Kf6!!

  …but they are all one-move deep, and this stops the
lot!

22. h4 h6

[22… Qxa2? 23. Bg4]

23. Rd1 Rb8

[23… Qxa2?? 24. Qxd6+ exd6 25. Rxd6#]

24. Rc7 Rfc8 25. Rxc8 Rxc8 26. Qb7 Qc5 27. Qb2
Qb6 28. Qc1 g5 29. Rd5 e6 30. hxg5+ hxg5


-+t+-+-+
X-+-+-+-
-D-XxJ-+
+-+rS-X-
-+p+pX-+
+-+-+-+-
p+-+bPp+
+-Q-+-K-

31. Rd1 Ke7 32. Qc2 Rb8 33. Qa4 g4 34. Qa3 Qc5 35. Qc3 g3
36. Rf1 gxf2+ 37. Rxf2 Rb1+ 38. Bf1 Qe3 39. Qxe3 fxe3 40. Rc2 Nxc4
0-1


5. c3
Bisguier,Arthur-Fischer,Robert/New York ch-US Rd: 5 1965

5… cxd4


tSlDj+-T
Xx+xXxLx
-+-+-Sx+
+-+-+-B-
-+-X-+-+
+-P-+n+-
pP-NpPpP
R-+qKb+r

This capture is best and common in these systems after Nbd2, since
White cannot play Nb1-c3

6. cxd4 Nc6 7. e3 O-O 8. a3 h6 9. Bh4 d6 10. Bc4
Bf5 11. h3 Rc8 12. O-O e5 13. e4 Bd7 14. dxe5 dxe5 15. Ba2
g5

  with the e-pawn fixed, the light-squared Bishop lacks
access to f5 and related squares, so this is quite safe here.

16. Bg3 Qe7 17. Re1 Rcd8


-+-T-Tj+
Xx+lDxL-
-+s+-S-X
+-+-X-X-
-+-+p+-+
P-+-+nBp
bP-N-Pp+
R-+qR-K-

Black’s position is harmonious with central control; White’s pieces
lack scope by contrast. White would like to sink a Knight into f5
but it’s going to have to be the one on f3, which is going to give
Black the d4 point.

18. Nh2 Be6 19. Bxe6 Qxe6 20. Nhf1 Rd3! 21.
Re3

  takes e3 away from the Nf1.

21… Rd7 22. Qb3 Qe7 23. Nf3 Rfd8 24. Rae1 Nh5
25. Rc3 Qf6 26. Ne3 Nd4


-+-T-+j+
Xx+t+xL-
-+-+-D-X
+-+-X-Xs
-+-Sp+-+
PqR-NnBp
-P-+-Pp+
+-+-R-K-

A nice example of over-protection, the Knight cannot be left, and
the exchange will give Black’s pieces extra scope.

27. Nxd4 exd4 28. Ng4 Qg6 29. Rd3
Nxg3

  White faces an uncomfortable choice

30. fxg3 Rc7 31. Nf2 Rdc8 32. Re2 Rc1+ 33. Kh2 h5
34. Qxb7 Be5 35. Qd5 R1c5 36. Qd7 h4 37. Nh1 Rc1 38. Rf3
g4


-+t+-+j+
X-+q+x+-
-+-+-+d+
+-+-L-+-
-+-Xp+xX
P-+-+rPp
-P-+r+pK
+-T-+-+n

Mate is threatened

39. Qxg4 Qxg4 40. hxg4 Kg7 41. Rf5


-+t+-+-+
X-+-+xJ-
-+-+-+-+
+-+-Lr+-
-+-Xp+pX
P-+-+-P-
-P-+r+pK
+-T-+-+n

41… Rxh1+!

0-1


  Another recent game featuring …g6 was this encounter:


Short Nigel D-Kasparov
Gary/Cup World, Reykjavik (Iceland) 1989

2… c6 3. Bf4 d6 4. h3 Qb6 5. b3 c5

  An interesting tempo-loss

6. dxc5 Qxc5 7. c4 g6 8. Nc3 Bg7 9. Rc1
Bf5


tS-+j+-T
Xx+-XxLx
-+-X-Sx+
+-D-+l+-
-+p+-B-+
+pN-+n+p
p+-+pPp+
+-RqKb+r

Black is fine here: his dark-squared Bishop is better than White’s,
has control of e4 and can enjoy the discomfort of White’s King,
which is at least three moves from castling.

10. Be3 Qa5 11. Bd2 Qd8 12. Nd4 Be4 13. e3 Nc6
14. Nde2 Bd3 15. Nf4 Bxf1 16. Kxf1 O-O 17. g3 e6 18. Kg2 d5 19.
cxd5 exd5 20. Qf3 d4 21. Ncd5 Nxd5 22. Qxd5 Qe7 23. Rhe1 Rad8 24.
Qc5 Qd7 25. e4 Ne5 26. Red1 b6 27. Qc7


-+-T-Tj+
X-Qd+xLx
-X-+-+x+
+-+-S-+-
-+-XpN-+
+p+-+-Pp
p+-B-Pk+
+-Rr+-+-

27…Qc7 Qb5 28. Qxa7 g5 29. Qa4

  Sacrificing the Knight for some play

29… Qxa4 30. bxa4 gxf4 31. gxf4 Nd3 32. Rc6 Nb2
33. Rdc1 Nxa4 34. f5 Rfe8 35. f3 Ra8 36. Kh1 Nc5 37. Rg1 Kh8 38.
Rc7 Rf8 39. Bf4 Rac8 40. Re7 Rce8 41. Rc7 Nd3 42. Bd6 Rg8 43. Rxf7
Be5 44. Rxg8+ Rxg8 45. Rd7 Nf2# 0-1


Torre Attack (Bg5 against
…e6)

3. Bg5


tSlDjL-T
XxXx+xXx
-+-+xS-+
+-+-+-B-
-+-P-+-+
+-+-+n+-
pPp+pPpP
Rn+qKb+r

3. … c5

  …b6 systems tend to be upset by d4-d5


tSlDjL-T
Xx+x+xXx
-+-+xS-+
+-X-+-B-
-+-P-+-+
+-+-+n+-
pPp+pPpP
Rn+qKb+r

4. e3

  There are two alternatives:

[4. e4 Wagner Gambit, a sharp line 4… cxd4 5. e5 h6
6. Bh4 g5 7. Bg3 Nh5 8. Qxd4 Nc6 9. Qe4 Bg7 Marshall-Nimzovitch,
Berlin 1928. /\ …Nxg3 and x e5]

[4. c3 4… cxd4 5. cxd4 Qb6 6. Qc2 Nc6 7.
Nc3?

[7. Bxf6 gxf6 8. e3 d5 9. Nc3 Bd7 10. Be2 Be7 11. O-O
O-O 12. Na4 Qc7 13. Nc5 Rfc8 14. Nxd7 Qxd7 15. Qa4 Ne5 16. Qxd7
Nxd7 17. Rfc1 Nb6=/+ “Black’s Knight is more powerful” – BELLIN
Larsen-Portisch, Tilburg 1980]

7… Bb4

[7… Nxd4]

8. e3 d5 9. Bd3 Bd7 10. O-O Be7

  “By now you should realise that this game lacks
quality
” – Daniel 11. a3 h6 12. Bxf6 gxf6 13. b4 Rc8 14.
Rfc1 f5 15. Qe2 O-O

  and now White blundered with

16. Na4?

[16. Nd2+/= x c5]

16… Nxd4! Stenhouse-Hill, Portsmouth 1996]


  After the main line with 4. e3, Black has two
alternatives:

Risky 4…Qb6

Positional 4… cxd4

  One rare alternative:

4… Be7 5. Nbd2 Nc6 6. c3 cxd4 7. exd4 O-O 8. Bd3 b6
9. O-O Bb7 10. Re1 h6 11. Bxf6 Bxf6 12. Ne4 Be7 13. Bb1 d5 14. Ng3
Bc8= R Ye-J Ye, Jakarta 1994


Risky 4…Qb6

4… Qb6


tSl+jL-T
Xx+x+xXx
-D-+xS-+
+-X-+-B-
-+-P-+-+
+-+-+n+-
pPp+pPpP
Rn+qKb+r

“This is undoubtedly the most critical variation of the Torre
Attack” – BELLIN.

  White must now decide whether to sacrifice the b2
pawn,

5. Nbd2,

  or to defend it with the passive-looking

5. Qc1.


Passive 5. Qc1

5. Qc1 Ne4

[5… Nc6 6. c3

[6. Bxf6 gxf6 7. c3 d5 8. Nbd2 Bd7 9. Be2 Rc8 10. O-O
cxd4 11. exd4 Bh6= Holmov-Anikayev, Tbilisi 1976]

6… Ne4 7. Bf4 d5 8. Bd3 Be7 9. Nbd2 f5


t+l+j+-T
Xx+-L-Xx
-Ds+x+-+
+-Xx+x+-
-+-PsB-+
+-PbPn+-
pP-N-PpP
R-Q-K-+r

and Black’s position is fine: Petrosian-Cherepkov, USSR
1961.]

6. Bf4 d5 7. c3 Nd7

[7… Nc6]

8. Nbd2 Ndf6 9. h3 Bd6 10. Ne5 c4?!

  (This type of move often leaves White free to ignore the
centre and attack elsewhere)

11. g4 Nxd2 12. Qxd2 Ne4 13. Qc2 Bxe5 14.
Bxe5

  and now I played the weakening

14… f../strong>

Aggressive 5. Nbd2

5. Nbd2

5… d5

[5… Qxb2 This looks unwise. 6. Bd3 cxd4 7. exd4 Qc3
8. O-O d5 9. Re1 Be7 10. Re3 Qc7 11. Ne5=/and with a nice position
for the sacrificed pawn.]

6. Bxf6 gxf6 7. c4 cxd4 8. exd4 dxc4 9. Bxc4 Nc6
10. O-O Bd7 11. d5


t+-+jL-T
Xx+l+x+x
-Ds+xX-+
+-+p+-+-
-+b+-+-+
+-+-+n+-
pP-N-PpP
R-+q+rK-

Although Black has played a safer line I would say that this
position is good for White. The problem for Black after 5. Nbd2 the
Knight on f6 can no longer go to e4, and therefore Black is likely
to end up with doubled pawns.


Positional 4… cxd4

4… cxd4


Bronstein-Ward, Maidstone 1994
/0-1

5. exd4 Be7 6. c3 b6 7. a4 O-O 8. Na3!? Nc6 9. Bd3 Bb7 10.
O-O Nd5 11. Bd2 Rc8 12. Re1 Qc7=


-+t+-Tj+
XlDxLxXx
-Xs+x+-+
+-+s+-+-
p+-P-+-+
N-Pb+n+-
-P-B-PpP
R-+qR-K-

This position is equal, although the first thing that struck me was
that White’s position looks a little easier to play. Perhaps Black
can leer at the Knight on a3 and work in a raid based on …Bd6 and
…Nf4. I don’t know how the game went, but Black won.

Summary

If you think that your opponent will defend the
pawn with 5. Qc1 then 4…Qb6 is clearly worth a try. However,
after 5. Nbd2, White is likely to achieve a better position because
no time has been wasted. This is not to say that you can’t take the
b-pawn, if you are looking for a sharp game. For those who prefer a
more positional type of game, then 4…cxd4 is ideal.


D. Trompovsky

1. d4 Nf6 2. Bg5


tSlDjL-T
XxXxXxXx
-+-+-S-+
+-+-+-B-
-+-P-+-+
+-+-+-+-
pPp+pPpP
RnBqKbNr

An even earlier Bishop move, and now only 2…e6 and 2…Ne4 can
stop White from kicking a hole in the Black pawn formation. In the
‘seventies Hort and Jansa often adopted it with a positional
approach, but a more brawling style has been characteristic of
Hodgson’s revival of the line in the ‘nineties.


Black plays …g6 against the
Trompovsky

Ah, now – this booklet has got a big hole in it – you can hardly
play …g6 against the Trompovsky.

2…g6 3. Bxf6 exf6

  and I think Black already has some problems getting
organised.


2… c5

  is the sort of move that might appeal to a KID player,
particularly if you have a quick look at

3. d5?! Ne4 4. Bf4 Qa5+


  A better idea for White is

3. Bxf6! e.g.

3… gxf6 4. d5 Qb6 5. Qc1


tSl+jL-T
Xx+xXx+x
-D-+-X-+
+-Xp+-+-
-+-+-+-+
+-+-+-+-
pPp+pPpP
RnQ-KbNr

which is probably the funny sort of position that White may feel
more comfortable than you, although I don’t think White can claim a
plus here, e.g. 5… f5

[5… d6]

6. c3

[6. e3]

[6. g3]

6… Bg7 7. e3 e6 8. Nh3

  Hort says this is unclear. I believe him.


  I recommend

2… Ne4

  Now I think the best for White is

3. Bf4

  Alternatives:

[3. Bh4 g5 4. f3 gxh4 5. fxe4 is the old theory on
this line: White will struggle to hold the dark squares]

[3. h4 is Hodgson’s favourite]

3… c5

[3… d5 4. f3 Nf6 5. e4 dxe4 6. Nc3 is a
Blackmar-Diemer Gambit a tempo ahead for White!]

[Another idea for Black is3… Nc6!? /\ 4.
f3

[4. d5 e5!]

[4. Nf3!]

4… e5! 5. dxe5 g5! 6. Bc1 Nc5

/\ …Bg7]

  After 3…c5:

4. f3 Qa5+ 5. c3 Nf6

  when

6. d5

  transposes above.


Black plays …e6 against the
Trompovsky

2. Bg5 e6


tSlDjL-T
XxXx+xXx
-+-+xS-+
+-+-+-B-
-+-P-+-+
+-+-+-+-
pPp+pPpP
Rn+qKbNr

3. e4

[3. Nf3 is the Torre]

Now

3… h6

  is the most common move, but not the only one:

[3… c5


tSlDjL-T
Xx+x+xXx
-+-+xS-+
+-X-+-B-
-+-Pp+-+
+-+-+-+-
pPp+-PpP
Rn+qKbNr

is almost entirely untested. One known example went

4. e5

[4. Nf3 is the Wagner Gambit]

4… h6 5. Bc1 Nd5 6. c4 Nb6 7. dxc5 Bxc5 8. Nf3 d5
9. exd6 Qxd6

[9… Bxd6!?]

10. Qxd6 Bxd6 11. Nc3 Nc6 12. Bd2 Nd7 13. O-O-O Ke7
14. Nb5


t+l+-+-T
Xx+sJxX-
-+sLx+-X
+n+-+-+-
-+p+-+-+
+-+-+n+-
pP-B-PpP
+-Kr+b+r

1/2-1/2 Soffer-Yudasin, Israel 1994.

Black could have played on with

14… Bc5]

  After 3…h6:

4. Bxf6 Qxf6

5. Nc3

  White can try the Knight on d2:

[5. Nf3 b6 6. Bd3 Bb7 7. Nbd2 a6

[7… c5 8. e5 Qd8 9. Be4 Qc7 10. O-O Be7 11. Re1 O-O
12. dxc5 bxc5 13. Bxb7 Qxb7 14. Nc4


tS-+-Tj+
Xd+xLxX-
-+-+x+-X
+-X-P-+-
-+n+-+-+
+-+-+n+-
pPp+-PpP
R-+qR-K-

Levenfish-Rabinovitch, Petrosgrad 1921]

8. Qe2 d6 9. O-O-O Nd7 10. Kb1 e5

  Lots of pawn moves, but he must have thought White
couldn’t rush the centre.

11. c3 Be7 += Korchnoi-Karpov, Hastings
1971/72]

5… Bb4 6. Nf3

[6. Qd2 c5 7. a3 Bxc3 8. bxc3 d6 9. f4 O-O 10. Nf3
Nc6 11. Bb5 Na5 12. Bd3 b6 13. O-O Bb7 Hodgson-Yudasin,
??]

6… d6 7. Qd2 Nd7 8. a3 Ba5 9. Bd3 O-O 10. O-O
c6 11. b4 Bc7 12. Ne2 e5 =

  Bezold-Bischoff, Altensteig 1994

Summary

I believe 3…c5!? is well worth a try, in order
to try and transpose into the Torre. Of course, White can go for a
Torre immediately with 3. Nf3, and it will be interesting to see
how many White players opt for this. 3…h6 is also OK, although
Karpov sank rather against Korchnoi in the game given in the
Custer’s Last Stand handout.

[Footnote from Frederick Prost: is
3…c5 really so easy?]


E. Systems with g3

1. d4 Nf6 2. g3


tSlDjL-T
XxXxXxXx
-+-+-S-+
+-+-+-+-
-+-P-+-+
+-+-+-P-
pPp+pP-P
RnBqKbNr

Transpositional except against the King’s Indian where the double
fianchetto system is known (with b2-b3).

  Against the …e6 systems it usually transposes into the
Catalan, where Black may have problems whether the centre is closed
(Botvinnik) or open (Keene).


Black plays …g6 against
g3

The system with g3 and b3 (without c4) is one to know about:

3. b3 Bg7 4. Bb2 d6 5. g3 O-O 6. Bg2


tSlD-Tj+
XxX-XxLx
-+-X-Sx+
+-+-+-+-
-+-P-+-+
+p+-+nP-
pBp+pPbP
Rn+qK-+r

6… e5

  Black has an important alternative here:

[6… Nbd7 7. O-O e5 8. dxe5 Ng4


t+lD-Tj+
XxXs+xLx
-+-X-+x+
+-+-P-+-
-+-+-+s+
+p+-+nP-
pBp+pPbP
Rn+q+rK-

9. Qd2

[9. Nc3 Pirc 9… Ngxe5!

[9… dxe5 10. Nd2+/= Pirc]

]


[9. c4 Re8 10. h3 Nh6 11. Nc3 dxe5 12. e4 c6 13. Qc2
f6 Holmov-Gufeld, about equal]


9… Ngxe5?!

[9… Re8! 10. h3 Nh6 11. Na3 dxe5 12. Nc4 f6 which
is probably OK for Black]

10. Nxe5 dxe5 11. Nc3 c6 12. Rad1../em>

[12. Ba3+/= ]

]


7. dxe5 Nfd7 8. O-O


tSlD-Tj+
XxXs+xLx
-+-X-+x+
+-+-P-+-
-+-+-+-+
+p+-+nP-
pBp+pPbP
Rn+q+rK-

8… dxe5

[8… Nc6 9. Qd2 Miles-Ristic, 1988 9… Ndxe5
Marovic]

9. e4 Nc6 10. Nbd2 b6 11. Qe2

  Now Polugaevsky-Medina, 1972, continued:

11… Qe7

[11… a5 Marovic]

12. Rfd1 Nc5 13. Nf1 Ba../strong>

1-0, 39

[13… Be6 was better, acording to Marovic]


  Of course, White might sidle over into the main line with
g3:


Arkell-Nunn/London
1992

3. g3 Bg7 4. Bg2 O-O 5. O-O

[5. c4 d6 was the game move order]

5… d6


tSlD-Tj+
XxX-XxLx
-+-X-Sx+
+-+-+-+-
-+-P-+-+
+-+-+nP-
pPp+pPbP
RnBq+rK-

6. c4

[6. c3]

6… Nbd7 7. Nc3 e5 8. Qc2 Re8 9. b3 c6 10. e3
exd4 11. Nxd4 h5


t+lDt+j+
Xx+s+xL-
-+xX-Sx+
+-+-+-+x
-+pN-+-+
+pN-P-P-
p+q+-PbP
R-B-+rK-

Intending …h5-h4xg3, when White will be reluctant to play f2-f4
to dislodge a Knight on e5.

12. Ba3 Qe7 13. Rad1 Nc5 14. b4 Nce4 15. Nxe4
Nxe4 16. b5 c5

  (forced, but the Ba3 needs another post now)

17. Ne2

  x d5: Black needs play on the King’s-side

17… Bf5 18. Qb3 h4 19. Nf4 Qe5 to prevent Bb2
20. Rd5 Qf6 21. g4 Bxg4 22. f3 h3


t+-+t+j+
Xx+-+xL-
-+-X-Dx+
+pXr+-+-
-+p+sNl+
Bq+-Pp+x
p+-+-+bP
+-+-+rK-

23. Bh1

[23. Nxh3]

[23. Bxh3]

23… Nc3 24. fxg4 Qh4 25. Rd3 Qxg4+ 26. Kf2 Bd4
27. Rxc3 Qxf4+ 28. Ke2 Qxh2+ 29. Kd1 Bxc3 30. Qxc3 Re5 31. Bb2 Rae8
32. Bd5 R8e7 33. Qd2 Qxd2+ 34. Kxd2 Rf5

[34… Rxe3 35. Bf6<-/-> ]

35. Rxf5 gxf5 36. Ke2 h2 37. Kf2 Re6 38.
Bc1

[38. Bxe6 h1=Q]

38… Rg6 39. Bg2 Rg4 40. Bd2 Rxc4
0-1


Black plays …e6 against the g3 system

2. g3 e6


tSlDjL-T
XxXx+xXx
-+-+xS-+
+-+-+-+-
-+-P-+-+
+-+-+-P-
pPp+pP-P
RnBqKbNr

This system with c2-c4 is well known: it is called the Neo-Catalan.

2. g3 e6


tSlDjL-T
XxXx+xXx
-+-+xS-+
+-+-+-+-
-+-P-+-+
+-+-+-P-
pPp+pP-P
RnBqKbNr

3. Nf3

3… c5

  [We looked at 4. dxc4 in the Custer booklet: the only
other independent line is]

4. c4 cxd4 5. Nxd4 Nc6

  which is the English Opening: g3 systems have become
fashionable against the Nimzo and so they are another one to slot
into your repertoire

6. Bg2 and now 6… d5 is the Tarrasch Defence to the
Queen’s Gambit

  One complex line which offers hances to both sides is

6. Nc3 Qb6!?

[6… Bb4 is safe, 6…Bc5 is uncommon]

7. Nb3

[7. Nc2 d5!? is an approved gambit]

7… Ne5

[7… Bb4!? and 7…d5?! have also been
tried]

8. e4 Bb4 9. Qe2


t+l+j+-T
Xx+x+xXx
-D-+xS-+
+-+-S-+-
-Lp+p+-+
+nN-+-P-
pP-+qP-P
R-B-Kb+r

with a complex position that is given in few Nimzo books! DR has
played either side with pleasure, and some lines he recalls go:

9… a5 10. f4

[10. Be3]

10… a4!? Nunn 11. fxe5 axb3 12. exf6
Rxa2

  Pick the bones out of that!


F. Systems with a delayed c4

tSlDjL-T
XxXxXxXx
-+-+-S-+
+-+-+-+-
-+?P-+-+
+-+-+-+-
pP-+pPpP
RnBqKbNr

Even if White has c2-c4 lines in their repertoire, it may reduce
Black’s options to delay this, e.g. in the Catalan.

  This is a transpositional device and your main openings
books should help you here.


G. Stonewall Opening

1. d4 2. e3 3. Bd3 4. f4


tSlDjL-T
XxXxXxXx
-+-+-S-+
+-+-+-+-
-+-P-P-+
+-+bP-+-
pPp+-+pP
RnBqK-Nr

White locks up the centre and rolls down the King’s-side

1. d4 d5 2. e3 Nf6 3. Bd3

[3. f4 is sometimes played to avoid the 3…Nc6 line,
but then Black can always play …Bf5]


Black plays …g6 against the
Stonewall

The Stonewall is not pointless, particularly after …d5/…e6. But
an early …g6 deadens the attack from d3, and Black can try …d6
and …e5 to blow up the centre, e.g.

1… g6 2. e3 Bg7 3. Bd3 d6 4. c3 Nd7 5. f4 e5 6.
Nf3 Ngf6 7. fxe5 dxe5 8. dxe5 Ng4 9. e6 fxe6 10. Nd4 Nde5 11.
O-O

[11. Be2 O-O 12. Bxg4 Qh4+ 13. g3 Qxg4 14. Qxg4
Nxg4=/+ …1/2-1/2 Jordan,D-Regis,D/Devon vs.Glos 1995]

11… Rf8 12. Rxf8+ Kxf8 13. Qf1+ Kg8 14. Bc2 c5
=+


Black plays …e6 against the Stonewall

2. e3 d5

[2… e6 immediately has no special virtues, unless
you really want to play a …b6 system]

3. Bd3 c5

[There is also the system with 3… Nc6 e.g.

4. f4

[4. c3 e5!]

4… Nb4! 5. Nf3 Nxd3+ 6. cxd3 g6 7. Nc3 Bg7 8. O-O
O-O=]

4. c3 Nc6

[4… e6 5. f4]

5. f4


t+lDjL-T
Xx+-XxXx
-+s+-S-+
+-Xx+-+-
-+-P-P-+
+-PbP-+-
pP-+-+pP
RnBqK-Nr

5… e6

  blocks the Bc8 better is:

5… Bg4 6. Nf3 e6 7. Nbd2 Bd6 8. h3 Bh5 9. b3
cxd4 10. cxd4 Rc8


-+tDj+-T
Xx+-+xXx
-+sLxS-+
+-+x+-+l
-+-P-P-+
+p+bPn+p
p+-N-+p+
R-BqK-+r

when Black is comfortable


H. The Richter-Veresov system

1. d4 Nf6 2. Nc3 d5 (Other moves transpose into
e.g. the Pirc or French)


tSlDjL-T
XxX-XxXx
-+-+-S-+
+-+x+-B-
-+-P-+-+
+-N-+-+-
pPp+pPpP
R-+qKbNr

This is another system emphasising piece play – again with the
threat of doubling the f-pawns, or reserving King’s-side chances.

  Against the Veresov itself:

3…Nbd7

3…Bf5 and

3…c5

  are independent lines with some little theory
attached.

  e.g.

[3… Bf5 4. f3

[4. e3]

[4. Bxf6]

4… Nbd7 5. Nxd5 Nxd5 6. e4 h6 7. Bh4 N7b6 8. exf5
Ne3 9. Qd2 Nxf1 10. Kxf1=/+ ]

[2… c5 is another idea again, which might appeal to
the KID/Benoni player]


Black plays …g6 against the
Veresov

2… g6


tSlDjL-T
XxXxXx+x
-+-+-Sx+
+-+-+-+-
-+-P-+-+
+-N-+-+-
pPp+pPpP
R-BqKbNr

Black offers a Pirc. If White declines we probably get a Torre
where the move Nc3 forgoes some of White’s best ideas, like Nbd2
and moves of the c-pawn.


Black plays …e6 against the
Veresov

1. d4 Nf6 2. Nc3 e6


tSlDjL-T
XxXx+xXx
-+-+xS-+
+-+-+-+-
-+-P-+-+
+-N-+-+-
pPp+pPpP
R-BqKbNr

3. Bg5 d5

3…c5

  You will find White players who head for the French here,
as pure Veresov ideas like 4. e3 and 4. Nf3 look insipid. These are
all playable, particularly at club level (what isn’t!).


Credits:

Dan composed the repertoire for the …e6 player.

  Steve composed the repertoire for the …g6 player

  Dave typed it up, and is responsible for all mistakes
that are not the responsibility of the other authors