Schematic thinking

-+-+-+-+
+-+-+-+-
-+-+jX-X
X-+-+-X-
nL-+-+p+
+-+-+p+p
-+-+-+-+
+-+-+k+-

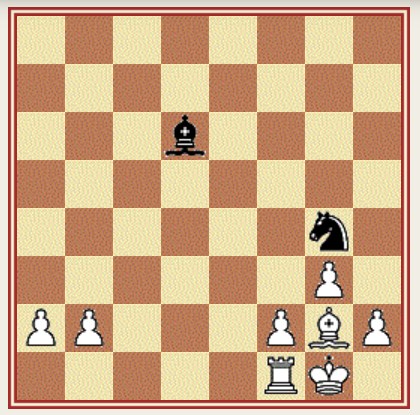
Recently, I was analysing an endgame with Steve Webb and at one point just pushed a bishop from b4 to d4, obliterating the chances of the Knight at a4 which can now only move to leave a lost K+P ending. Steve was briefly outraged, as I recall, so what made me do that? Well, you have to have seen the pattern before, but obviously …Bb4-d4 is not a legal move. The point is that thinking in this way stops you getting bogged down in move orders, and focuses your attention on what must be done soon.

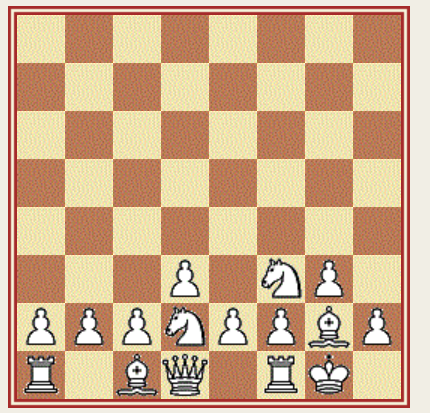
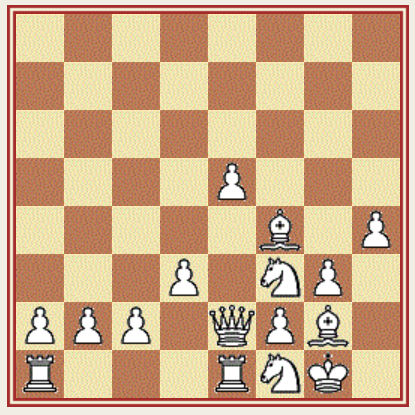
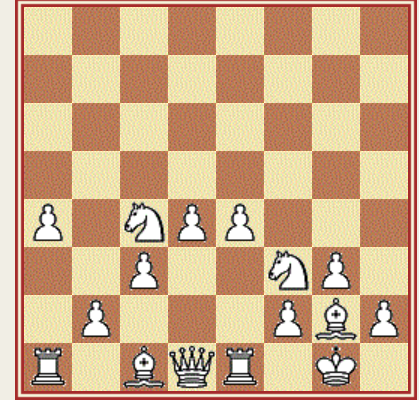
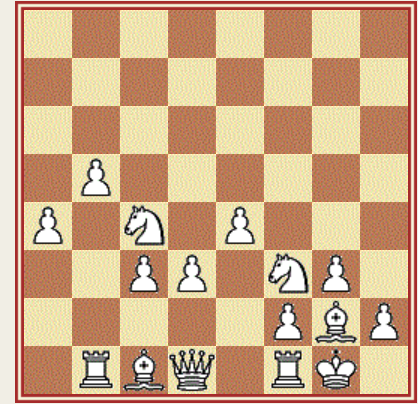
Schematic thinking 1: Bott and Morrison, The Chess Apprentice

Thomas,G-Monticelli 1933: 1. e4 e5 2. Nf3 Nc6 3. Bb5 a6 4. Ba4 d6 5. Bxc6+ bxc6 6. d4 f6 7. Be3 Ne7 8. Qd2 Ng6 9. Nc3 Be7 10. h4

Thomas-Monticelli, 1933


t+lDj+-T
+-X-L-Xx
x+xX-Xs+
+-+-X-+-
-+-Pp+-P
+-N-Bn+-
pPpQ-Pp+
R-+-K-+r

There some lovely sections in The Chess Apprentice called ‘Winning Advantages’ and ‘The forces move into position’‘, which have lots of these schematic diagrams in. They genuinely changed the way I looked at a chessboard.

10…O-O 11. h5 Nh8 12. O-O-O Nf7 13. Rdg1 Bd7 14. g4 exd4 15. Nxd4 Ne5 16. Qe2 Qc8 17. Nf5 Re8 18. f4 Nf7 19. h6 Nxh6 20. Nxg7 Kxg7 21. Qh2 Nf7 22. Qxh7+ Kf8 23. f5 Bd8 24. Qg6 Ke7 25. Rh7 Rf8 26. Bh6 Be8 27. Qg7 1-0

Schematic Thinking 2: Capablanca

“Once in a lobby of the Hall of Columns of the Trade Union Centre in Moscow a group of masters were analysing an ending. They could not find the right way to go about things and there was a lot of arguing about it. Suddenly Capablanca came into the room. He was always find of walking about when it was his opponent’s turn to move. Learning the reason for the dispute the Cuban bent down to the position, said ‘Si, si,’ and suddenly redistributed the pieces all over the board to show what the correct formation was for the side trying to win. I haven’t exaggerated. Don Jose literally pushed the pieces around the board without making moves. He just put them in fresh positions where he thought they were needed.”

“Suddenly everything became clear. The correct scheme of things had been set up and now the win was easy. We were delighted by Capablanca’s mastery…”

KOTOV, Think like a Grandmaster, tr. Cafferty, pub. 1971 Batsford.

Capablanca – Ragozin (Moscow) [E22], 1936

1. d4 Nf6 2. c4 e6 3. Nc3 Bb4 4. Qb3 Nc6 5. e3 d5 6. Nf3 O-O 7. a3 dxc4 8. Bxc4 Bd6 9. Bb5 e5 10. Bxc6 exd4 11. Nxd4 bxc6 12. Nxc6

This gain of a pawn ultimately decides the game.

12… Qd7 13. Nd4 Qg4 14. O-O Ba6 15. h3 Qh4 16. Nf3 Qh5 17. Re1 Rab8 18. Qa4 Bb7 19. e4 h6 20. Be3

Black is struggling to hold the Queen’s-side.

20… Rfe8 21. Bd4 Nh7 22. Bxa7 Ra8 23. Qb5 Qxb5 24. Nxb5 Rxe4 25. Rxe4 Bxe4 26. Nd2 Bd3 27. Nxd6 Rxa7 28. N6e4 Nf8 29. Nc5 Bf5 30. Nf3 Ne6 31. Rc1 Kf8 32. Nxe6+ Bxe6


-+-+-J-+
T-X-+xX-
-+-+l+-X
+-+-+-+-
-+-+-+-+
P-+-+n+p
-P-+-Pp+
+-R-+-K-

“White’s plan is to prevent the advance of the enemy c-pawn which might make his own pawn at b2 weak, and to control the whole board as far as the fifth rank. This is achieved by playing the King to e3, the Rook to c3, the Knight to d4 and the pawns to b4 and f4. When this has been achieved White will advance his Q-side pawns”

CAPABLANCA, Moscow 1936 Tournament Bulletin, quoted by KOTOV in Play like a Grandmaster, tr. Cafferty, pub. 1978 Batsford.

(“Note – no variations!” KOTOV)

33. Nd4 Rb7 34. b4 Bd7 35. f4 Ke7 36. Kf2 Ra7 37. Rc3 Kd6 38. Rd3 Ke7 39. Ke3 Ra4 40. Rc3


-+-+-+-+
+-XlJxX-
-+-+-+-X
+-+-+-+-
tP-N-P-+
P-R-K-+p
-+-+-+p+
+-+-+-+-

mission accomplished

40… Kd6 41. Rd3 Ke7 42. Rb3 Kd6


-+-+-+-+
+-Xl+xX-
-+-J-+-X
+-+-+-+-
tP-N-P-+
Pr+-K-+p
-+-+-+p+
+-+-+-+-

the Knight is needed on c3 now to support the advance of the Q-side pawns, so we have a little shuffle

43. Ne2 g6 44. Rd3+ Ke6 45. Kd4 Ra6 46. Re3+ Kd6 47. Nc3 f5 48. b5 Ra8 49. Kc4 Be6+ 50. Kb4 c5+ 51. bxc6 Bg8 52. Nb5+ Kxc6 53. Rd3 g5


t+-+-+l+
+-+-+-+-
-+j+-+-X
+n+-+xX-
-K-+-P-+
P-+r+-+p
-+-+-+p+
+-+-+-+-

A slightly desparate-looking move. The Black pawns fall now and the win becomes straightforward.

54. Rd6+ Kb7 55. fxg5 hxg5 56. Rg6 Rf8 57. Rxg5 f4 58. Nd4 Rc8 59. Rg7+ Kb6 60. Rg6+ Kb7 61. Nb5 Rf8 62. Nd6+ Kb8 63. h4 1-0


P.S. “Silman Thinking Technique”, my foot.

Rooks on ranks and files

Knights like outposts, bishops like clear diagonals: you could guess that rooks like clear ranks and files. The best rank to put your rook on is the seventh, particularly if the opponent’s king is trapped behind it. A rook on the seventh rank (or ‘on the seventh’ as people sometimes say) can threaten unmoved pawns and with assistance can create mate threats. To get to the seventh the rook will have to move along a file. You can see Znosko-Borovsky doing just that with the c-file in the Illustrative Games. The other use of rooks on files is to attack: we have seen some examples of rooks attacking down the central d- and e-files in the section above on Attacking the King, and in the other Illustrative Game we can see Tarrasch making good use of the g-file to attack a king which has castled.

Rooks can be moved into action along the third rank; I include a brisk wins by Keene and Miles. Beginners often develop their rooks by going a4 and Ra3; this is a manoeuvre that you may rediscover as you get on – for example, Petrosian has often used that development against the Benoni, when he has already played a4 to slow up …b5. This has good and bad points: for example, Miles-Clarke 1976 went 1. d4 d5 2. c4 dxc4 3. Nf3 Nf6 4. e3 c5 5. Bxc4 e6 6. Nc3 a6 7. a4 cxd4 8. exd4 Be7 9. O-O Nc6 10. Re1 Nb4 11. Bg5 O-O 12. Ne5 Re8 13. Re3 Now, after playing 13.Re3 Miles spotted 13…Nfd5 14.Nxd5 Nxd5 15.Rh3 Bxg5 16.Qh5 but wasn’t convinced that it worked (16…Qf6!?) – Clarke also thought about it but avoided it. It does show clearly some of the risks and opportunities of the Re3-h3 idea.

Rs can also support knight outposts, so that – in a position like the diagram above in the section on outposts – if a knight on d5 is exchanged, a rook from d1 may recapture, still putting pressure on the pawn on d6.


Compensation for material?

Mostly, situations of material imbalance are fairly clear. Typically extra material wins: even with an otherwise level position, the extra firepower can make an attack pay, or make the opponent’s defences overstretched.

  Occasionally, normal material values are overturned. This is most obvious in situations of sacrifice: the mutual possibilities of exchange sacrifices Rh1xNh5 and …Rc7xNc3 in the Sicilian Dragon are well-known, if not always easy to judge. The sacrifices remove a key defender and open lines against the King.


-+t+-+j+
+-TlXxL-
x+-X-+x+
Dx+-S-Ps
-+-Np+-+
+bN-Bp+-
pPpQ-+-+
+k+r+-+r

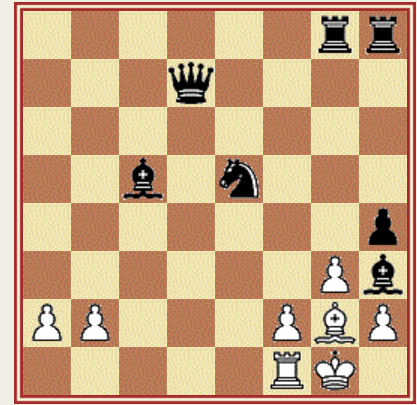
These attacking possibilities are not all we need to know. A while ago, I showed you one of my classier messes:

A tactic appears for you: you see it and analyse correctly, but wrongly assess the outcome.

-+-+tTj+
+xX-+-+-
x+-X-+-X
+-+pLsXd
p+p+nX-+
+-+-+p+p
-P-+qBp+
+r+-R-+k
Ward,D – Regis,D (1994)

26… Bd4 27. Bxd4 Rxe4 28. Qxe4 Ng3+ 29. Kg1 Nxe4 30. Rxe4 Re8 31. Rbe1 Rxe4 32. Rxe4 Qf7 33. Re6 Kh7 34. Rf6

[34. Kh2! …when it’s all a bit tricky!]

34… Qe8 35. Re6 Qxa4 36. Re7+ Kg6 37. Rxc7 Qd1+ 0-1

  The tactic was obvious enough, what I failed to assess was how good White’s pieces would be in the ending. Best was probably to recapture on d4 with the knight on #27.

  What is at issue here are situations which suit particular pieces. Here are some unusual exploitations of material imbalance. Some are exceptions to the usual material rules, but perhaps we should rather think of these as illustrations of some unbroken positional rules – Rooks always need open files.

  Several of these examples I got from Jan Timman’s recent and hugely enjoyable games collection Selected Games (cadogan), where I was struck by several games with a material imbalance. I don’t know if Jan gets these more often than other GMs or just enjoys them more! Anyhow, I hope you get something out of these examples.


The exchange


Compensation for the exchange: Bronstein,David – Boleslavsky,Isaak (Moskva ch_SU, 1961

t+-+-+j+
+-+-+x+-
-+-X-+x+
Px+p+-Bx
-P-+s+-P
+-+-+-+-
-+-+bLp+
+-+-Rk+-
A simple case: an exchange for extra passed Pawns

35. Bxb5 Bxe1 36. Kxe1 Nxg5 37. hxg5 Kf8 38. Bc6 Ra7 39. Kd2 Ke7 40. Kc3 f6 41. gxf6+ Kxf6 42. Kc4 Ke5 43. Kb5 g5 44. Kb6 Rf7 45. a6 g4 46. a7 Rf8 47. Bd7 Kf4 48. b5 h4 49. Bxg4 Kxg4 50. Kc6 1-0


Compensation for the exchange (R v N) Lasker – Janowsky, 1909

-+-+-+j+
+-X-+-+d
x+pX-T-+
+x+pXp+x
-P-S-+-+
+-+r+-Pq
p+-+-+-+
+-+r+-+k
1. Rf1 Qf7

[1… Nxf5 2. Rdf3]

[1… Rxf5 2. Rxf5 Nxf5

[2… Qxf5 3. Qxf5 Nxf5 4. Rf3 Nd4 ? 5. Rf6 Kg7 6. Rxd6 cxd6 7. c7]

3. Rf3]

2. Qg2

  cooperative

[2. Kh2 e.g. 2… Qxd5 3. Qxh5]

2… Rxf5 3. Rxf5 Qxf5 4. Re3

[4. Ra3 e4 5. Rxa6 e3 6. Ra3 e2]

[4. Rd1 Nf3 5. Rf1 e4]

4… Qb1+ 5. Kh2 Qxb4 6. g4 h4

  limiting White’s counterplay

7. Kh3 Qc4 8. Qe4 Kg7 9. Kxh4 Qf1 10. a3

[10. Kg5 Qf6+ 11. Kh5 Qh6#]

10… a5 11. Kg3 Qg1+ 12. Kh3 Qf2 13. g5 b4 14. axb4 axb4 15. Kg4 Qg1+

[15… b3]

16. Kh5 Qh2+ 17. Kg4 b3 18. Re1 Qc2 19. Kh5

[19. Qxc2 bxc2 20. Rc1 Kg6 21. Kh4 e4 22. Kg4 e3 winning]

19… Qxe4 20. Rxe4 Nc2 21. Rxe5 b2

[21… dxe5 22. d6 also wins for Black (Tarrasch), but why bother?]

22. Re7+ Kf8 23. Rxc7 b1=Q 24. Rc8+ Ke7 25. Rc7+ Kd8 26. Rd7+ Ke8 27. Rxd6 Nd4 0-1


Compensation for the exchange: Ljublinsky Victor (RUS) – Botvinnik M (Moscow) [C77], 1943

25. Qc2


-T-T-+j+
+-L-Dx+x
l+x+-+x+
X-X-X-+-
-+p+p+-+
+pN-Bp+-
p+q+-+pP
R-+r+-K-
25… Rd4 26. Ne2?

[26. Bxd4 cxd4 27. Na4 c5 28. Nb2 and with Nd3 White achieves an ideal blockading position.]

26… Bc8 27. Nxd4 cxd4 28. Bf2 c5 29. Rf1 f5


-Tl+-+j+
+-L-D-+x
-+-+-+x+
X-X-Xx+-
-+pXp+-+
+p+-+p+-
p+q+-BpP
R-+-+rK-
The Rooks have no open files, while the Bishops give the King a Hard Stare. The d-Pawn is also a constant danger.

30. Bg3 Bd7 31. Rad1 f4 32. Bf2 g5 33. g4?

  perhaps White intends to seal the King’s-side, but of course Black does not permit this.

[33. a3 and opening a file on the Queen’s-side is essential]

33… fxg3 34. Bxg3 Bh3 35. Rf2 h5 36. Rfd2 h4 37. Bf2 Rf8 38. Rd3 Rf4 39. Kh1 Kh7 40. Rg1 Bd8 41. Qe2 Qf7 42. Qd1 Qh5


-+-L-+-+
+-+-+-+j
-+-+-+-+
X-X-X-Xd
-+pXpT-X
+p+r+p+l
p+-+-B-P
+-+q+-Rk
43. Be3 Qxf3+ 44. Qxf3 Rxf3 45. Bxg5 Rxd3 46. Bxd8 Re3 47. Bb6 Rxe4 48. Bxc5 Re2 49. Rd1 Bg4 50. h3 Bxh3 51. b4 Bf5 52. Bd6 d3 53. bxa5 h3 0-1


Compensation for the exchange: Selesniev Alexey – Alekhin Alexander (Triberg) [A47], 1921

20. Bd3


-T-+-Tj+
+-DsXxL-
l+-X-+xX
X-Xp+-+-
p+p+-+-+
+-+b+nP-
-+qBpP-P
+r+-+rK-
20… Rb4 21. Bxb4 cxb4 22. Nd2 Nc5?!

[22… Rc8]

23. Nb3 Nd7


-+-+-Tj+
+-DsXxL-
l+-X-+xX
X-+p+-+-
pXp+-+-+
+n+b+-P-
-+q+pP-P
+r+-+rK-
Black has great play on the dark squares, especially c5, and a protected passed Pawn. Additionally, the White Pawns at a4 and c4 are targets.

24. c5

  A good bid for counterplay: the Rooks need open lines and the Pawn was blocking the Bishop. However, the Black Queen’s-side Pawns now become very dangerous.

24… Bxd3 25. exd3 dxc5 26. Rfe1 Ne5 27. Re3

[27. Qxc5!?]

27… Rc8 28. Rc1 Qd7 29. d4 Ng4 30. Re4 c4 31. Nc5 Qf5 32. Qe2


-+t+-+j+
+-+-XxL-
-+-+-+xX
X-Np+d+-
pXxPr+s+
+-+-+-P-
-+-+qP-P
+-R-+-K-
32… b3 33. Rxg4 b2 34. Qxb2 Qxg4 35. Rxc4 h5 36. Qc2


-+t+-+j+
+-+-XxL-
-+-+-+x+
X-Np+-+x
p+rP-+d+
+-+-+-P-
-+q+-P-P
+-+-+-K-
The return of the exchange has given White some play…

36… h4

  …but this ushers in a new phase of the game: Alekhin has the initiative, and there is no more dangerous prospect for a player!

[…] 74. Nh3+ Kf1 0-1


A complex exchange sacrifice: Portisch L – Timman J (5, Antwerp) [B06], 1992

-T-T-+j+
X-+-+xLx
-+bP-+x+
+pX-P-+-
-+qX-P-+
+-+-+-+-
-Dn+-+pP
+-+-+rK-
An imbalance of the exchange is overlaid with a fascinating battle between passed d-Pawns.

26. Qxc5 d3 27. Nb4!


-T-T-+j+
X-+-+xLx
-+bP-+x+
+pQ-P-+-
-N-+-P-+
+-+x+-+-
-D-+-+pP
+-+-+rK-
27… d2 28. Nd3 Qb3 29. Nf2 Qa4 30. g3 a6 31. b6 Rdc8 32. b7! Rxc6 33. Qa7 Rxb7 34. Qxb7 Rc1 35. Qf3 Qd4 36. Kg2 Re1! 37. Nd1 Bf8 38. Qf2 Qd5+ 39. Kg1 Rxf1+ 40. Kxf1 f6 41. exf6 Bxd6 42. Qe3 Kf7 43. Ke2 Bc5! 44. Qc3 Qe4+ 45. Kf1 Qh1+ 46. Ke2 Qxh2+ 47. Kf3 Qh1+ 0-1


Queen for Rook and Minor Piece

This is usually a straightforward win. The Queen has problems if it is the only White piece left, and if the defender’s position can hold the Queen off.


The Queen in an open position: Euwe, M – Grunfeld,E (Zandvoort) Q vs. RB, 1936

t+-D-Tj+
+l+-LxXx
x+-+-+-+
+xSnPq+-
-+x+-+-+
+-+-+n+-
pP-+-PpP
R-Br+-K-
18. Nf6+ Bxf6 19. Rxd8 Bxd8


t+-L-Tj+
+l+-+xXx
x+-+-+-+
+xS-Pq+-
-+x+-+-+
+-+-+n+-
pP-+-PpP
R-B-+-K-
In this open position the Queen is boss and White wins quickly by direct attack.

20. Ng5 Bxg5 21. Bxg5 Rfe8 22. Re1 Re6 23. Re3 Rae8 24. h4 h6 25. Bf6 g6 26. Qf4


-+-+t+j+
+l+-+x+-
x+-+tBxX
+xS-P-+-
-+x+-Q-P
+-+-R-+-
pP-+-Pp+
+-+-+-K-
26… Kh7 27. Bg5 f5 28. exf6 0-1


Keres,Paul – Fischer,Robert (Yugoslavia ct Rd: 1 [B99] Q v RN, 1959

t+l+j+-T
+-D-LxXx
x+-XxS-+
+x+-+-+-
-+-NpP-+
+-N-+q+-
pPp+b+pP
+-Kr+-+r
12. e5 Bb7 13. exf6 Bxf3

“so I chopped it off!” – RJF

14. Bxf3 Bxf6 15. Bxa8 d5 16. Bxd5 Bxd4 17. Rxd4 exd5 18. Nxd5 Qc5 19. Re1+ Kf8


-+-+-J-T
+-+-+xXx
x+-+-+-+
+xDn+-+-
-+-R-P-+
+-+-+-+-
pPp+-+pP
+-K-R-+-
20. c3 h5 21. f5 Rh6 22. f6

  conceding (“throwing away” – RJF) a pawn in order to try and keep Black tied up

22… gxf6 23. Nf4 h4 24. Rd8+ Kg7 25. Ree8 Qg1+ 26. Kd2 Qf2+ 27. Ne2 Rg6 28. g3 f5


-+-Rr+-+
+-+-+xJ-
x+-+-+t+
+x+-+x+-
-+-+-+-X
+-P-+-P-
pP-KnD-P
+-+-+-+-
Keres may have been optimistic about this line but Black is sorted out and can plan the win. The Queen in an open position, with play on both wings, is a monster. Black soon obtains a passed Pawn and play against the exposed King.

29. Rg8+ Kf6 30. Rxg6+ fxg6 31. gxh4 Qxh2 32. Rd4 Qh1 33. Kc2 Ke5 34. a4 Qf1 35. Nc1 Qf2+ 36. Kb3 bxa4+ 37. Ka3 Qc2 38. Nd3+ Kf6 39. Nc5 Qc1 40. Rxa4 Qe3 41. Nxa6


-+-+-+-+
+-+-+-+-
n+-+-Jx+
+-+-+x+-
r+-+-+-P
K-P-D-+-
-P-+-+-+
+-+-+-+-
41… f4 42. Rd4 Kf5 43. Nb4 Qe7 44. Kb3 Qxh4 45. Nd3 g5 46. c4 Qg3 47. c5 f3 48. Kc4 f2

  “Bzzzt! Game over, thank you for playing…”

49. Nxf2 Qxf2 50. c6 Qxb2 51. Kc5 Qc3+ 52. Kd5 g4 53. Rc4 Qe5# 0-1


Timman J – Seirawan Yasser (10, Surakarta) [D29] Q v RB, 1983

19. Rd6


-+-T-Tj+
+-+s+x+x
xD-Rx+x+
+xL-Pp+s
-+-+-+-+
+bN-B-+-
pP-+qP-P
R-+-+-K-
19… Bxe3! 20. Rxb6 Bxb6 21. Rd1 Nc5 22. Qf3 Nxb3 23. axb3 Bd4


-+-T-Tj+
+-+-+x+x
x+-+x+x+
+x+-Pp+s
-+-L-+-+
+pN-+q+-
-P-+-P-P
+-+r+-K-
24. Rd3 exf5?! 25. Qd1 Bb6 26. Nd5 Rb8


-T-+-Tj+
+-+-+x+x
xL-+-+x+
+x+nPx+s
-+-+-+-+
+p+r+-+-
-P-+-P-P
+-+q+-K-
Where can White find a winning plan of campaign?

27. Rh3!

[27. Nxb6 Rxb6 28. Rd6 Rfb8 when neither a mating attack nor a passed Pawn seems likely.]

27… Bd8 28. Rxh5 gxh5 29. Qxh5 Kh8 30. Qxf5 Rg8+ 31. Kf1 Rg7 32. Nf4 Kg8 33. e6 Be7 34. Nh5 Rf8 35. Nxg7 Kxg7


-+-+-T-+
+-+-LxJx
x+-+p+-+
+x+-+q+-
-+-+-+-+
+p+-+-+-
-P-+-P-P
+-+-+k+-
White has regained his extra material and should be able to get a win on technique.

36. Qe5+

[36. b4! keeps the Queen’s-side Pawns vulnerable]

36… Kg6 37. Kg2 b4 38. f4 f5 39. Kf3 h5 40. Qe2 h4 41. Qxa6 Rd8 42. Qe2


-+-T-+-+
+-+-L-+-
-+-+p+j+
+-+-+x+-
-X-+-P-X
+p+-+k+-
-P-+q+-P
+-+-+-+-
(Adjourned: how can the White King effect an entry?)

42… Rd6 43. Qe3 Rd8 44. Ke2 Kf6 45. Qe5+ Kg6 46. Qe3 Kg7 47. Qg1+ Kf6 48. h3 Rf8 49. Kd3 Kxe6 50. Qe3+ Kd7 51. Kd4 Rf6


-+-+-+-+
+-+jL-+-
-+-+-T-+
+-+-+x+-
-X-K-P-X
+p+-Q-+p
-P-+-+-+
+-+-+-+-
52. Qg1! Rf8 53. Kd5 Rf6 54. Qg8 Ra6 55. Qb8 Rh6 56. Qb7+ Kd8 57. Ke5 Rf6 58. Qb8+ Kd7 59. Qg8 Rc6 60. Kxf5 Rf6+ 61. Ke5 Rc6 62. Qd5+ Kc7 63. Qa5+ Kb7


-+-+-+-+
+j+-L-+-
-+t+-+-+
Q-+-K-+-
-X-+-P-X
+p+-+-+p
-P-+-+-+
+-+-+-+-
Nearly zugzwang!

64. Qa4 Bf8 65. Qb5+ Kc7 66. Qa5+ Rb6 67. Qa7+ Rb7 68. Qa6 Bg7+ 69. Kd5 Rb6 70. Qa7+ Rb7 71. Qa5+ Kb8 72. Qd8+ Ka7 73. Qxh4 Ka6 74. Qd8 Bxb2 75. f5 Bc3 76. f6 Rh7 77. Kc6 1-0


Ivanchuk Vasily – Timman J [04, Hilversum] [E99] Q v RN, 1991

-T-D-Lj+
+-+l+-+t
xN-X-S-+
P-+pX-+-
-+-+p+p+
+-+-X-+-
-Pr+b+q+
+-Rn+-K-
“The game annotated below does not really come within the confines of what is commonly understood to be top chess.” — Timman

33… Nh5

[33… Bh6!]

34. gxh5+!

  else the Knight comes to f4, winning

34… Rg7 35. Nxd7 Rxg2+ 36. Kxg2 Qxd7 37. Nxe3

  White is getting sorted

37… Bh6!?

[37… Qa4 38. Bf3 Qxa5 39. Nf5 with a blockade]

38. Ng4 Bg5 39. Rc7 Qa4 40. R1c4 Qxa5 Time-control 41. Nf2?

[41. Rc8+ Rxc8 42. Rxc8+ Kg7 43. Rc2]

41… Qe1! 42. Rc8+ Rxc8 43. Rxc8+ Kg7 44. Rc2


-+-+-+-+
+-+-+-J-
x+-X-+-+
+-+pX-Lp
-+-+p+-+
+-+-+-+-
-Pr+bNk+
+-+-D-+-
now the Knight is passive

44… Bh4?

[44… Be3 45. Bf3 Bd4

[45… a5!]

46. Ng4]

45. Bf3 Kh6 46. Re2 Qc1 47. Ng4+ Kg5 48. Ne3 Kf4 49. h6! Qc8 50. Nf5 Qd8 51. Re3


-+-D-+-+
+-+-+-+-
x+-X-+-P
+-+pXn+-
-+-+pJ-L
+-+-Rb+-
-P-+-+k+
+-+-+-+-
51… Bg5?!

  “a groundless winning attempt”

52. h7 Bf6

[52… Qh8 was intended, but 53. Be2 Qxh7 54. Rf3+ Kxe4 55. Bd3+ Kxd5 56. Ne3+]

53. Be2 Bh8 54. Bd3 Qc7 55. Rf3+ Kg5 56. Rg3+ Kf6 57. Rh3 Qc1 58. Nxd6 Qxb2+ 59. Kf1 a5 60. Nc4 Qa1+ 61. Ke2 a4 62. d6 Qd4 63. Rh6+ Kg7 64. Re6 Kxh7 65. Re7+ Kg6 66. d7 Bf6 67. Re6 a3 68. Nd6 Qb6 69. Bc4 a2 70. Bxa2 Qb2+ 71. Kf3 Kh5!!


-+-+-+-+
+-+p+-+-
-+-NrL-+
+-+-X-+j
-+-+p+-+
+-+-+k+-
bD-+-+-+
+-+-+-+-
a miracle has occurred

72. Rxf6 Qc3+ 73. Kg2 Qd2+ 74. Rf2 Qxd6 75. Be6=

  …drawn on move 103!


Queen for two Rooks

Where the Rooks are connected and can cooperate in attacking Pawns, they are clearly stronger, and this is usually the case.


Janowski,D – Lasker,Emanuel (Paris) [C48] Q vs. 2 RR (Q with attack), 1909

-+-+tJ-+
+xXs+x+x
x+-X-P-+
+-+-+-+-
-+-+-P-+
+p+-+q+-
pBp+-KpP
+-+-T-+-
25. Qxb7

[25. Qh5 R1e2+

[25… R8e6 26. f5 R6e4 27. Bc3 R1e3 28. Qh6+ Ke8 29. Qxe3]

[25… R8e4 26. Bc3 R1e3 27. Qxh7 Ke8 28. h4]

[25… R8e3 26. Bc3]

26. Qxe2]

25… R1e2+ 26. Kf3 Rxc2 27. Bd4 a5 28. Qb5 Nc5 29. Qxa5 Nd3

[/\ …Ne1+ and …Rxg2]

30. Be3 d5

[/\ …Ne1+; Qxe1, d4]

31. Bd2 c5 32. Kg3 Nc1

[32… d4 33. f5 (/\ Bh6+ and Qb5) 33… Nc1

[33… Ne5 34. Bh6+ Kg8 35. Qb5 Rd8 36. Qf1 d3 37. Qe1 d2

[37… Nc6 38. Qe3]

38. Bxd2 Rcxd2 39. Qxe5]

34. Bh6+ Kg8 35. Qb5 Rd8 36. Qf1 Nxa2 37. Qf4]

33. Bxc1 1-0

[33. Bxc1 Rxc1 34. Qd2 when the d-pawn falls]


Ivanchuk V – Timman J [13, Tilburg] [A29] Q v RR, 1990

37. R1f7+


-+-+tR-+
+-Qs+rJx
-+-+-+-T
+p+-+-+d
-+-+-+-+
P-N-X-Pl
-+-+p+-X
+-B-+-+k
“White has no choice but to allow this liquidation, but the two Rooks are much stronger than the Queen.”

37… Qxf7 38. Rxf7+ Kxf7


-+-+t+-+
+-Qs+j+x
-+-+-+-T
+p+-+-+-
-+-+-+-+
P-N-X-Pl
-+-+p+-X
+-B-+-+k
39. Qf4+ Kg6 40. Kxh2 Rh5 41. Qd6+ Nf6 42. Kg1 Rf5 43. Qd3


-+-+t+-+
+-+-+-+x
-+-+-Sj+
+p+-+t+-
-+-+-+-+
P-NqX-Pl
-+-+p+-+
+-B-+-K-
43… Kh5?

[43… Ree5!? just fails to mate]

[43… Kg7!]

44. g4+! Kxg4 45. Bxe3 Rg8 46. Kh2 Kh4 47. Bg5+

  (the move Timman had overlooked; the Black King is persistently misplaced)

47… Kxg5 48. Kxh3 Nh5?

“I was getting short of time at this point, and – worse – was still aiming to win.”

[48… Rg6!]

49. Nd5 Rg6 50. Qe3+ Nf4+ 51. Nxf4 Rxf4 52. b6 Kf5 53. Qc5+ Ke4 54. Qe7+ Kf5 55. Qxh7 Re4 56. b7 Re3+ 57. Kh4 1-0


A curiosity

Agust always says that you should teach chess backwards, like the Russians: learn how to mate with the King and two Queens against bare King, then King and Queen, then King and Rook…

  Agust also says he is glad he learned to mate with Bishop and Knight, and sorry he neglected the endgame of Bishop and Rook against Rook. Here’s another that many of us may have neglected…


Timman J – Speelman J (10, Linares) [D35] KBB v KN, 1992

66. Bxb5


-+-+-+-+
+-+-+-+-
-+-+-+-B
+b+k+-+-
-+-+-+-+
+-+-+jS-
-+-+-+-+
+-+-+-+-
66… Nf5 67. Bf8 Ne3+ 68. Kd4 Ng2 69. Kd3 Nf4+ 70. Kd2 Ng2 71. Bc6+ Kf2 72. Bd6 Nh4 73. Bc5+ Kg3 74. Bb6 Ng2 75. Bd5 Nh4 76. Ke2 Kf4 77. Bb3 Nf5 78. Bc7+ Kg5 79. Be5 Kg4 80. Bc2 Ng3+ 81. Kf2 Nf5 82. Bd1+ Kg5 83. Kf3 Nh4+ 84. Ke4 Nf5 85. Ba4 Ne7 86. Bd7 Ng8 87. Bf4+ Kg6 88. Ke5 Nf6 89. Bb5 Kf7 90. Bc4+ Kg6 91. Ke6 1-0

  Timman in his notes regrets that the theory of this endgame indicates a win can be forced only after more than 50 moves, and so there is little incentive, under the restored 50-move rule, to study this type of endgame. He concludes:

“The chess world is becoming dull and superficial” — Timman

New starting formations (Tabi’at)

Introduction: Tabi’at

The old game of chess

  Modern (Western) chess originated from the Persian game
of shatranj , itself a derivation of the very similar
Hindu game of chaturanga . The rules of shatranj
(no double Pawn moves or castling, weaker Queen ( firzan )
and Bishop ( fil

  made it a slow game with a deferred clash of forces. This
encouraged the development of tabi’a (starting
formations), a recognised arrangement of forces which could be
aimed for almost regardless of the opponent’s play. You will find
written tabi’a tabia and tabiya , the
plural is tabi’at.

  Hooper and Whyld in their excellent Oxford Companion
to Chess
give a selection of tabi’at.


|+.+.+.+.|
|.+p+.).+|
|+php)n).|
|p+.+.+.)|
|+rbqkbr-|
+-----------------+
 

  mujannah (=”flank opening”)

  N.B. the pieces on c1 and f1 are fils , the
piece on d1 a firzan  


|+.+.+.+.|
|.+.+.+p+|
|)p)p)p+.|
|.+.+n$.)|
|+nbqkbr-|
+-----------------+

  sayyal (=”torrent”)

  A King’s-side attacking formation.


|+.+.+p+.|
|.+.).+p+|
|pppqpn+-|
|.+.h.+.)|
|+rb+kbr-|
+-----------------+

  Muwashshah (=”richly girdled”)


In practice, say H&W, the opponent would never allow the
completion of this strong attacking formation.

  Some players have tried to interpret old tabi’at
in modern chess, for example the mujannah can arise from
Bird’s opening. This is unnecessary, for modern chess has its own
tabi’at . The Soviet literature is quite rich in uses of
the term in modern chess.


Modern
Tabi’at

  Old Stodge

+-----------------+
|r+b1k+.4|
|0p0.+p0p|
|.+n0.h.+|
|+.g.0.+.|
|.+b+p+.+|
|+.hp+n+.|
|p)p+.)p)|
|$.gqi.+r|
+-----------------+

  I am uncomfortably aware that for some players,
especially juniors, this is a tabi’a . I wouldn’t mind so
much if I though they had the slightest idea what to do when they
got this far.

  King’s Indian

+-----------------+
|r+b1.4k+|
|0p0.hpgp|
|.+.0.hp+|
|+.+p0.+.|
|.+p+p+.+|
|+.h.+n+.|
|p).+b)p)|
|$.gq+ri.|
+-----------------+

  There are strong arguments for supposing this to be a
modern tabi’a . Both sides set up their formations without
any great account being taken of the moves of their opponent, and
from here a great many alternative plans are available to each
player.

  Sicilian Taimanov

  The veteran Russian GM Mark Taimanov is just one author
who uses the term in his writings.

+-----------------+
|r+b1k+.4|
|+.+pgp0p|
|p+n+p+.+|
|+p+.+.+.|
|.+.+p+.+|
|+.h.g.+.|
|p)p!b)p)|
|$.+.+ri.|
+-----------------+

  “This is one of the typical tabias (
sic ) of the Taimanov system. As in many similar variations,
this position is assessed as favourable for White.

  “White has an advantage in the centre, harmonious
development, pressure along the d-file and a wide choice of plans
to gain the initiative. Black is slightly restricted (at least in
the centre), and he has to spend time (at least three tempi) on
development.

  “Nevertheless, many practical examples show that
Black’s position is quite viable. What is the secret?

  “First of all, Black’s position is invulnerable as
yet, because his pieces control the whole defensive region, so it
is difficult to approach his position (the only worrying aspect is
the weakened d6 square). Besides, Black has good opportunities of
his own in prospect. For instance, if he manages to arrange his
pieces freely according to the scheme …Qc7, …Rfd8, …Bb7,
…Rac8, then he can count on promising counterplay on the
Queen’s-side connected with …Nc6-a5-c4, and, in some cases, on
pressure along the a8-h1 diagonal. That is why the theoretical
debate concerned with this variation has already been going on for
several decades, deepening the understanding of the position for
both sides, but not coming to a final conclusion.

  “Obviously, White’s attempts to gain the initiative
can be linked either to the weak d6 square (12. Bf4), or to active
play in the centre and King’s-side (11.f4 or 11.Rad1,
etc.).”

  The book gives two games:

  11.Rad1 [ or 11.f4 Bb7 12.e5!? Na5!?
13.Bd3 Rc8 14.Ne2 Nc4 15.Bxc4 Rxc4 16.Rad1 Qc8 (Black is better)
17.c3 b4!? 18.Rc1 0-0 19.b3 bxc3 20.Nxc3 Rc6 21.Na4 Ba3 22.Rxc6
Qxc6 23.Nb6 d6!? 24.exd6 Bxd6 25.Rc1 Qe4 26.Rc4 Qb1+ 27.Rc1 Qg6
28.Qc2 Be4 29.Qf2 Rd8!? 30.Rd1 Bc7 31.Rxd8+ Bxd8 32.Nc4 Bd5 33.Nd2
h6 34.h3 a5 35.Nf3 Bc7 36.Nd4 Qb1+ 37.Kh2 g5!? 38.Nb5 Bxf4+ 39.Bxf4
gxf4 40.Nc3 Qf5… Unzicker,W-Taimanov,M/Wijk aan Zee 1981/0-1
(53)]
11…0-0 12.Bf4 Qa5!? 13.a3 Rd8 14.Bd6 Bb7
15.Bxe7 Nxe7 16.Qg5!? f6 17.Qc5 Nc6 18.Rd6 Rac8 19.Rfd1 Nb8 20.Qe3
Rc6 21.R6d4 Qb6 22.Qh3 Qc5 23.Nd5!! exd5 24.exd5 Rd6 25.c4! bxc4
26.Rxc4 Qa5 27.Rh4! h6 28.Rxh6! Rxd5 29.Rh8+ Kf7 30.Bc4 Ke7 31.Bxd5
Bxd5 32.Rxd8 Nc6 33.Re8+! 1-0 Sznapik,A – Donchev,D [ or B46]
Prague (11), 1985


French Tarrasch

  There are two parallel but over-lapping variations of the
main line 3…Nf6 French Tarrasch.

  1.e4 e6 2.d4 d5 3.Nd2 Nf6 4.e5 Nfd7 5.Bd3 c5 6.c3
Nc6 7.Ne2 cxd4 8.cxd4 f6 9.exf6 Nxf6 10. Nf3 Bd6

  1.e4 e6 2.d4 d5 3.Nd2 Nf6 4.e5 Nfd7 5.Bd3 c5 6.c3
Nc6 7.Ne2 cxd4 8.cxd4 Qb6 9.Nf3 f6 10.exf6 Nxf6 11.0-0
Bd6

+-----------------+
|r+b+k+.4|
|0p+.+.0p|
|.1ngph.+|
|+.+p+.+.|
|.+.).+.+|
|+.+b+n+.|
|p).+n)p)|
|$.gq+ri.|
+-----------------+

  Tony D strongly recommends having this type of position
in your repertoire, and being able to play it for both sides. The
point is, there are some very common Pawn formations to be mastered
here, and you can read a lot of the plans right off the Pawn
structure. However, the Pawn structure is not fixed.

  A French root and some branches

  The classic French structure arises after the Pawn
moves:

  e4 d4 e5

  …e6 …d5

+-----------------+
|rhb1kgn4|
|0p0.+p0p|
|.+.+p+.+|
|+.+p).+.|
|.+.).+.+|
|+.+.+.+.|
|p)p+.)p)|
|$ngqibhr|
+-----------------+

  As both sides contest the centre, this fundamental
structure is altered.

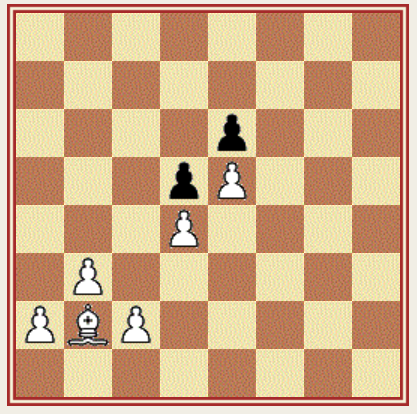
  The basic French centre

-+p+
+pP-
-P-+
+-+-

  There are some themes here that re-appear in many
variations below.

  Black has a poor light-squared Bishop, at least for the
moment. Black would like to exchange light-squared Bishops, White
would like to exchange dark-squared Bishops.

  White has more space and a potential King’s-side
attacking position.

  Black, who has the move, will attempt to attack the chain
with Pawn moves like:

  …c5 …f6 …cxd4 …fxe5 …f5

  Black will continue to put pressure on d4 and can extend
the scope of the attack to c3 by advancing the b-Pawn. Nimzovitch,
who studied the Advance Variation, always recommended the attack on
the base of the Pawn chain. Since Nimzo, and since the development
of the Tarrasch variation, we see much more virtue in attacking the
head. In fact, we see a lot more …f6s in the Advance these
days.

  White will defend or change the centre with Pawn moves
like:

  c3 f4 dxc4 exf6

  White must try to make the space or the attack tell
without allowing Black to destroy the centre and without getting in
a tangle. Black will use obvious piece moves like …Nc6 and …Qb6
to put pressure on the Pawn centre. The immediate Pawn attack,
around which Black’s development in this line revolves, is:

  …c5

-+p+
ppP-
-P-+
+-+-

  [ or Black can try and do without this move in other
lines of the French (Guimard).]

  c3

  French tension centre

-+p+
ppP-
-P-+
P-+-

  White usually tries to hold the centre initially with
c2-c3.

  After an exchange of Pawns:

  …cxd4, cxd4

  French centre with open c-file

-+p+
+pP-
-P-+
+-+-

  The exchange relieves a certain amount of central
pressure, but brings the base of White’s Pawn chain a little nearer
Black’s pieces.

  The open c-file allows a variety of new possibilities for
Black, most notably use of the b4 square (…Bb4+, …Nb4).

  …f6, exf6 Nxf6

  Two weaknesses

-+p+
+p+-
-P-+
+-+-

  This is the key formation we will discuss in more detail
below. The two Pawn weaknesses alluded to are Pe6 and Pd4; the Pe6
is weaker, being exposed on a half-open file, and White has the
advantage of being able to play on e5 as well as e6. However, Black
can attack d4 just as easily as White can attack e6, and can even
hope to get in the dynamic …e6-e5:

-+-+
+pp-
-P-+
+-+-

  After an exchange of Pawns (White naturally does not want
to allow …e5-e4) we develop the:

  IPQP centre

  Isolated passed Queen Pawn.

-+-+
+p+-
-+-+
+-+-

  White should behave the same as in an IQP centre,
blockading the Pawn and holding Black to its defence, looking for
second weaknesses; Black should look for attacking chances on the
open lines, and chances to advance the passed Pawn.

  dxc5

  French strongpoint centre.

-+p+
+pP-
-+-+
P-+-

  White gives up d4, the better to hang on to the single
point e5. Also, this exchange may wrong-foot Black by requiring a
recapture on c5.

  Black will typically try to destroy this centre with

  …f6

-+pp
+pP-
-+-+
P-+-

  With the head of the White Pawn chain so close to hand
and under such pressure, it is hard for White to defend it and we
normally see an exchange.

  This leads to the next central formation:

  Isolated Pawn couple

-+p+
+p+-
-+-+
P-+-

  This is quite a stable formation which can dominate
planning in the early middle game. Black has a concrete weakness on
e6 and a weak square on e5. This is why White is so happy to
exchange: a lot of the cramp exerted by the previous structure
still persists and White now has open lines against plain
targets.

  Black would ideally like to achieve …e6-e5, dominating
the centre. White, not unnaturally, would prefer to restrain this,
and so moves like Re1, Ne5, Bf4 and so on are all key. White would
perhaps also like to achieve f2-f4, but may need to move the Nf3 to
do so.

  You very often get a similar centre with f4 from the main
line of the Classical Variation:

-+p+
+p+-
-+-P
P-+-

  French very tense centre.

  From the Tarrasc with 5.f4:

-+pp
ppP-
-P-P
P-+-

  This centre could resolve into almost any other
formation! In fact the tension may be enhanced by a Black
…g7-g5.

  Some specifics

  We’ll look in detail at the “Two weaknesses” formation as
seen in the …Nf6 French Tarrasch.

-+p+
+p+-
-P-+
+-+-


The ideas and the moves

This French Tarrasch tabi’a is a complex formation with a
nearly full complement of pieces and Pawns and a wide variety of
plans available to each side. We can see in each of the games below
a rich interplay of desirable strategic ideas tempered by tactical
realities. It is even impossible to generalise on which wing each
player will attack: Black has several King’s-side attacking ideas
like …Ng4, …Bxh2 and …Rxf3

  To look at specifics, I’ll choose the less common …Qb6
line.

  This is because:

  1. The more common Qc7 line is a jungle (although we can
    transpose)
  2. The more common line Qc7 can be avoided by the murky 8.Nf4
    variation, winning the exchange.
  3. This less common Qb6 line has a superb how-to-play guide in
    John Watson’s book.

  MacDonald and Harley note that the Qb6 often comes back
to Qc7, helping protect the King. But this is no waste of time
because typically White has had to spend time coping with the
attacks on b2 and d4, and may have settled for the passive Be3.
They also note that Farago always plays …Qb6 and is never in any
trouble!

+-----------------+
|r+b+k+.4|
|0p+.+.0p|
|.1ngph.+|
|+.+p+.+.|
|.+.).+.+|
|+.+b+n+.|
|p).+n)p)|
|$.gq+ri.|
+-----------------+

  This is the position after Black’s move 11, with White to
move.

  The Black Queen attacks Pawns on b2 and d4, restricting
White’s development. If the Bc1 moves, the b2 Pawn is hanging. If
either Knight moves, the d4 Pawn isn’t really hanging, because
after …Nxd4; Nxd4 Qxd4, the Bd3 can play away with check, winning
the Qd4. But the Ne2 really will move one day, and the Black King
may not always be on a checkable square. In fact, one common idea
is for Black to play …Kh8, threatening the d-Pawn. After
castling, Black’s Rook has occupied the half-open f-file, with new
ideas like …Rf8xf3 or xf2. Black’s pieces are all quite active
and White has yet to untangle; White is no position yet to exploit
the static weakness of the Pe6 and the temporarily poor Bc8. Black
has some unobvious moves like …Nb4 (hitting d3/c2) and …Ng4
(hitting ../e5), or manoeuvring either Knight to f5
(…Nc6-e7-f5/ …Nf6-g4-h6-f5) to keep White from settling into a
sound attacking position, and some enterprising ideas like
…Bc8-d7-e8-h5 to activate the Bishop.

  What are White’s choices here? Almost every legal move
has been played!

  1. 12.Rb1 – idea: protect the b-Pawn and play Bf4
  2. 12.Ng3 – idea: control ../h5, block …Bd6xh2
  3. 12.Bg5?! – ideas: gambit b-Pawn, play Bg5-h4-g3 to swap
    dark-squared Bishops
  4. 12.a3 – ideas: advance b-Pawn to b4, harass Nc6, occupy c5;
    prevent …Nb4 (maybe organise Bc2/Qd3) (development lagging
    though)
  5. 12.Re1 – idea: pressure on e5/Pe6/Ke8, but weakens f2; often
    transposes below
  6. 12.Qd2 – idea: Qg5
  7. 12.Bf4 – ideas: exchange Bd6, gambit Pb2; there is sometimes
    the trick …Bxf4; Nxf4, Nxd4!; Nxd4, e5!
  8. 12.b3 – ideas: protect b-Pawn, move Bc1 to f4 (or b2)
  9. 12.Nf4 – idea: hit e6. A critical try although Black can gambit
    the Pe6
  10. 12.Bd2 – idea: to c3 securing b2 and d4; slow
  11. 12.Nc3 – the flexible main line, committing White to nothing
    (although giving up Bf4). It adds some new ideas like Nc3-b5, or,
    after …a6, Nc3-a4-b6

  This actually doesn’t exhaust the ideas, just the moves!
One more idea is Ra1-c1xc6, undermining e5.

  How might the game go after 12. Nc3?

+-----------------+
|r+b+k+.4|
|0p+.+.0p|
|.1ngph.+|
|+.+p+.+.|
|.+.).+.+|
|+.+b+n+.|
|p).+n)p)|
|$.gq+ri.|
+-----------------+

  Tseitlin,M-Beake,B/Hastings Challengers 1990/EXP
21/1-0 (57)

  This key game was given in John Watson’s book, although
he safeguards the Black pieces to a B Becke. This continues a fine
tradition of mis-attributing key games by Exeter players, after BCO
gave a critical Petroff variation played by HV Mallison (against
Hugh Alexander) as being essayed by Mattison, the Latvian
problemist.

  [We spent some time looking at the variations in Watson’s
book]

  I find all this detail daunting, but Tony D says the
detail is not so important as the ideas – there are a lot of games,
but not so much theory! The idea being that Black can solve
problems over the board. On the other hand, Watson says “Theory has
exploded!”. Perhaps the real answer is, ideas first, theory second.
There are lots of ideas in “non-theoretical” openings which are not
widely known, and players get by in blissful ignorance because
their opponents don’t know the theory either! For examples, look at
the Beating the
Anti-Indians
document.

  Your comments and experiences are welcome!

  P.S. Other French centres

  If White avoids e4-e5 we get other centres; while the
Pawn is on e4 either White or Black can exchange, which lead to
very different types of game.

  Bibliography:

  Hooper, David & Whyld, Ken. Oxford Companion
to Chess
(2nd edition). O.U.P.

  Taimanov, Mark. The Sicilian Taimanov
System
. Batsford

  Watson, John. Play the French (revised
third edition). Cadogan.

  MacDonald, Neil & Harley, Andrew. Mastering
the French
. Batsford.
Exchange sacrifices

Actively sacrificing a Rook depends on you having an open file and something to aim at. So the best-rehearsed exchange sacrifices are …Rc8xNc3 in the Sicilian, …Rf8xNf3 in the French and to some extent the Dutch, Rf1xf6 against the Sicilian… You need some compensation for your Rook: either a good central pawn, or the weakening of the opposing King’s defences, or all three!

White sacrifices for attack on f6 in the Sicilian

Nezhmetdinov R. – Tal M. [B85]

White sacrifices for attack on h5 in the Sicilian

Fischer R. – Larsen B. [B77]

Black sacrifices for attack on c3 in the Sicilian

Movsesian S. – Kasparov G. [B80]

Black sacrifices for initiative on c3 in the Sicilian

Bednarski J. – Lehmann H. [B87]

Black sacrifices for too little on c3 in the Sicilian

Devon_Harry – Somerset [B78]

Black sacrifices for initiative in the King’s Indian

Pachman L. – Bronstein D. [E67]

Encore!

Zita F. – Bronstein D. [E67]

White sacrifices for all sorts of compensation in the Grunfeld

Bronstein D. – Boleslavsky I. [D89]

Another common theme is the ‘passive’ sacrifice of Rook for the opponent’s better Bishop by parking it on the natural outpost on an open file. You get a passed pawn and play against a colour complex.

Black passively sacrifices for initiative (1)

Liublinsky V. – Botvinnik M. [C77]

Black passively sacrifices for initiative (2)

Selesniev – Alekhin

Compensation for the exchange

Lasker – Janowsky

Rooks don’t like defending against passed pawns

Pope S. – Regis D. [B22]

The defensive sacrifice for defensive reasons is particularly associated with Petrosian, and everyone cites this example:

A defensive sacrifice

Reshevsky – Petrosian [E58]

Petrosian is at it again

Petrosian T – Spassky B [E66]

The Karpov sacrifice

Lutz C. – Karpov A. [E12]

A whole Rook

Maroczy G. – Tartakower S. [A85]

Click on […] to see games list.

Planning in the endgame

Lessons that can be applied elsewhere, I hope; if you have examples
of games where you have struggled, send them in.

How to plan, anyway (from Jeremy Silman).

Botvinnik-Kann

Here is a breakdown of the different imbalances:

1) Material (owning pieces of greater value than the opponent’s).

2) Space (the annexation of territory on a chess board).

3) Superior Minor Piece (the interplay between Bishops and
Knights).

4) Pawn Structure (a broad subject that encompasses doubled pawns,
isolated pawns, etc.).

5) Control of a key file or square (files and diagonals act as
pathways for your pieces, while squares act as homes

6) Lead in development (more force in a specific area of the
board).

7) Initiative (dictating the tempo of a game).

Recognising these imbalances (you will find definitions to all
these terms in the Glossary at the end of this book) and understanding
their relationship to planning will be the main focus of this book. If
we are to use these things properly we must be able to break down our
thinking in a way that allows us to dissect any particular position.

Here are the stages of my thinking technique that enables us to
accomplish this:

1. Figure out the positive and negative imbalances for both sides.

2. Figure out the side of the board you wish to play on. You can
only play where a favourable imbalance or the possibility of creating a
favourable imbalance exists.

3. Don’t calculate! Instead, dream up various fantasy positions,
i.e., the positions you would most like to achieve.

4. Once you find a fantasy position that makes you happy, you must
figure out if you can reach it. If you find that your choice was not
possible to implement, you must create another dream position that is
easier to achieve.

5. Only now do you look at the moves you wish to calculate (called
candidate moves). The candidate moves are all the moves that lead to our
dream position. This will be discussed fully in Part Three of this book.

Let’s now take a look at this thinking technique in action. If
it seems difficult, don’t panic! It just takes practice. Nobody ever
said that getting your thoughts to work in a structured way would be
easy!

Complete game

  • Botvinnik M. – Kan I. [E21]

Elements of endgame planning:

1. Passed pawn

  • Fischer R. – Berliner [B03]

2. Pawn majority

  • Marshall F. – Capablanca J. [D33]

3. Rook on the seventh

  • Fischer – Petrosian [B42]

  • Capablanca J. – Tartakower S. [A90]

4. Infiltration (Weak colour complex), blockade, breakthrough

  • Bernstein – Mieses [B45]

  • Petrosian A. – Hazai L. [E80]

  • Pillsbury H. – Gunsberg I. [D94]

5. Accumulation theory

  • Steinitz – Blackburne [C29]

6. Two weaknesses

  • Hug – Barle [C50]

  • Lasker E. – Capablanca J. [D62]

7. Manoeuvring

  • Nimzovitch A. – Capablanca J. [B12]

8. Minority attack

  • Vogt – Andersson [B84]

9. Endgame technique

  • Calvo – Anderssen [B15]

A bit of Capablanca magic

“Once in a lobby of the Hall of Columns of the Trade Union Centre
in Moscow a group of masters were analysing an ending. They could not
find the right way to go about things and there was a lot of arguing
about it. Suddenly Capablanca came into the room. He was always find of
walking about when it was his opponent’s turn to move. Learning the
reason for the dispute the Cuban bent down to the position, said ‘Si,
si,’ and suddenly redistributed the pieces all over the board to show
what the correct formation was for the side trying to win. I haven’t
exaggerated. Don Jose literally pushed the pieces around the board
without making moves. He just put them in fresh positions where he
thought they were needed.”

“Suddenly everything became clear. The
correct scheme of things had been set up and now the win was easy. We
were delighted by Capablanca’s mastery…”

— KOTOV, Think like a
Grandmaster, tr. Cafferty, pub. 1971 Batsford.

  • Capablanca – Ragozin [E22]

Alekhin plays for a win

  • Znosko Borovsky Euge – Alekhin Alexander [C79]

The best books for further study of endgame planning are undoubtedly
Shereshevsy’s.

Click […] for list of games

The Principle of ‘two weaknesses’

The Principle of two weaknesses – one weakness or two?

One sick pawn can lose you the game, but you need two points of
attack to win. How does this add up?

  Both are true. In order to win against one weakness you
need to attack the weak point, gain an advantage in space or
mobility through this, and use your mobility to force through on a
second front. Then one or other point will crack because your
opponent’s pieces won’t be able to cover both attacks.
Chekhover-Rudakowsky is a nice example of this.

  In fact defensive play is so awful that your opponent
will probably give you an extra target out of carelessness or
frustration (Hutchings-Keene, Vogt-Anderssen).
But if not, you will have to open up another front
(Lasker-Capablanca). It may be that before going for your
primary target you should take time out to create a second weakness
for later (Hug-Barle). The key to understanding space
advantages is that you can use it to create weaknesses where none
existed (Tarrasch-Mieses).


Chekhover-Rudakowsky,
1945

1. d4 d5 2. c4 e6 3. Nf3 Nf6 4. Bg5 Be7 5. e3 O-O 6. Nc3
Nbd7 7. Qc2 c6 8. Bd3 dxc4 9. Bxc4 Nd5 10. Bxe7 Qxe7 11. O-O b5 12.
Be2 a6 13. Ne4 Bb7 14. Ne5 Rac8 15. Nxd7 Qxd7 16. Nc5 Qc7 17. Rfd1
Rcd8 18. Rac1 Bc8 19. Qe4 Nf6 20. Qh4 Qa5 21. a3 b4


-+-T-Tj+
+l+-+xXx
xDx+x+-+
+-R-+-+-
pX-P-+-Q
+p+-P-+-
-+-+bPpP
+-R-+-K-

White has an advantage in space and mobility: Chernev suggests
counting up the legal moves available to the pieces on each side.

22. a4 Nd7 23. b3 Nxc5 24. Rxc5 Qb6 25. Rdc1 Bb7
26. a5 Qa7 27. Bd3 DIAGRAM


-+-T-Tj+
Dl+-+xXx
x+x+x+-+
P-R-+-+-
-X-P-+-Q
+p+bP-+-
-+-+-PpP
+-R-+-K-

White forces a weakness just as we learned above – but was only
able to do so because he attacked c6 first.

27…g6 28. Qf6 Rd6 29. Qe7 Rfd8 30. h4 R8d7 31.
Qf6 Qa8 32. Be4 Qe8 33. h5 Rd8 34. Bxc6 Bxc6 35. h6 Kf8 36. Rxc6
Rxc6 37. Rxc6 Rd7 (37… Qxc6 38. Qxd8+ Qe8 39. Qd6+ Kg8 40.
Qxa6 {threat Qb7} 40… Qe7 41. Qb6
) 38. Rc8 Qxc8 39. Qh8+
1-0


  The fact that weak pawns can lose you the game means that
many games are based around the theme of creating or threatening to
create weak pawns – the Nimzo-Indian, for example.


Hutchings-Keene, 1982

1.c4 Nf6 2.Nc3 b6 3.Nf3 Bb7 4.d4 e6 5.g3 Bb4

  Both Black bishops threaten to kick a hole in the White
pawn formation by …Bxc3 or …Bxf3.

6.Bd2 c5 7.a3 Bxc3 8.Bxc3 Ne4 9.Qc2 Nxc3 10.Qxc3
Qf6

  Renewing the threats against c3/f3.

11.Rd1 Bxf3 12.Qxf3 Qxf3 13.exf3 Nc6


t+-+j+-T
X-+x+xXx
-Xs+x+-+
+-X-+-+-
-+pP-+-+
P-+-+pP-
-P-+-P-P
+-+rKb+r

14.dxc5 {?}

  White’s f-pawns aren’t pretty but Black can’t get at them
at the moment. In any event, one weakness won’t lose the game.
Instead of avoiding further concessions, White hands Black the
half-open b-file and a target on b6. Any ‘pressure’ White hopes to
gain on the d-file will vanish the moment Black plays …Nd4.

14…bxc5 15.Bg2 Rb8 16.Rd2 Rb3 17.Kd1 Ke7 18.f4
Nd4 19.Kc1 h5 {!?} DIAGRAM


-+-+-+-T
X-+xJxX-
-+-+x+-+
+-X-+-+x
-+pS-P-+
Pt+-+-P-
-P-R-PbP
+-K-+-+r

The pressure on the b-file has given White a headache on the
King’s-side. Black’s last is a little trap…

20.h4 {?}

  Into which White falls.

20…Rhb8 21.Bf1 (penny drops!)
[21. Re1 Rxg3 22. fxg3 Nb3+ 23. Kc2 Nxd2 24. Kxd2 Rxb2+ 25. Kd3
Rxg2]

21…Rf3 22.Kd1 Rxa3 {!} 0-1


Vogt-Anderssen, 1978

1.e4 c5 2.Nf3 d6 3.d4 cxd4 4.Nxd4 Nf6 5.Nc3 e6 6.Be2 a6
7.f4 Qc7 8.O-O Be7 9.Kh1 Nc6 10.Be3 Nxd4 11.Qxd4 O-O 12.Rad1 b5
13.e5 {!?} 13…dxe5 14.Qxe5 Qb8 {!} 15.Qxb8 Rxb8 16.Ba7 Ra8 17.Bb6
Bb7 18.a3 Rfc8 {!}

  Black has survived the sharp opening and now turns his
attention to is endgame plans. Black fixes attention on the pawn at
c2.


t+t+-+j+
+l+-LxXx
xB-+xS-+
+x+-+-+-
-+-+-P-+
P-N-+-+-
-Pp+b+pP
+-+r+r+k

19.Ba5 g6 20.h3 {?}

  This gives White a problem square on g3 and a problem
pawn on f4.

20…h5 21.Bf3 Bxf3 22.Rxf3 h4 23.Rd2 Rc4 24.b3
Rc6 25.a4 b4 26.Ne2 Rac8 27.c4 bxc3 28.Rxc3

  The weak c-pawn has been replaced in Black’s affections
by the weak b-pawn.

28… Nd5 29.Rxc6 Rxc6 30.Rb2 Bf6 31.Ra2 Rc8
32.Bd2 Rb8 33.Nc1 Nb4 34.Bxb4 Rxb4 35.Rf2 Be7 36.Rf3


-+-+-+j+
+-+-Lx+-
x+-+x+x+
+-+-+-+-
pT-+-P-X
+p+-+r+p
-+-+-+p+
+-N-+-+k

White is at full stretch…

36…Bd6 37.Ne2 Re4 38.Rd3 Bc5 39.Rc3 Bf2 40.Rc2
Kg7 41.Ng1 Rxf4 ….0-1


Lasker,- Capablanca,
1921

1. d4 d5 2. c4 e6 3. Nc3 Nf6 4. Bg5 Be7 5. e3 O-O 6. Nf3
Nbd7 7. Qc2 c5 8. Rd1 Qa5 9. Bd3 h6 10. Bh4 cxd4 11. exd4 dxc4 12.
Bxc4 Nb6 13. Bb3 Bd7 14. O-O Rac8 15. Ne5 Bb5 16. Rfe1 Nbd5 17.
Bxd5 Nxd5 18. Bxe7 Nxe7 19. Qb3 Bc6 20. Nxc6 bxc6 21. Re5 Qb6 22.
Qc2 Rfd8


-+tT-+j+
X-+-SxX-
-Dx+x+-X
+-+-R-+-
-+-P-+-+
+-N-+-+-
pPq+-PpP
+-+r+-K-

There are two isolated pawns: which is weaker?

23. Ne2 Rd5 24. Rxd5 cxd5


-+t+-+j+
X-+-SxX-
-D-+x+-X
+-+x+-+-
-+-P-+-+
+-+-+-+-
pPq+nPpP
+-+r+-K-

Now there is only one. It is not exposed on a half-open file, so
can White defend?

25. Qd2 Nf5 26. b3 h5 27. h3 h4

  a typical preparatory probe

28. Qd3 Rc6 29. Kf1 g6 30. Qb1 Qb4


-+-+-+j+
X-+-+x+-
-+t+x+x+
+-+x+s+-
-D-P-+-X
+p+-+-+p
p+-+nPp+
+q+r+k+-

Black’s pressure on the d-pawn cannot be increased. So Black opens
up a new point of attack.

31. Kg1 a5

  Lasker said when he saw this that he knew he was
lost.

32. Qb2 a4 33. Qd2 Qxd2 34. Rxd2 axb3 35. axb3
Rb6 36. Rd3 Ra6 37. g4 hxg3 38. fxg3 Ra2 39. Nc3 Rc2 40. Nd1 Ne7
41. Nc3 Rc1+ 42. Kf2 Nc6 43. Nd1 Rb1


-+-+-+j+
+-+-+x+-
-+s+x+x+
+-+x+-+-
-+-P-+-+
+p+r+-Pp
-+-+-K-+
+t+n+-+-

Black has his two points of attack.

44. Ke2

  I think not really a blunder, more a desire for clarity.
[44. Ne3 Na5 picks up the b-pawn anyhow]

44… Rxb3 45. Ke3 Rb4 46. Nc3 Ne7 47. Ne2 Nf5+
48. Kf2


-+-+-+j+
+-+-+x+-
-+-+x+x+
+-+x+s+-
-T-P-+-+
+-+r+-Pp
-+-+nK-+
+-+-+-+-

White still has two points to defend.

48… g5 49. g4 Nd6 50. Ng1 Ne4+ 51. Kf1 Rb1+ 52.
Kg2 Rb2+ 53. Kf1 Rf2+ 54. Ke1 Ra2 55. Kf1 Kg7 56. Re3 Kg6 57. Rd3
f6 58. Re3 Kf7 59. Rd3 Ke7 60. Re3 Kd6 61. Rd3 Rf2+ 62. Ke1 Rg2 63.
Kf1 Ra2


-+-+-+-+
+-+-+-+-
-+-JxX-+
+-+x+-X-
-+-Ps+p+
+-+r+-+p
t+-+-+-+
+-+-+kN-

Both sides are repeating moves: Capablanca because he can, Lasker
because he has to!

64. Re3 e5 the final push: Black creates
a passed pawn 65. Rd3 exd4 66. Rxd4 Kc5 67. Rd1 d4 68. Rc1+
Kd5


-+-+-+-+
+-+-+-+-
-+-+-X-+
+-+j+-X-
-+-Xs+p+
+-+-+-+p
t+-+-+-+
+-R-+kN-

poor White can do nothing 0-1


Hug – Barle (Pula izt) [C45]
1975

1. e4 e5 2. Nf3 Nc6 3. Bc4 Bc5 4. Nc3 Nf6 5. d3 d6 6. Bg5
Na5 7. Bb3 Nxb3 8. axb3 Be6 9. Na4


t+-Dj+-T
XxX-+xXx
-+-XlS-+
+-L-X-B-
n+-+p+-+
+p+p+n+-
-Pp+-PpP
R-+qK-+r

9… h6

[9… Bb6 10. Nxb6 axb6 or 10…cxb6; 11.d4! with a
superior pawn structure 11. Rxa8 Qxa8 12. Bxf6 gxf6 13. Nh4
Pritchett]

10. Bh4 Bg4

[10… g5 11. Bg3 Nd7 12. Nxc5 Nxc5 13. b4 Nd7 14.
d4]

11. Nxc5 dxc5 12.h3 Bxf3 13. Qxf3 Qd6 14. Bxf6
Qxf6 15. Qxf6 gxf6


t+-+j+-T
XxX-+x+-
-+-+-X-X
+-X-X-+-
-+-+p+-+
+p+p+-+p
-Pp+-Pp+
R-+-K-+r

Here we have the doubled f-pawns again. White can start an
immediate attack on them with O-O and f2-f4

16. Ra5!

  accurate: forces a permanent weakness on a7. Black must
divert his King to the Q-side when a shift to the f-file catches
him wrong-footed. Black is probably already lost.

[16. O-O Ke7 17. f4 h5 18. Rf2 Rh7 19. Raf1 and Black
can defend the one weakness on the f-file.]

16… b6 17. Ra6 Kd7 18. O-O Kc6


t+-+-+-T
X-X-+x+-
rXj+-X-X
+-X-X-+-
-+-+p+-+
+p+p+-+p
-Pp+-Pp+
+-+-+rK-

19. f4 Kb7 20. Raa1 Rh7 21. fxe5 fxe5 22. Rf6

  White now wins a pawn while Black struggles for
counterplay.

22… a5 23. Rf5 Re8 24. Raf1 Re7 25. Rh5 Re6 26.
Rhf5 Re7 27. g4 Kc6 28. Rf6+ Kb5 29. R1f5 a4 30. bxa4+ Kxa4 31. Rh5
c4 32. dxc4 Kb4 33. Rhxh6 Rxh6 34. Rxh6 Rd7 35. Rf6 Kxc4 36. Kf2
Rd2+ 37. Ke3


-+-+-+-+
+-X-+x+-
-X-+-R-+
+-+-X-+-
-+j+p+p+
+-+-K-+p
-PpT-+-+
+-+-+-+-

37… Rh2

[37… Rxc2 doesn’t help, e.g. 38. Rxf7 c5 39. Rf2
Rxf2 40. Kxf2 Kb3]

38. Rc6+ Kb5 39. Rxc7 Rxh3+ 40. Kf2 Rh2+ 41. Kg3
Re2 42. Kf3 Re1 43. Re7 f6 44. g5 fxg5 45. Rxe5+ Kc4 46. Rxg5 Rf1+
47. Ke2 Rb1 48. b3+ Kc3 49. Rb5 Rc1 50. Rxb6 Rxc2+ 51. Ke3
1-0


Tarrasch – Mieses (3) [C10]
1916

1. e4 e6 2. d4 d5 3. Nc3 dxe4 4. Nxe4 Nd7 5. Nf3 Ngf6 6.
Bd3 Be7 7. O-O Nxe4 8. Bxe4 Nf6 9. Bd3 b6


t+lDj+-T
X-X-LxXx
-X-+xS-+
+-+-+-+-
-+-P-+-+
+-+b+n+-
pPp+-PpP
R-Bq+rK-

White has more space but no target as yet.

10. Ne5 O-O 11. Nc6 Qd6 12. Qf3 Bd7 13. Nxe7+
Qxe7 14. Bg5 Rac8 15. Rfe1 Rfe8 16. Qh3


-+t+t+j+
X-XlDxXx
-X-+xS-+
+-+-+-B-
-+-P-+-+
+-+b+-+q
pPp+-PpP
R-+-R-K-

White uses his better pieces to force a concession.

16… Qd6 17. Bxf6 gxf6 18. Qh6 f5 19. Re3 Qxd4
20. c3


-+t+t+j+
X-Xl+x+x
-X-+x+-Q
+-+-+x+-
-+-D-+-+
+-PbR-+-
pP-+-PpP
R-+-+-K-

Black is suddenly shot full of holes.

1-0

Exchanging to win

I was struck recently when discussing this position with the coaching group:

+-----------------+
|r+.+r+k+|
|+p0.+p0p|
|p+pg.+q+|
|+.h.0N+.|
|.+.+P+Q+|
|+.+PG.+P|
|P)P+.)P+|
|$.+.+RI.|
+-----------------+

White’s next move, 15. Nh4 , was regarded with scorn by some – ” he’s just playing for a draw “. On the contrary, provoking the exchange of Queens looked like a reasonable winning attempt to me! In fact, Black did swap with 15…Qxg4 without much thought about alternatives, when 15…Qe6 might have been worth a look.

Some players seek exchanges and some avoid them; I get the impression that juniors exchange without much hesitation.

Exchanges are just moves, says Stephen Gerzadowicz. They have good and bad effects, and are better for one side or another. Weight these up, then decide whether to exchange or not. Fortunately, there are some general guidelines to help us.

Rules for exchanging

  • If you are ahead in material, exchange pieces (but not Pawns)
  • If you are behind in material, exchange Pawns (but not pieces)
  • Avoid the exchange of your most active piece (especially if you are defending)
  • If you have more space, are attacking the King, or have Pawn weaknesses, avoid exchanges (especially of Queens).
  • If you have less space, are defending the King, or have better Pawn structure, seek exchanges (especially of Queens).
  • If you have the advantage of the two Bishops, avoid the exchange of your opponent’s remaining Bishop for one of your Bishops.
  • If you have two Rooks and your opponent only one, seek the exchange of your opponent’s remaining Rook for one of your Rooks.
  • Avoid being left with a permanently poor piece, like a Bad Bishop
  • Last but not least, look at the effect of the exchange on the position. Have you improved the opponent’s Pawn structure? Have you brought into play an opposing piece?

Having looked at all these ideas, we can perhaps understand the position given more clearly. The Black Bishop is poor but not yet Bad; Black has the worse Pawn structure, and the Queen is one of his most active pieces. The exchange draws the h-Pawn in to become a g-Pawn, so White can play g3 and f4 without fearing that …exf4 will split his Pawns. Also, White is GM David Norwood, who might have thought that a technical endgame might expose his amateur opponent’s deficiencies.

Okay, let’s look at these guidelines in examples.

If you are ahead in material, exchange pieces (but not Pawns)

If you are behind in material, exchange Pawns (but not pieces)

Right

+-----------------+
|.+.+.+.+|
|0R+.+p0p|
|.+.+.i.+|
|+P+.+.+.|
|.+.+.+P+|
|4.+.+.+P|
|.+.+.+K+|
|+.+.+.+.|
+-----------------+


Regis,D – Walker,J [C33] Exeter vs. Teignmouth, 1994

34.b6 ! 34…axb6 35.Rxb6+ Kg5 36.Rb5+ Kg6 37.Rc5 h6 38.Rb5 f6 39.Rc5 Re3 40.Rc7 Re5 41.Kg3 h5 42.Rc3 hxg4 ? 43.hxg4 Kg5 44.Ra3 g6 45.Rb3 Re4 46.Rb5+ f5 ? [46…Re5 47.Rb4] 47.gxf5 gxf5 48.Rb8 Re3+ 49.Kf2 Ra3 50.Rb4 f4 51.Rb8 1/2../strong>

the basic draw: Philidor’s position White has been steering for this since move 33!

Wrong

+-----------------+
|.+.+.+.+|
|0.+b+k+.|
|.+.+.0.+|
|+.+.4.0p|
|P+.H.+.)|
|+P+.+P).|
|.+.+.I.+|
|+.+.$.+.|
+-----------------+


Hecht,H – Spassky B V [B31] Dortmund, 1973

Black should retain the Rook by 50…Rc5.

50…Rxe1 51.Kxe1 Ke7 52.Kd2 Kd6 53.Kd3 Ke5 54.a5 a6 55.b4 Kd5 56.Kc3 gxh4 57.gxh4 Ke5 58.Kc4 Kd6 59.b5 axb5+ 60.Nxb5+ Ke5 61.Kc5 Bc8 62.Kb6 Bstrong 63.a6 Bg2 64.f4+ Kxf4 65.Nd6 f5 66.Nb7 Kg3 67.a7 f4 68.a8Q f3 69.Qb8+ 1-0


Avoid the exchange of your most active pieces (especially if you are defending)

Wrong


van Scheltinga – de Groot [E94] errors: eagerness to exchange, 1936

1.d4 Nf6 2.c4 g6 3.Nc3 Bg7 4.e4 d6 5.Nf3 0-0 6.Be2 e5 7.0-0 Nfd7 8.Be3 Nc6 9.Qd2

+-----------------+
|r+b1.4k+|
|0p0n+pgp|
|.+n0.+p+|
|+.+.0.+.|
|.+P)P+.+|
|+.H.GN+.|
|P).!B)P)|
|$.+.+RI.|
+-----------------+

9…exd4 10.Nxd4 Nxd4 11.Bxd4 Bxd4 12.Qxd4 Qf6 13.Qd2

The exchanges have left White dominating the board.

13…Qe5 14.f4 Qc5+ 15.Kh1 Nf6 16.b4 Qxb4 17.Qd4 Kg7 18.Nd5 Qc5 19.Qxf6+ 1-0

I couldn’t find another example of this from the point of view of exchanges, but if you think about retreating as having the same effect:


Nimzowitsch,A – Capablanca,J [C62] St Petersburg (1), 1914

1.e4 e5 2.Nf3 Nc6 3.Nc3 Nf6 4.Bb5 d6 5.d4 Bd7 6.Bxc6 Bxc6 7.Qd3 exd4 8.Nxd4 g6 9.Nxc6 bxc6 10.Qa6 Qd7 11.Qb7 Rc8 12.Qxa7 Bg7 13.0-0 0-0 14.Qa6

+-----------------+
|.+r+.4k+|
|+.0q+pgp|
|Q+p0.hp+|
|+.+.+.+.|
|.+.+P+.+|
|+.H.+.+.|
|P)P+.)P)|
|$.G.+RI.|
+-----------------+

White has grabbed a Pawn on the Queen’s-side. It is striking how quickly White’s game deteriorates:

14…Rfe8 15.Qd3 Qe6 16.f3 Nd7 17.Bd2 Ne5 18.Qe2 Nc4 19.Rab1 Ra8 20.a4 Nxd2 21.Qxd2 Qc4 22.Rfd1 Reb8 23.Qe3 Rb4 24.Qg5 Bd4+ 25.Kh1 Rab8 26.Rxd4 Qxd4 27.Rd1 Qc4 28.h4 Rxb2 29.Qd2 Qc5 30.Re1 Qh5 31.Ra1 Qxh4+ 32.Kg1 Qh5 33.a5 Ra8 34.a6 Qc5+ 35.Kh1 Qc4 36.a7 Qc5 37.e5 Qxe5 38.Ra4 Qh5+ 39.Kg1 Qc5+ 40.Kh2 d5 41.Rh4 Rxa7 0-1

Znosko-Borovsky says, ” A player who is at disadvantage in time should keep up any available threat” . That is, the Queen was better on a6, restricting the freedom of action of Black’s pieces.

If you have more space, are attacking the King, or have Pawn weaknesses, avoid exchanges (especially of Queens).

Right

Timman,J – Petrosian,T, Las Palmas izt (2), 1982

1.d4 d5 2.c4 dxc4 3.Nf3 Nf6 4.Nc3 c6 5.a4 Bg4 6.Ne5 Bh5 7.f3 Nfd7 8.Nxc4 e5 9.Nxe5 Nxe5 10.dxe5 Nd7 11.f4 Bb4 12.Qc2 Qe7 13.e4 g5 14.Be2 gxf4 15.e6 Qh4+ 16.Kf1 Bxe2+ 17.Qxe2 fxe6 18.Qf2

+-----------------+
|r+.+k+.4|
|0p+n+.+p|
|.+p+p+.+|
|+.+.+.+.|
|Pg.+P0.1|
|+.H.+.+.|
|.).+.!P)|
|$.G.+K+R|
+-----------------+

18…Qe7 19.e5?! Nxe5 20.Bxf4 Rf8 21.Rd1 Bc5 0-1

White’s elaborate Bishop manoeuvres in the main line Ruy Lopez are at least in part designed to keep Black burdened with a full complement of minor pieces.


Kasparov,G (2800) – Karpov,A (2730) [C92](W (20), 1990

1.e4 e5 2.Nf3 Nc6 3.Bb5 a6 4.Ba4 Nf6 5.0-0 Be7 6.Re1 b5 7.Bb3 d6 8.c3 0-0 9.strong Bb7 10.d4 Re8 11.Nbd2 Bf8 12.a4 h6 13.Bc2 1-0

+-----------------+
|r+.1rgk+|
|+b0.+p0.|
|p+n0.h.0|
|+p+.0.+.|
|P+.)P+.+|
|+.).+N+P|
|.)BH.)P+|
|$.GQ$.I.|
+-----------------+

This was crowned by a famous attack.

14.cxd4 Nb4 15.Bb1 c5 16.d5 Nd7 17.Ra3 f5 18.Rae3 Nf6 19.Nh2 Kh8 20.b3 bxa4 21.bxa4 c4 22.Bb2 fxe4 23.Nxe4 Nfxd5 24.Rg3 Re6 25.Ng4 Qe8 26.Nxh6 c3 27.Nf5 cxb2 28.Qg4 Bc8 29.Qh4+ Rh6 30.Nxh6 gxh6 31.Kh2 Qe5 32.Ng5 Qf6 33.Re8 Bf5 34.Qxh6+

[34.Nf7+ Matt/Mate in 6! 34…Qxf7 35.Qxh6+ Bh7 36.Rxa8 Ne7 37.Rxf8+ Ng8 38.Rgxg8+ Qxg8 39.Qxh7#]

34…Qxh6 35.Nf7+ Kh7 36.Bxf5+ Qg6 37.Bxg6+ Kg7 38.Rxa8 Be7 39.Rb8 a5 40.Be4+ Kxf7 41.Bxd5+ 1-0

Wrong

+-----------------+
|.+r1.4k+|
|0p+bhp0.|
|.+.+ph.0|
|+.+.H.+.|
|.+.).+.+|
|+BH.+.+.|
|P).+Q)P)|
|+.$.+RI.|
+-----------------+


Kortchnoi,V (2695) – Karpov,A (2700) [D31], 1981 [Wcstrong0-Merano (9)]

16. Ne4?

Undoubtedly a mistake, freeing Black’s game. As we can see from the sequel, though, White was trying to win, not merely play the best moves.

16…Nxe4 17.Qxe4 Bc6 18.Nxc6 Rxc6 19.Rc3?!

[19.Rxc6 Nxc6 20.d5 exchanges the IQP leaving nothing much left to play for.]

Black won the endgame.


If you have less space, are defending the King, or have better Pawn structure, seek exchanges (especially of Queens).

Right

1.d4 d5 2.c4 e6 3.Nc3 Nf6 4.Bg5 Be7 5.e3 0-0 6.Nf3 Nbd7 7.Rc1 c6 8.Bd3

+-----------------+
|r+b1.4k+|
|0p+ngp0p|
|.+p+ph.+|
|+.+p+.G.|
|.+P).+.+|
|+.HB)N+.|
|P).+.)P)|
|+.$QI.+R|
+-----------------+

Capablanca’s freeing manoeuvre took most of the sting out of the QGD:

8…dxc4 9.Bxc4 Nd5 10.Bxe7 Qxe7 11.0-0 Nxc3 12.Rxc3 e5 13.dxe5 Nxe5 14.Nxe5 Qxe5 =

You will see Capa play like this in many games.

Wrong


Littlewood,P – Mestel,J [E61] Hastings (9), 1981

1.d4 Nf6 2.Nf3 g6 3.c4 Bg7 4.Nc3 0-0 5.e4 c6 6.e5 Ne8 7.Bf4 d6 8.strong Nd7 9.exd6 Nxd6 10.Be2 Re8 11.Qd2 Nf5 12.Rd1 c5 13.Nb5 Nf8

+-----------------+
|r+b1rhk+|
|0p+.0pgp|
|.+.+.+p+|
|+N0.+n+.|
|.+P).G.+|
|+.+.+N+P|
|P).!B)P+|
|+.+RI.+R|
+-----------------+

The simple 14. dxc5 wins a Pawn and seeks exchanges. Instead White wins an exchange, but allows counterplay.

14.Nc7 Nxd4 15.Nxe8 Qxe8 16.Ne5 f6 17.Nd3 b6 18.0-0 Bb7 19.Be3 e5 20.Rfe1 Rd8 21.Bxd4 Rxd4 22.Bf1 Ne6 23.f3 h5 24.b4 cxb4 25.Qxb4 Bf8 26.Qc3 Qd7 27.Kh1 Kh7 28.Qc2 Bc6 29.Qb1 Ba4 30.Rd2 Bh6 31.Rb2 Bf8 32.Nf2 Ba3 33.Ne4 Kg7 34.Rf2 Bc6 35.Nc3 Bc5 36.Nb5 Rh4 37.Rd1 Nd4 38.Nxd4 Rxd4 39.Re1 Rh4 40.Rd1 Rd4 41.Re1 h4 42.Rb2 Qd6 43.Rb3 e4 44.fxe4 Qe5 45.Rbe3 Bd6 46.g3 Rxe4 47.Qxe4 Bxe4+ 48.Rxe4 Qxg3 49.R4e2 Bb4 50.Rd1 Qf3+ 51.Kh2 Bd6+ 52.Kg1 Bc5+ 53.Kh2 Qg3+ 54.Kh1 Qg1# 0-1


If you have the advantage of the two Bishops, avoid the exchange of your opponent’s remaining Bishop for one of your Bishops.

Right


Wrong


If you have two Rooks and your opponent only one, seek the exchange of your opponent’s remaining Rook for one of your Rooks.

Right


Wrong


Avoid being left with a permanently poor piece, like a Bad Bishop

Right

+-----------------+
|.+r+k+.4|
|0p+b+p+.|
|.+.+p+.0|
|1.+p).+R|
|.h.).!.+|
|+.+B+N+.|
|P+P+.)P+|
|$.+.+K+.|
+-----------------+


Bryson,D – Williams,C [C12] BCCC, 1984 [TDH]

18…Bb5

The classic French manoeuvre to offload the bad Bishop.

Wrong

+-----------------+
|.+.+.4r+|
|+p0.+k+p|
|p+.0.g.+|
|+.+P0.+.|
|.+P+N+.+|
|+.+.+K+.|
|P).+.).)|
|$.+.+.$.|
+-----------------+


Booth,C (1800) – Regis,D (1825) [A42] Exeter vs. Harrogate, National Major Plate Final, 1996

Black has been left with classic KID bad Bishop.

22.b4 b6 23.a4 a5 [23…Bh4 24.a5] 24.Rxg8 Kxg8 25.bxa5 bxa5 26.Rb1 h5 27.Ke3 Bh4 28.Rb5 Rf4 29.Rxa5 Bxf2+ 30.Nxf2 Rxc4 31.Ne4 h4 32.Nd2 Rc3+ 33.Ke4 Kf7 34.Ra7 Kf6 35.a5 c6 [35…] 36.dxc6 Ke6 37.Rd7 Rxc6 38.Rd8 Rc3 39.Re8+ Kf7 40.Rh8 Ra3 [40…] 41.Nc4 Ra4 42.Kd5 Ra1 43.Rxh4 Rd1+ 44.Kc6 e4 45.Nxd6+ 1-0


Last but not least, look at the effect of the exchange on the position. Have you improved the opponent’s Pawn structure? Have you brought into play an opposing piece?

Right


Forintos,G – Gligoric,S [E77] Ljubljana, 1969

1.d4 Nf6 2.c4 g6 3.Nc3 Bg7 4.e4 d6 5.f4 0-0 6.Be2 c5 7.d5 e6 8.Nf3 exd5 9.exd5

+-----------------+
|rhb1.4k+|
|0p+.+pgp|
|.+.0.hp+|
|+.0P+.+.|
|.+P+.).+|
|+.H.+N+.|
|P).+B+P)|
|$.GQI.+R|
+-----------------+

9…Nh5 (Spassky) 10.0-0 Bxc3 11.bxc3 f5 12.Ng5 Ng7

A wonderful transformation, despite the loss of the Bg7 which is so often the salvation of Black’s game. White’s Pawns are blockaded across the board, and Black’s weak e6 square is comfortably under observation.

13.Bf3 Nd7 14.Re1 Nf6 15.Rb1 Re8 16.Rxe8+ Qxe8 17.Rb2 Bd7 18.Rxb7 Rb8 19.Rxb8 Qxb8 20.Qc2 h6 21.Nstrong Qe8 22.Bd2 Ba4 23.Qc1 Ng4 24.Nf2 Nxf2 25.Kxf2 Qe7 26.Kg1 Ne8 27.Qb1 1/2../strong>

Wrong

How often do we see in club play, …Bg4, … Bxf3, then Qxf3 or Nxf3 when the net effect is that Black has lost the Bishop pair and brought out a White piece. Here’s a more complex example:


Peters, J – Andersson,U [B15] defence: mending weaknesses, 1978

1.e4 c6 2.d4 d5 3.Nc3 dxe4 4.Nxe4 Nf6 5.Nxf6+ exf6 6.Bc4

+-----------------+
|rhb1kg.4|
|0p+.+p0p|
|.+p+.0.+|
|+.+.+.+.|
|.+B).+.+|
|+.+.+.+.|
|P)P+.)P)|
|$.GQI.HR|
+-----------------+

White’s Queen’s-side majority is a big engame plus, so White was startled by…

6…Qe7+ 7.Qe2 Be6

Black will only enter an endgame on certain conditions!

8.Bxe6

[8.Bb3 is the only testing continuation]

8…Qxe6 9.Bf4 Na6

The threat of …Nb4 eventually prompts the exchange on e6

10.0-0-0 0-0-0 11.Qxe6+ fxe6

White has drifted into a dull position.

12.h4 c5 13.Be3 cxd4 14.Bxd4 Bc5 15.Ne2 e5 16.Bxc5 Nxc5

Black has no problems and even won.


Further Reading

TAULBUT & JONES, Chess Exchanges (Pergamon)

MEDNIS From the Middlegame to the Endgame (Cadogan)

EUWE & KRAMER The Middle Game, Vol. II – Chapters on Liquidation (Bell).

Capablanca was the great artist of exchanges, in defence and attack.

A disaster in the Stonewall

Alsop,A – Blundell,J [D00] East Devon Minor (Exeter) (4), 05.03.2000

What went wrong here? Play over this game twice, once fairly quickly to see how it went, and then again slowly to see what went on in more detail, and think of other ideas.


Lessons from this game:

  1. Play with a plan . If you understand the ideas behind your chosen openings you have a big advantage over your opponent and can often win games very quickly. In this game White played with one idea – to lock up the centre then attack the King’s-side – and carried it out. Black went from move to move without making any huge mistakes, but this is not enough.
  2. If you think your opponent will stop your plan, play it straight away! Black did have one chance to play …c5, but in trying to make it better, lost the chance.
  3. Open a file for your Rooks . Rooks are worth half a Queen each, and if you don’t get them working, it’s like being a Queen behind! When you plan where to put your pieces in the opening, you must also think about your Rooks. In this game Black suffered from not getting the c-file open for his Rooks. This started to go wrong at move 3!
  4. Don’t castle into an attack . In this game White was ‘pointing’ towards the King’s-side. If Black had blocked this attack – or not castled King’s-side – White’s pieces might have been on silly squares.
  5. Swap off your opponent’s good pieces, keep your own . Black swapped his good Ne4 for a duff White piece on d2, but he did have the good idea of exchanging the Nc6 for the Bd3. Without the Bd3 White would be pretty planless.

None of these criticisms are made because Black is a poor player, it’s just very hard to play positions where you don’t know what to do. It takes a lot of experience before you can plan what to do in positions you haven’t seen before, but it is possible to pinch ideas from other people. So, try to play positions you understand, try to understand the positions you play.

With light notes:


The fianchetto: a user’s guide

Fianchetto basics

A Bishop developed in fianchetto reaches deep into the opponent’s position and influences two important central squares.
We can see this effect in IQP positions.

Commonly in isolated Queen-Pawn positions Black has a cramped position and White has chances for attacking the King.

When an IQP faces a fianchetto, Black has two advantages over the standard formation: extra pressure on the isolated Pawn, and an extra-strong defensive phalanx on the light squares.
We can see this in Rubinstein’s line in the Tarrasch Defence. 1. d4 d5 2. c4 e6 3. Nc3 c5 4. cxd5 exd5 5. Nf3 Nc6 6. g3

If the opponent tries to block the long diagonal with Pawns, you can lever open the line again with your own Pawns.


This is a simple plan which can be played by either side. I have played dozens of games like this.

A castled fianchetto position can be a very hard nut to crack – for example, h7 is difficult to get to. The Pawns cover the dark squares and the Bishop covers the light squares.


However, there is a recipe for attacking the castled King’s fianchetto position.
The weaknesses created by the g2-g3 move can be used by the opponent to get at the King: either by getting pieces into the holes (f3 and h3), or by using the h-Pawn to lever open the h-file, or some combination of these ideas. If the Bishop is removed, all that will be left is a network of holes.

Black has correctly tried to get at the King through the h-file, particularly h3. If White plays Bxh3, the Black Queen will leap onto the doorstep of the White King. Another clever point is: Black has held the Bishop on h3 while advancing the h-Pawn, so White cannot meet …h7-h5 with h2-h4, blockading the h-file.
Here Black should play 1…hxg3 with the idea of 2. hxg3 Bxg2 3. Kxg2 Qh3+ mating.
This attacking scheme is not very quick to set up, but works like clockwork.
“I had won hundreds of five-minute games in similar positions and had it down to a science: lever open the h-file… sac, sac … and mate!” – Bobby Fischer

Lee,R – Holmes,D [E82] BCCC 1969-70

1.d4 Nf6 2.c4 g6 3.Nc3 Bg7 4.e4 d6 5.f3 0-0 6.Be3 b6 7.Qd2 c5 8.d5 Na6 9.0-0-0 Nc7 10.Bh6 a6 11.g4 b5 12.h4 bxc4 13.Bxc4 Nb5 14.Nge2 Nxc3 15.Nxc3 Bd7 16.h5 Qe8 17.hxg6 fxg6 18.Bxg7 Kxg7 19.Qh6+ Kh8 20.e5 dxe5 21.d6 exd6 22.Rxd6 Qe7 23.Rxf6 Rxf6 24.Nd5 Qg7 25.Nxf6 1-0

Homer,S – Wilde,T [B07] Devon vs. Cornwall, 06.02.1999

1.e4 d6 2.d4 Nf6 3.Nc3 g6 4.Be2 Bg7 5.h4 h6 6.Be3 0-0 7.h5 Kh7 8.hxg6+ fxg6 9.Qd2 Ng8 10.0-0-0 Nc6 11.Nf3 Qe8 12.Rh4 h5 13.g4 Nf6 14.gxh5 gxh5 15.Rdh1 Rh8 16.Nd5 Nxd5 17.Rxh5+ Kg8 18.Rxh8+ Bxh8 19.Rg1+ Bg7 20.exd5 Nd8 21.Bh6 1-0

[Cool Blue Cat says:]
I must emphasise the importance of this plan. There are several standard attacks which you must be able to play – this is one of them – and where it often seems the attack is easier to play than the defence. If you ever intend to play a fianchetto system, your opponents can trot out this plan almost without thinking, and if you get your counterattack wrong you will almost certainly be checkmated. In every opening where there is a King’s-side fianchetto you can expect to find a critical line where the opponent tried to checkmate down the h-file.

Having placed your Bishop on the long diagonal you need to be careful how you place your central Pawns. If they sit about in front of the Bishop they limit its reach until they move; if they become blocked they can choke it for a long while.

On the other hand, leaving your central Pawns unmoved leaves the centre free for your opponent! So fianchetto openings are difficult to handle, particularly in how you play in the centre. This is part of the attraction of fianchetto systems: they are difficult and so grandmasters can hope for their GM opponents to go astray at some point.

Fianchetto Openings

Fianchettoes turn up frequently in closed Queen’s-Pawn openings, and there is a Fianchetto Variation for White in each of the Indian Defences (semi-closed openings).

  • King’s Indian: 1. d4 Nf6 2. c4 g6 3. Nc3 Bg7 4. Nf3 O-O 5. g3
  • Grunfeld: 1. d4 Nf6 2. c4 g6 3. g3 d5
  • Queen’s Indian: 1. d4 Nf6 2. c4 e6 3. Nf3 b6 4. g3
  • And most recently, Kasparov has experimented with:

    Nimzo Indian: 1. d4 Nf6 2. c4 e6 3. Nc3 Bb4 4. g3

But the history of the fianchetto is particularly bound up with the history of the flank (hypermodern) openings.
Reti and his contemporaries rejoiced in the fianchetto, arguing that you did not need to occupy the centre as White as long as you controlled it.
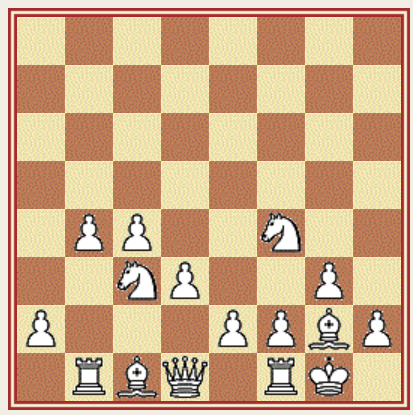
The diagram is from Reti-Lasker, New York 1924. We can see that Reti has allowed Lasker to occupy the centre but Rtei has fianchettoed both Bishops to hit back at this, and has even backed up his Bb2 with a Queen on a1!

1.Nf3 d5 2.c4 c6 3.b3 Bf5 4.g3 Nf6 5.Bg2 Nbd7 6.Bb2 e6 7.O-O Bd6 8.d3 O-O 9.Nbd2 e5 10.cxd5 cxd5 11.Rc1 Qe7 12.Rc2 a5 13.a4 h6 14.Qa1 Rfe8 15.Rfc1

This is the outline of the Catalan Opening (1. d4, 2. c4, & g3). White combines a fianchetto with both a central stake on d4 and pressure on Black’s centre with c2-c4. Black can try to reinforce d5 with moves like …e6 and …c6, but this is rather passive.
Black can stop the fight for the d5 point by …d5xc4, but this gives White a central majority and opens up the long light diagonal.

This is a development we often see in the English Opening (1.c4). White uses the pressure of the fianchettoed Bishop to strike at the Black Queen’s-side.

Having plonked a Pawn on c4, it makes sense to let the light-squared Bishop peer around the side of it; we see the same development by Black in many closed Sicilian systems and in the Benoni and Dutch Defences, where Black fianchettoes to avoid the Bishop’s Pawn. In each case the fianchettoed Bishop can used to support a Pawn advance.

The Reti-Barcza system beginning with 1. Nf3 reserves all White’s options.


This is a rather slow, subtle opening system which is difficult for all players to handle.
White can expand on the King’s-side, centre or Queen’s-side (west, south-west, south).
The King’s-side expansion is known as the King’s Indian Attack, and is often played by players of 1.e4 against half-open defences like the French. It’s another clockwork attack.

Expansion on the King’s-side

Expansion in the centre

Expansion on the Queen’s-side

The fianchetto can also be tried in e-Pawn games, particularly the half-open defences – we have mentioned the King’s Indian Attack against the French, and the Pirc and Modern Defences are based upon a Black King’s-side fianchetto. White has also tried a fianchetto of the King’s Bishop in many lines of the Sicilian, Open and Closed.

  • Closed Sicilian: 1. e4 c5 2. Nc3 Nc6 3. g3 g6
  • Open Sicilian: 1. e4 c5 2. Nf3 e6 3. d4 cxd4 4. Nxd4 Nf6 5. Nc3 d6 (Scheveningen Variation) 6. g3
  • Sicilian: 1. e4 c5 2. Nf3 e6 3. b3

1.e4 c5 2.Nf3 d6 3.d4 cxd4 4.Nxd4 Nf6 5.Nc3 g6
In the open Sicilian, Black may post the dark-squared Bishop on the long diagonal without fear that it may be stifled by Pawns. The Dragon Bishop is a fearsome creature, particularly if White castles Queen’s-side hoping to carry out the clockwork attack against Black’s King’s-side. Black already has a half-open c-file against White’s own King!

Conclusion

The fianchetto is one of the basic building-blocks of chess thinking. Although it is associated with some of the most complex opening systems that are played by GMs, you are bound to come across it, and should at least know how to attack a castled King which is also hiding behind a fianchetto.